
User guide
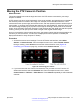
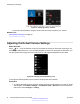
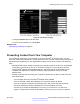


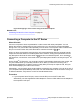
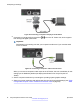
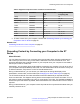

Figure 55: Connecting a computer's display to the XT Series
2.
Connect the computer audio to the audio-in port on the XT Codec Unit, which supports
both analog and digital optical audio.
Important:
Participants in the meeting can hear your computer’s audio even if you mute the audio
on the XT Series.
Figure 56: Connecting a computer's audio to the XT Series
When you connect a computer's audio output to the XT Series, the echo cancellation for this
analog input is disabled by default (see Deployment Guide for the Avaya Scopia
®
XT
Series).
3. Set the computer's resolution by accessing the operating system graphics settings.
4. Select your screen resolution and refresh rates from the list of supported settings (see
Table
8: Supported computer monitor resolutions and refresh rates on page 59).
Participating in Meetings
58 Avaya Scopia
®
XT Series User Guide April 2015
Comments? infodev@avaya.com