
User guide


Procedure
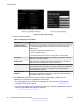
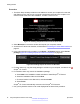
1. The Quick Setup wizard provides the web address to access your endpoint from the web,
and displays a user code to pair a computer's keyboard and mouse to the endpoint. You
enter this code at the end of the installation, so make a note of it now.
Figure 23: Installing Scopia
®
XT Control from the Quick Setup
2. Select Minimize to remove the window and expose your computer content.
3. Access the XT Series web interface, as described in Accessing XT Series Web Interface on
page 23.
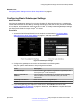
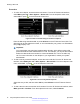
4. In the main web page of the endpoint, in the Home > XT Control section, select Create
package (
Figure 24: Installing Scopia
®
XT Control for Windows on page 36).
Figure 24: Installing Scopia
®
XT Control for Windows
5.
For Mac users only, copy the setup package to a folder on your computer, and launch the
Scopia
®
XT Control:
6. For Windows users only, launch the installation package:
a. Select Next in the installation wizard and select to install Scopia
®
XT Control.
b. Select the installation folder and click Next.
c. Choose a location in the Start menu, and select Install.
d. Select Finish.
Scopia
®
XT Control automatically connects to the Scopia
®
XT Executive.
7. Use your keyboard to enter the user code displayed at the start of this procedure.
Getting Started
36 Avaya Scopia
®
XT Series User Guide April 2015
Comments? infodev@avaya.com