
User guide


'Troubleshooting' | 36
RADVISION | User Guide for SCOPIA XT1000 Version 2.0
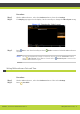
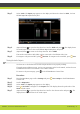
Step 3 Select Audio. The Inputs page appears on the display and shows the values for POD1, the first
XT1000 Digital Microphone Array Pod.
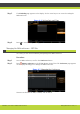
Step 4 (Optional) Press to open the drop-down list. Scroll to POD2 and press . The display shows
the audio input values for the second XT1000 Digital Microphone Array Pod.
Step 5 (Optional) Press to return to the drop-down list. Select SPDIF.
This mode is used when a DVD, DVR, or PC is connected to the XT1000 Codec Unit.
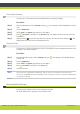
Step 6 To navigate to the previous label, press Previous. To navigate to the next label, press Next.
Testing the Audio Outputs
Use this test to check whether the audio output interfaces are properly working.
The Audio page includes two tests, one for tone generation at the local terminal, and one for tone
transmission from the local terminal to the remote terminal.
To return to the previous page, press on the XT1000 Remote Control Unit.
Procedure
Step 1 From the Main Menu page scroll to Settings and press User settings on the XT1000 Remote
Control Unit.
Step 2 Scroll to Diagnostics.
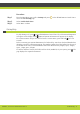
Step 3 Select Audio. The Inputs page appears on the display.
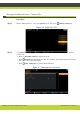
Step 4 Press Next label to navigate to the Outputs label. The display shows the peak value of the
Monitor audio output.
Step 5 (Optional) Press to open the drop-down list. Scroll to the relevant value and press . The
display shows the peak value of the audio output.