
Installation guide


Setting up the MCU | 20
RADVISION | Installation Guide for SCOPIA Elite 5100 Series MCU Version 7.7
Locating a Shelf in the Rack
Before choosing a shelf that will support the device, follow this procedure.
Procedure
Step 1 Read “Verifying Rack Suitability” on page 17, which contains important positioning and spacing
information.
Step 2 Prepare masking tape or a felt-tip pen to mark the location of the device-fixing cage nuts. If the
holes on the rack are marked with numbers, write down the numbers on a piece of paper.
Step 3 If you choose to mount the shelf, see the manufacturer’s guidelines for mounting a shelf.
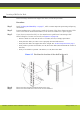
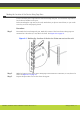
When looking for a location on the rack (see Figure 4-5 on page 20):
• Choose a shelf on a rack with at least 1.73 inches (4.4 cm) of empty space above.
• Verify that the shelf you want to use is properly mounted and secured.
• Verify that the shelf can support the device weight. See Technical Specifications page 5.
• Verify a hole is present 0.20 inches (0.5 cm) above the shelf (measured from the center of
the hole).
• Verify a second hole is present 1.46 inches (3.7 cm) above the shelf.
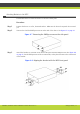
Figure 4-5 Checking the location of the shelf in the rack
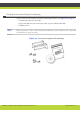
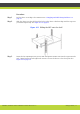
Step 4 Ensure the shelf is positioned horizontally in the rack.
Step 5 Ensure the rack breaks are locked or the rack is stabilized.