
Installation guide


Performing Initial Configuration of the SCOPIA Elite MCU | 14
RADVISION | Installation Guide for SCOPIA Elite 5100 Series MCU Version 7.5
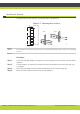
Procedure
Step 1 Connect the power cable.
Step 2 Start the terminal emulation application on the PC.
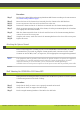
Step 3 Set the communication settings in the terminal emulation application on the PC as follows:
• Baud rate: 9600
• Data bits: 8
• Parity: None
• Stop bits: 1
• Flow control: None
Step 4 Turn on the power to the MCU.
A log of the auto-boot events scrolls across the computer monitor.
Step 5 When the message “Press any key to start configuration” appears on the screen, press any key
within 10 seconds.
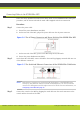
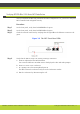
The network configuration Main menu appears:
Main menu
N: Configure network port values
P: Change the configuration software password
S: Configure network security mode
T: Configure TFTP servers list
A: Advanced configuration menu
Q: Quit
Note: If you do not press a key before the countdown ends, the device continues its initialization
and you will need to reboot the device to return to the network configuration Main menu.
Step 6 Enter N at the prompt to configure default network port values and press Enter.
Step 7 Enter 2 to change the network configuration.
Step 8 Enter N at the prompt to enable IPv6 in addition to IPv4.
Step 9 Enter N at the prompt to enable IP separation.
Step 10 Enter the IP address you want to assign to the MCU at the Management IP address prompt and
press Enter.