
Installation guide


4
Performing Initial Configuration of the SCOPIA Elite MCU | 13
RADVISION | Installation Guide for SCOPIA Elite 5100 Series MCU Version 7.5
Performing Initial Configuration of the SCOPIA Elite
MCU
When you finished installing the MCU, you need to perform the initial configuration during which
you configure the basic features. After the initial configuration the MCU should be ready for use.
• Setting the IP Address......................................................................... page 13
• Accessing the SCOPIA Elite 5100 Series MCU Administrator Interface................. page 15
• Changing a User Password .................................................................... page 16
• Changing SCOPIA Elite 5100 Series MCU Service Prefix .................................. page 16
• Setting the MCU’s User Interface Language ............................................... page 18
• Setting a Text Overlay Language ............................................................ page 19
• Configuring Protocols for the SCOPIA Elite MCU .......................................... page 20
• Configuring a Dual-NIC MCU.................................................................. page 24
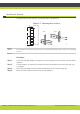
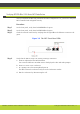
Setting the IP Address
You use the serial port on the SCOPIA Elite 5100 Series MCU front panel to assign a new IP address
to your MCU. You must assign the IP address before you connect the MCU to the network.
Before You Begin
Make sure you have these items:
• Dedicated IP address for the MCU
• Dedicated subnet mask for the MCU
• IP address of the default router the MCU uses to communicate over the network
• PC with available serial port and terminal emulator software installed
• Serial cable