
Installation guide


Setting up the SCOPIA Elite 5100 Series MCU | 12
RADVISION | Installation Guide for SCOPIA Elite 5100 Series MCU Version 7.5
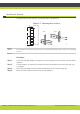
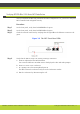
Verifying SCOPIA Elite 5100 Series MCU Installation
After you installed the MCU and performed the initial configuration of it, you need to verify that
MCU is installed and configured correctly.
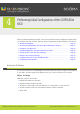
Procedure
Step 1 On the front panel, verify that the POWER LED is lit green.
Step 2 On the front panel, verify that the STATUS LED is lit green.
Step 3 Check the network connection by verifying that the right LED on the Ethernet connector is lit
green.
Figure 3-6 The MCU Front Panel LEDs
Step 4 Verify that the MCU is ready to be used by creating a conference:
a. From an endpoint dial the MCU IP address.
You access the MCU auto attendant service which plays the video and audio prompts.
b. Press 0 to create a new conference.
c. At a prompt, enter the meeting ID and press #.
The MCU creates the conference and you see the Conference window.
d. Exit the conference by disconnecting the call.