
User guide


'Initial Configuration' | 27
RADVISION | Administrator Guide for SCOPIA XT1000 Version 2.0
Step 4 Set the fields as required.
Step 5 Press Save.
Configuring Audio Connections
Configuring the Microphone Array Pod(s)
You may also access this page from a previous screen in the configuration.
Procedure
Step 1 In the Administrator settings menu select I/O connections.
Step 2 Scroll to Audio - Inputs.
Step 3 Select the POD1 or POD2 page.
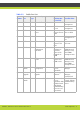
Field Name Description
PIP - Position Sets the position of the small image on the monitor: upper left, upper
right, lower left, lower right.
PIP - Rotation Enables/disables image rotation. This setting also controls the direction in
which the image rotates. Pressing pip will activate image rotation (if
enabled).
Fixed - The image does not change position.
Clockwise - Image rotates clockwise to change position.
Counterclockwise - Image rotates counterclockwise to change position.
Multi Image Type Sets the PIP and PaP functions.
auto - Both PIP and PaP functions are enabled. Press pip to switch
between PIP and PaP.
PIP - Only PIP is enabled.
PaP - Only PaP is enabled.
Multi Image Mode Sets PIP and PaP activation, depending on the number of video streams
available. Multi Image Type must be set to auto.
auto - PIP and PaP are enabled only when needed. This will occur when the
number of video streams is greater than the number of available monitors.
The order of the video streams is set automatically, with precedence to the
remote video streams.
On - PIP and PaP are enabled if at least two video streams are available.
If there is one video stream, the image will show in full screen (e.g.: when
the system is not connected).
Off - PIP and PaP are disabled.