
Installation guide


D6600 NetCom
D9133TTL Configuration
D6600 NetCom System Guide
© 2001 Radionics Page 59 46542C
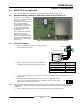
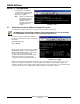
12. When asked to set the Gateway address
type N [ENTER] or Y
[gateway address]
[ENTER]
Figure 22: Telnet session – Gateway Address
13.
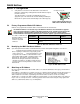
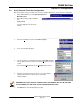
If the Netmask needs to be changed from the default, enter the number of bits that correspond to the
Netmask your network is using (see Table 18).
See your network administrator for more information.
Press [ENTER] after entering the correct number of bits for the Netmask.
Number of
Host Bits
Netmask Number of
Host Bits
Netmask Number of
Host Bits
Netmask
1 255.255.255.254 11 255.255.248.0 21 255.224.0.0
2 255.255.255.252 12 255.255.240.0 22 255.192.0.0
3 255.255.255.248 13 255.255.224.0 23 255.128.0.0
4 255.255.255.240 14 255.255.192.0 24 255.0.0.0
5 255.255.255.224 15 255.255.128.0 25 254.0.0.0
6 255.255.255.192 16 255.255.0.0 26 252.0.0.0
7 255.255.255.128 17 255.254.0.0 27 248.0.0.0
8 255.255.255.0 18 255.252.0.0 28 240.0.0.0
9 255.255.254.0 19 255.248.0.0 29 224.0.0.0
10 255.255.252.0 20 255.240.0.0 30 192.0.0.0
31 128.0.0.0
Table 18: Netmask Address
14.
You will be prompted to change the Telnet password, press [N] for the default of "No". This screen will now
show the Setup Mode screen you saw previously.
Be careful NOT to enter a password into the D9133TTL-X by accident or select [Y] to change the
password. If you do, do not lose the password. Otherwise, you will not be able to re-enter a TELNET
programming session with the D9133TTL-X. The unit will have to be sent back to the factory and
reconditioned before it will be able to receive another TELNET session.
15.
Now press 1 [ENTER] to go into setup Channel 1 configuration.
The following will be displayed:
Press Enter to accept the default of (9600).
Enter 9600 [ENTER] to change it.
16. You should then see:
Press Enter to accept the default of (4C). If it doesn't show that, type 4C [ENTER] to change it.
17. You should then see:
Press [ENTER] to accept the default of (00). If it doesn't show that, type 00 [ENTER] to change it.
18. You should then see:
For the Port number, type a number that is between 2000 and 10000 followed by [ENTER].
The port number can be compared to a phone extension on a PBX system. For our example we will be
using D9133TTL-Es and C900TTLs all set up on port 7700.
You should then see:
19.
Press Enter to accept the default of (CC). If it doesn't show that, type CC [ENTER] to change it.
You should then see:
20.
Type 00 [ENTER].