
Installation guide


D6600 NetCom
D6200 Programming Software Overview
D6600 NetCom System Guide
© 2001 Radionics Page 51 46542C
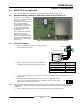
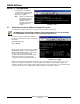
The C900 Control Commands
Screen appears. A C900 IP
Address must be selected from
the
Select C900
drop down menu.
Once a C900 has been selected,
the Dialer Status and Message
Transmission Rate can be
modified. After selections have
been made, the Change button
must be pressed for the
commands to be sent to the C900.
4.13.1 Changing C900 Status Settings
NetCom is capable of sending several Control Commands to the C900 to change its status.
All these commands and related C900 status changes will be recorded on the printer and sent to the automation
software. Other C900 status messages such as Low Battery, Reboot, and Dialer Diagnostic are also sent to the
D6600 where they are processed and sent to the automation computer and the printer. The C900 input #1 status
report (Open, Short and Normal) will be generated by the D6600 and sent to the automation and printer.
To send C900 Control Commands, use D6200 software, click on the NetCom menu, the select C900 Control
Commands. In this window, click the select button to choose a C900 account. All C900 accounts that are online
(Status=1) will appear in this window. The status of a C900 may have changed since the last time the Account
database was read from the D6600. For an accurate C900 Account status, read the Account database from the
D6600 before making any C900 changes. To view all C900 accounts, click the “List All C900” button. This will
show all accounts that have the net device specified as C900 in the account database will be displayed in this
window. (To specify the net device (C900 or 9133) for each account, use the D6200 software, click on the
NetCom menu, the select Account Database Configuration. In this window select an account and click the edit
button. In this window under the Account tab, select the device in the Net Device section, then click OK. NOTE:
If this is left blank - no selection - the account will be displayed in the selection window.) In the C900 Command
window select the C900 account that will receive the commands. Select the command that will be transmitted to
the C900 (See definitions above). Click the change button, this message will be transmitted to the C900 upon the
next poll the D6600 receives from that selected C900. All these status changes are recorded in the D6200
History Log file.
To query the status of an active C900, click the Query button under the D6200 menu item C900 Control
Commands. The real status of the queried C900 will be displayed in the History Log upon the next poll the
D6600 receives from that selected C900. Click the Explain C900 Status button in the History Log window to get a
more detailed explanation.
The following sections describe these Control Commands.
4.13.1.1 Switch to Intercept
This command will force the C900 to work in the Intercept mode. This allows the C900 to receive the dialer
signals and then send them to the D6600 NetCom through LAN/WAN.
Refer to “Command Sent (Switch to Intercept mode)” in the D6600 Computer Interface Manual (P/N 39963F or
later) for the D6600 output format.
4.13.1.2 Switch to Fallback
This command will force the C900 to temporarily work in the fallback mode, so that the dialer can use its PSTN
network to communicate with the central stations. This feature allows the central station to remotely access the
dialer for uploading and downloading. If a C900 is switched to fallback, an optional reminder message can be
created every 30 minutes. This will ensure that the operator is aware the C900 is in the fallback mode and may
return the C900 back to the intercept mode for LAN/WAN communications.
The C900 will automatically switch to Intercept after one hour of being switched to Fallback or turn to Intercept
mode immediately once it has received the command Switch to Intercept.