
Installation guide


D6600 NetCom
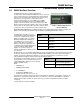
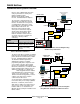
Communication System Overview
D6600 NetCom System Guide
46542C Page 18 © 2001 Radionics
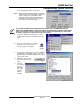
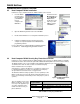
3.
The network dialog box appears with three tabs:
Configuration, Identification and Access Control.
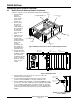
From the Configuration tab, scroll down the Network
components until you get to the TCP\IP protocol for your
Network Interface Card (NIC) which should look
something like this.
Note: Most NIC cards will be displayed with the label
“Network Adapter.”
Note: Be sure that you have selected the TCP/IP
protocol for the network adapter, not the adapter
itself.
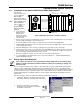
Microsoft Protocol Icon Microsoft Adapter Icon
4.
Highlight the protocol icon for TCP/IP bound to your NIC card and click the
"Properties…" button.
5. Select the IP address tab, then click the "Specify an IP address" radio
button.
6. Enter an IP address and subnet mask
for the network you will be setting up,
such as 202.96.168.1.
Note: If you have any questions regarding the assignment of the IP
address or subnet mask, see the network administrator!
All devices that will be using this network will usually have the
same first three digits of the 4-digit IP address. (For example, all IP
addresses would be 202.96.168.xxx, where 'xxx' is different for
each device).
5. Some files may have to be copied to the computer.
This may require Microsoft
®
Windows
®
operating
system disk for the appropriate version you are using.
6. After copying the files, the PC may have to be restarted. If so, connect the Host PC's NIC card to the
network (hub/MAU) and restart the PC.
7.
After the reboot is completed, you should perform the following check to see if the previous procedures
were correctly entered.
Open a MS-DOS window by selecting Start àà
Programs àà MS DOS Prompt:
8. Once the DOS Window appears,
type the command winipcfg
[ENTER].