
Installation guide


D6600 NetCom
Communication System Overview
D6600 NetCom System Guide
© 2001 Radionics Page 17 46542C
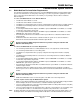
2.3 Installation of the Optional D6672 Serial COM1 Expansion Kit
The following
instructions will assist
you in installing the
D6672 COM1
Expansion Kit (refer to
Figure 9 for assistance.)
Note: After completion of the
D6672 installation,
return to section 2.2
D6600
Receiver/Gateway
NetCom Installation,
STEP #9.
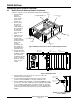
5. Power down the
D6600. Remove
battery power.
Remove AC power.
Unplug the AC cord
from the outlet.
OFF
ON
1
2
3
4
Detection Systems Inc.
Fairport N.Y. USA
Input:
85-264 AC
47-63 Hz
2.5 Amps
B
A
T
T
E
R
Y
D6645
Line Terminator Card
D6615
CPU Terminator Card
External Parallel
Printer Connection
(25-pin)
Location of installed
D6672 Serial COM1
Expansion Kit
“Blank Pate”
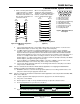
Figure 9: D6600 Rear View (before installation of D6672)
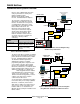
2. Remove the four screws from the blank plate on the rear of the receiver. The blank plate is the second plate
from the left when viewing the receiver from the rear.
3. Connect the COM1 connector cable to the 4-pin connector on the inside of the COM1 plate.
4. Align the COM1 plate with the screw holes at the rear of the receiver. The COM1 9-pin connector should be
on the outside of the receiver.
5. Attach the COM1 plate to the receiver by securing the four screws at the corners of the plate.
6. From the front of the receiver, connect the other end of the COM1 connector cable to the 4-pin connector at
the front bottom corner of the CPU Card. The cable should be connected with the red wire on the top, and
the connector tabs facing toward the inside of the receiver.
7. Once the installation is complete, the rear of the receiver should resemble Figure 5.
8. To connect COM1 to the network please refer to the previous Section 2.2 D6600 Receiver/Gateway
NetCom Installation, Step #9.
2.4 Setting Up the Host Computer
If the computer you intend to use for programming the D6600, D6680, and the alarm panel network
adapters is already a functioning workstation within the network you are planning on utilizing, then
skip this section!
The host computer is defined as any computer or workstation that is properly configured and connected to the
network you plan on utilizing that will manage/administer the D6600 and other devices. Any existing desktop
computer or laptop on the network could be used. However, for security reasons, it is probably best the computer
be set aside and not used as a regular workstation. This computer will also be the computer on which you will
install the D6200 Software. The D6200 Software is used to program and administer the D6600 Receiver and
other devices.
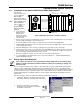
If the host computer is new to the network the following steps MUST be performed:
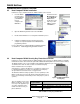
1.
In Microsoft
®
Windows
®
operating system click on the
Start button and then go to Settings and Control Panel.
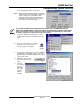
2.
Once the control panel is open, find and
double-click on the “Network” icon to launch
the Network control panel.