
Installation guide
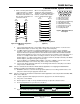


D6600 NetCom
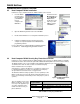
Communication System Overview
D6600 NetCom System Guide
46542C Page 16 © 2001 Radionics
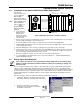
Use the arrow keys to move through menus, press
M / E
to enter a menu level, and
CAN
to exit a level.
19.
Use the down arrow key go to Menu 2 CPU CONFIGURATION, then press the
M / E
key.
2. CPU CONFIGURATION
20.
Use the arrow keys to Menu 2.2 GLOBAL, then press the
M / E
key.
2.2 Global
21.
Use the arrow keys to Menu 2.2.1 Time Setup, then press the
M / E
key.
2.2.1 Time Setup
Current setting [00:15:32.]
22.
Key in the current time in 24-hour format (HH:MM:SS). Press the
M / E
key.
23.
Use the arrow keys to Menu 2.2.2, Date Setup, then press the
M / E
key.
2.2.1 Date Setup
Current setting [01/01/1980]
24.
Key in the current date in the following format: MM/DD/YYYY. Press the
M / E
key.
25.
Press
CAN
to exit through the menus. The display will then show:
05/22/2000 00:15:05
26.
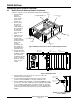
The D6600 unit is now close to being ready to accept signals from digital dialers via the phone line.
ALTHOUGH THE D6600 IS CLOSE TO RECEIVING SIGNALS VIA THE TRADITIONAL PHONELINE,
OTHER D6600 PROGRAMMING STEPS MUST BE PERFORMED BEFORE THE D6600 CAN
COMMUNICATE TO THE NETWORK VIA THE NEWLY INSTALLED D6680 Network Adapter! THIS
PROGRAMMING CAN BE PERFORMED IN ONE OF TWO WAYS:
• PROGRAM THE D6600’s INITIAL NetCom PARAMETERS VIA THE FRONT MOUNTED KEYPAD.
THIS IS THE METHOD RECOMMENDED BY RADIONICS.
Note: The programming of the initial NetCom parameters via the front mounted keypad is covered
further on in Section 3.8 Configuring for Network Communication via a D6680 Network
Adapter.
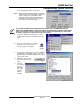
• PROGRAM THE FUNCTIONS FROM A HOST COMPUTER RUNNING THE D6200 SOFTWARE VIA
A DIRECT NULL MODEM SERIAL CONNECTION TO COM4 ON THE D6600. THIS OPTION IS NOT
PREFERRED BECAUSE THIS WOULD REQUIRE DISCONNECTING THE CABLE BETWEEN THE
D6680 AND THE D6600 THAT WAS JUST INSTALLED.