
User Manual


21
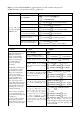
END POINT adjusts only the individual servo. It will have no effect on any other servo that is operated in
conjunction with this servo via mix or preset programming such as FLAPERON, AILEVATOR, etc. This is so
that each individual servo can be carefully fine-turn to avoid binding and other conflicts. To adjust the total
travel of a function such as FLAPERON, make the adjustments in that function's controls. For CCPM
helicopters, adjust the total travel of the function, such as collective pitch, in SWASH AFR. Adjust the linkage
or the END POINT? It is nearly always best to adjust your linkages to get as close as possible prior to utilizing
END POINT. The higher the END POINT setting, the better position accuracy and the more servo power
available at nearly any position (except if using digital servos). Higher END POINT values also mean longer
travel time to reach the desired position, as you are utilizing more of the servo's total travel. (For example,
using 50% END POINT would give you only half the steps of servo travel, meaning every click of trim has
twice the effect and the servo gets there in half the time). End point (and moving the linkage) = torque,
accuracy, but transit time to get there.
• END POINT (instead of adjusting linkages) = travel time, but torque, accuracy.
Engine idle management: IDLE-DOWN and THR-CUT: functions which work with the digital THROTTLE
TRIM to provide a simple, consistent means of engine operation. No more fussing with getting trim in just the
right spot for landings or take offs! For additional engine adjustments, see THROTTLE-NEEDLE and
THROTTLE DELAY.
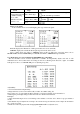
Goals
Steps
Inputs
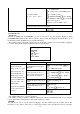
Decrease the flap servo
throw in the upward
direction to 5% to allow
trimming of level flight
only and down travel to
85% to prevent binding.
Open END POINT function
for 1s.(If ADVANCE, again)
to END POINT,PUSH
Choose proper channel and move
stick or Knob in direction you
want to adjust and set servo throw
(Ex: flap up 5%)
to FLAP,PUSH, to 5%,press
Close
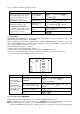
2.3.4 Trim
TRIM submenu: resets and adjust effectiveness of digital trims.
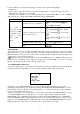
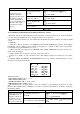
【TRIM】
RESET:Execute
STEP-AILE: 4( 0)
ELEV: 4( 0)
THRO: 4( 0)
RUDD: 4( 0)
The AT10II has digital trims which are different from conventional mechanical trim sliders. Each TRIM
LEVER is actually a two-direction switch. Each time the TRIM LEVER is pressed, the trim is changed a
selected amount. When you hold the TRIM LEVER, the trim speed will increase. The current trim position is
graphically displayed on the start up screen. The TRIM submenu includes two functions that are used to
manage the trim options.
(1) Trim reset (RESET): Electronically centers the trims to their default values. Note that the
SUB-TRIM settings and the trim STEP rate are not reset by this command.
(2) Trim step (STEP): changes the rate at which the trim moves when the TRIM LEVER is activated.
It may be set from 1 to 40 units, depending on the characteristics of the MULTIROTOR. Most
ordinary MULTIROTOR do well at about 2 to 10 units. Generally larger trim steps are for
models with large control throws or for first flights to ensure sufficient trim to properly correct
the model. Smaller trim steps are later used to allow very fine adjustments in flight.
HELI models only: OFFSET is available in the idle ups. If OFFSET is inhibited, adjustment of the TRIM
LEVERS will adjust the trims for all flight conditions. If OFFSET is active, then moving the trims within