
User Manual


9
correct for minute manufacturing deviations from servo to servo.
• To center the servos, connect them to receiver and turn on the transmitter and receiver. Center the
trims on the transmitter, then find the arm that will be perpendicular to the pushrod when placed on the
servo.
• After the servos are installed, operate each servo over its full travel and check that the pushrods and
servo arms don’t bind or contact each other. Also make sure the controls do not require excess force to
operate. If there is an objectionable buzzing sound coming from a servo, there is probably too much
resistance in the control. Find and correct the problem. Even is there is no servo damage, excess battery drain
will result.
• Use the mounting plate from the receiver on/off switch as a template for the cutout and screw holes,
mount the switch on the side of the fuselage opposite the engine exhaust, and where it won’t be inadvertently
turned on or off during handling or storage. Be certain the switch moves without restriction and ‘snaps’ from
ON to OFF, and that the cutout allows full motion of the switch in both directions.
• When install the switch harness to the helicopter please use the switch cover. Generally sandwich the
frame between the switch and switch cover and securely tighten the screws, Different models might require
different installations. If so, please follow the model’s instruction manual.
• To prevent the servo lead wires from being broken by vibration during flight, provide a slight amount
of slack or extra so that the wire sticks out slightly and fasten it at suitable points. In addition, periodically
check the wire during daily maintenance.
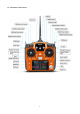
1.2.2 Receiver and servo connections
(1)Airplane servo connection
Receiver output
and channel
AIRPLANE
1
ailerons/aileron-1¹/combined
flap-2&aileron-1¹
2
elevator
3
throttle
4
rudder
5
spare/landing gear/aileron-2¹
³/combined flap-1 and aileron-2² ³
6
spare/flaps/combined flap-1 and
aileron-2²
7
spare/aileron-2¹
8
spare/elevator-24/mixture control
9
spare
10
spare