
Installation Guide
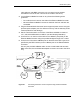
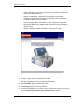
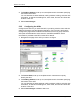
Table Of Contents
- Title
- Contents
- Introduction
- System Description
- Pre-Installation
- Receipt of Equipment
- Site Planning
- Main Rack and Supporting Hardware
- Remote ACUs
- RFUs
- RadioBlades
- RAPs
- URU
- Interconnecting Cabling
- Main Rack Configuration
- RF Planning
- Site Survey
- Alarm Configuration
- Tools Required
- Installation
- Equipment Commissioning
- iDEN Interface
- Power Plant
- RadioFrame System
- Coverage Validation
- Site Acceptance Guidelines
- RadioFrame System Functionality Test
- RadioFrame System iDEN Functionality Test
- Interconnect & Dispatch Setup & Voice Quality
- Packet Data Service Connection and Latency
- Short Message Service
- Handover and Cell Reselection
- Interconnect Connection Stability and SQE Performance
- Dispatch Connection Stability
- Idle SQE Testing and Validation
- System Self-Recovery Test
- Packet Data Stability and Throughput
- Validation of ‘Unable to Key BR’ Alarm
- Rectifier & AC Power Alarms
- iSC-3 Functionality Test
- RadioFrame System iDEN Functionality Test
- Connecting the RFS to the Customer LAN
- Operations and Maintenance
- Appendixes

RadioFrame System
Installation
RFN_3.1 Beta 79
cable with two male BNC connectors; one connector is a tee adapter
terminated on end of the tee—this end is connected to the iSC-3).
2 Lay the Ethernet Media Converter on any flat surface following these
guidelines:
• Do not block the air vents on the sides of the Ethernet Media Converter.
• Mount the Ethernet Media Converter so that both the front and back are
accessible.
3 Plug the Ethernet Media Converter into an approved power source using the
provided power adapter (use of a different cord may void the warranty and/or
cause electrical fire and damage).
4 Set the Terminator switch on the front of the Ethernet Media Converter to
“On”, and set the MDI switch to “MDI-X” (see the following illustration).
5 Connect Port 1 on the front of the NCU to the 10BaseT port (RJ45) on the
Ethernet Media Converter using the provided straight-through CAT 5 cable.
6 Connect one of the three 10Base2 ports on the back of the iSC-3 (port to be
specified by the RFN customer) to the 10Base2 port on the Ethernet Media
Converter.
Use only the provided 10Base2 cable: 50 ohm coaxial cable with two male
BNC connectors; the terminated tee adapter connector connects to the iSC-3
only.
Figure 30 Connecting the RFS to an iSC-3 requires using an Ethernet Media
Converter.