
Installation Guide

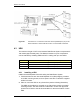
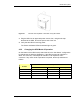
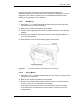
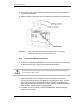
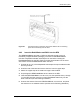
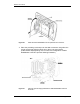
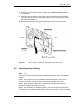
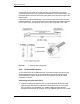
Table Of Contents
- Title
- Contents
- Introduction
- System Description
- Pre-Installation
- Receipt of Equipment
- Site Planning
- Main Rack and Supporting Hardware
- Remote ACUs
- RFUs
- RadioBlades
- RAPs
- URU
- Interconnecting Cabling
- Main Rack Configuration
- RF Planning
- Site Survey
- Alarm Configuration
- Tools Required
- Installation
- Equipment Commissioning
- iDEN Interface
- Power Plant
- RadioFrame System
- Coverage Validation
- Site Acceptance Guidelines
- RadioFrame System Functionality Test
- RadioFrame System iDEN Functionality Test
- Interconnect & Dispatch Setup & Voice Quality
- Packet Data Service Connection and Latency
- Short Message Service
- Handover and Cell Reselection
- Interconnect Connection Stability and SQE Performance
- Dispatch Connection Stability
- Idle SQE Testing and Validation
- System Self-Recovery Test
- Packet Data Stability and Throughput
- Validation of ‘Unable to Key BR’ Alarm
- Rectifier & AC Power Alarms
- iSC-3 Functionality Test
- RadioFrame System iDEN Functionality Test
- Connecting the RFS to the Customer LAN
- Operations and Maintenance
- Appendixes

RadioFrame System
Installation
RFN_3.1 Beta 77
8 Holding the ground strap in place, replace each iDEN RadioBlade antenna
one at a time.
9 Insert the 802.11b RAPs, one at a time, into the specified slots in the RFU
until the connector on each RAP seats firmly into the back of the RFU (see
the following illustration).
10 Remove the antistatic wrist strap and place the front cover on the RFU.
Figure 28 Insert the 802.11b RAPs into the specified slots of the RFU.
4.5 Interconnecting Cabling
4.5.1 T1
The Telco interface should have been installed according to the Pre-installation
chapter.
NOTE: The equipment can be installed and tested without the Telco T1/E1
present. The T1/E1 must be connected for proper operation of the site.
NOTE: Some modular cables have a ridge along one side of the cable for
purposes of alignment with the connector.
NOTE: The SmartJack is capable of passing -48V Telco power through to the
site controller. For operation, iDEN does not require this power. If -48V is present