
User's Manual

GSM/802.11b RadioFrame System Method of Procedure
Installation
RadioFrame Networks, Inc.
47
4 Installation
Following all construction work, both exterior and interior, the site and facility shall be in a
suitable condition for the installation of communications equipment. In general, the
following considerations need to be observed:
• Interior of facility shall be free of excessive dust.
• All refuse related to the installation tasks shall be removed.
Consideration should be exercised when laying out a site to allow primarily for all code
requirements for spacing, and then the most efficient use of space. Special attention shall
be given to future expansion with regard to cable runway heights, electrical outlet
placement, and equipment placement.
Prior to performing the installation procedures, prepare the site with all associated
antennas, phone lines, and other related site equipment. This information is covered in
the Pre-Installation chapter. The main rack may already be installed, depending on the
site configuration.
4.1 Main Rack and Supporting Hardware
This section provides installation instructions for a cabinet already containing the
RadioFrame Networks BCU and ACU. The procedure listed here is for permanently
mounting the equipment cabinet within a site.
The following procedures describe how to mount non-wheeled cabinets in a system site
building. Be sure to read all of the procedures carefully to ensure a quality installation.
4.1.1 Main Rack
The main rack must be secured to the floor for optimum stability. Since the main rack is
very heavy, this procedure is written so that the rack is moved only once.
Warning!
Always use two or more persons whenever moving a cabinet. A fully
configured equipment cabinet weighs approximately 800 lbs (360 kg).
Perform the following steps to properly install the main rack within the site building:
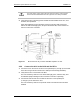
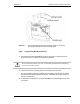
1 Measure the mounting location for the main rack within the row.
2 Carefully mark the mounting holes with a pencil, as indicated on the appropriate main
rack footprint.
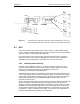
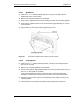
3 Drill the marked mounting holes to the appropriate depth of the mounting hardware
with a hammer drill and bit.
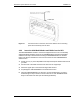
4 Insert an anchor into the drilled hole.
If necessary, tap the anchor into place using a hammer.