
User's Manual


PDL-4 A.C.ID-M System (with GPS) User Guide
Page 18
If the EXIT button is pressed depth and current will be
logged without GPS data.
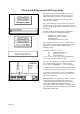
If the VectorBar is tilted at an angle of more than 45
0
the 'Tilt angle too great (45
0
maximum)' screen is
displayed.
Successful confirmation cannot be achieved until the tilt
angle is reduced to less than 45
0
.
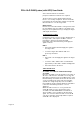
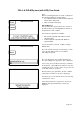
If the VectorBar is tilted, but at an angle of less than
45
0
the Confirmation screens will be similar to that
shown opposite, which shows a Final Confirmation,
achieved with A.C.ID-M.
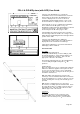
SmartProbe-2 or Extended SmartProbe-2
DANGER
Before pushing the SmartProbe-2 into the ground
you must:
Check that the insulating handle grips are not
damaged - Do not use a probe with damaged
insulation.
Perform a Power mode sweep of the area to check
for, and locate, power cables.
Always wear electrically insulating rubber gloves
when handling the SmartProbe-2 in the ground.
Use an electrically insulating rubber mat for extra
protection.
Depending on transmitter being used apply the signal
as follows:
LMS-3
• Select CD and A.C.ID-M and apply the signal to the
target cable.
• Locate the target cable with the PDL-4 as
previously described.
PTX-3
• Select CD or LF and apply the signal to the target
cable.
• Locate the cable, with the PDL-4, and mark the
approximate position with a suitable marking fluid.
• Select A.C.ID-M on the PTx-3
Push the SmartProbe-2 into the ground so that the tip
enters the Confirmation Zone (within 5 inches either
side of, and 12 inches above, the target cable) - use
the graduations on the probe as a guide.