
User's Manual


PDL-4 A.C.ID-M System (with GPS) User Guide
Page 15
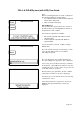
Select 'Perform CD Reset' and when
prompted confirm that a CD Reset is required.
'CD Reset Successful' is displayed when the CD
Reset is successfully completed. The CD arrow will
point away from the transmitter (towards end ground)
when the PDL-4 is over the target cable.
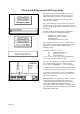
Depth/Current
Rest the end of the PDL-4 blade on the ground, centre
the level bubble and select Cable Locate Mode, and
then press the Depth/Current key to display the target
cable depth and current.
Confirmation Procedure
Confirmation mode is used for positive identification of
the target cable, and requires an LMS-3 or PTx-3
transmitter to generate the A.C.ID-M signal.
Depending on the transmitter being used apply the
signal as follows:
LMS-3
• Select CD and A.C.ID-M and apply the signal to
the target cable.
• Locate the target cable with the PDL-4 as
previously described.
PTX-3
• Select CD or LF and apply the signal to the target
cable.
• Locate the cable, with the PDL-4, and mark the
approximate position with a suitable marking fluid.
• Select A.C.ID-M on the PTx-3
Cable Identification
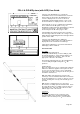
VectorBar, VectorBar 20 and Extended Range
VectorBar
Place the VectorBar on the ground above the cable, at
90
0
to the cable direction, and with no more than 40
0
tilt from the horizontal on the VectorBar and 30
0
on the
Extended Range VectorBar. Ensure that the CD arrow
on the VectorBar points away from the transmitter
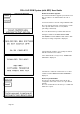
(towards the end ground point). If the VectorBar is
placed with the arrow pointing towards the transmitter
a “A.C.ID Current Wrong Direction” screen is
displayed.
When the LMS-3 or PTx-3 is set to generate the
A.C.ID-M signal, press the green button on the
VectorBar - the LED will illuminate and remain on.
The VectorBar is now searching for the A.C.ID-M
signal. For customers with more than one A.C.ID-M
code press the button repeatedly until the required
A.C.ID-M code is displayed.