
User's Manual


PDL-4 A.C.ID-M System (with GPS) User Guide
Page 7
To replace the batteries proceed as follows:
• Unscrew the quick-release screws a quarter of a
turn, anti-clockwise
• Remove batteries
• Insert new batteries, ensuring that they are installed
correctly, as indicated on the diagram within the
battery housing
• Replace covers
• Screw in quick-release screws a quarter of a turn
clockwise.
One battery compartment at also houses an RS232
socket for software download.
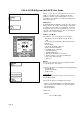
SmartProbe-2 & Extended Range SmartProbe-2
When activated the SmartProbe-2, or extended
range SmartProbe-2, transmits its battery status to
the PDL-4. If low battery-level is indicated on the
PDL-4 LCD the battery should be replaced.
The battery is a PP9 cell, located under
the black cover on the head of the SmartProbe-2 or
extended range SmartProbe-2. The cover is
attached by 3 quick-release screw.
To replace the battery proceed as follows:
• Unscrew the 3 quick-release screws a quarter of a
turn anti-clockwise
• Remove cover
• Remove battery
• Insert new battery, ensuring that it is installed
correctly, as indicated on the diagram within the
battery housing
• Replace cover
• Screw in the 3 quick-release screws a quarter of a
turn clockwise.
The Battery Compartment also houses an RS232
socket for software download.
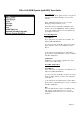
PDL-4 Operation
Power On/Off
Press and hold the On/Off key for one second. The
speaker will emit a tone and the software revision
number will be displayed for two seconds. The PDL-4
then enters Cable Locate mode.