
User's Manual


PDL-4 A.C.ID-M System (with GPS) User Guide
Page 6
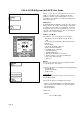
To replace batteries proceed as follows:
• Release battery-housing cover by means of the
release catch, situated under the carrying handle
• Remove battery or batteries
• Insert new battery or batteries, ensuring correct
installation, as indicated on the label within the
battery housing
• Close battery-housing cover.
VectorBar and Extended Range VectorBar
When activated the VectorBar, or extended range
VectorBar, transmits its battery status to the PDL-4. If
low battery-level is indicated on the PDL-4 display the
batteries should be replaced.
Note: To ensure optimum performance of the
equipment always replace batteries as a set.
There are two battery compartments, located under
separate grey covers, one at each end of the bar. Each
cover is attached by 2 quick-release screws and each
compartment houses 2 D-cells.
To replace the batteries proceed as follows:
• Unscrew the quick-release screws a quarter of a
turn, anti-clockwise
• Remove batteries
• Insert new batteries, ensuring that they are installed
correctly, as indicated on the diagram within the
battery housing
• Replace covers
• Screw in quick-release screws a quarter of a turn
clockwise.
The battery compartment at the green
button end of the VectorBar and extended range
VectorBar also houses an RS232 socket for
software download.
VectorBar 20
When activated, the VectorBar 20 transmits its battery-
level status to the PDL-4. If low battery-level is indicated
on the PDL-4 display the batteries in the VectorBar 20
should be replaced.
Note: To ensure optimum performance of the
VectorBar 20 always replace batteries as a
set.
There are two battery compartments, located under
separate grey covers placed next to each other. Each
cover is attached by 2 quick-release screws, and each
compartment houses 2 D-cell batteries.