
Operating instructions
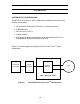


MFJ-933 Loop Tuner
TM
Instruction & Technical Manual
- 21 -
FAST-START INSTRUCTIONS
Step 3
Pre-set the MFJ – 933 Loop Tuner controls to the following settings for the 14.2
MHz operation (settings are approximate, but should be reasonable):
• TUNING control to position “4 ½ ”.
• MATCHING control to position “9”.
Step 4
Tune the transceiver or receiver to the 20 meter band and frequency of interest
and “Ear-ball” fine-tune the MFJ-933 Loop Tuner
TM
controls for maximum noise
and S-Meter reading. “Ear-balling,” like “Ball-parking” is a term often to describe
the listening process as used to hear a “peak” in reception before actually
applying a transmit signal to the tuner. The tuner will produce a peak when the
exact position for the controls and switches is found.
Step 5
Apply 10 to 20 Watts of power to the MFJ – 933 Loop Tuner and adjust the
TUNING and MATCHING controls for minimum SWR. Readjust the controls until
you see no further improvement in minimum SWR.
Step 6
Once you are satisfied that the adjustments and settings are correct for minimum
SWR and maximum antenna current, you can advance the power to 150 Watts if
desired. Be sure that MPE distance standard is met. Should any arcing be
detected, stop transmitting and check connections and proximity to objects that
may be suspect. If arcing seems to be inside of the MFJ – 933, Loop Tuner,
lower output power and re-check for arcing.
As a courtesy to our fellow hams, for safety and to keep within FCC regulations
you should use the minimum power needed for communications. 20 to 50 watts
often provides very reliable communications. The difference between 50 and
100 watts is less than ½ S-unit and is not noticeable on the receiving end.