
Install guide


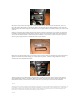


Now take that piece of MDF and match it up to the bottom of the “cubby-hole” on the boot lining and
cut it down to size. Stick the MDF to the boot lining using some strong double sided tape. Take the CD
player and mount it in place, screwing through the bootlining into the MDF. Now stick some 3M
adhesive fastener tape (that really sticky foam tape) and put strips of it on the bottom of the MDF.
Cut a small hole in the back of the “cubby-hole” and stick the connector from the CD changer through
it. Refit the bootlining remembering to stick down the MDF to the shelf above the fuel tank. Your CD
Changer is now fitted, but not connected.
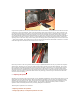
In order to connect the CD Changer to the head unit you will need to connect the two together using a
cable. The only way to do this is by removing some interior parts. First of all, you will have to remove
the rear seats. The rear seats are made up of just two parts, the bottom part and the back part. The
bottom part must be removed first. There are two bolts holding it in place, look at where the seat
joins up with the footwell, in the middle of each seat (either side) you will find a bolt, undo both of
these. Now pull the seat forward to release it from the connectors you just unbolted, lift it up, and
then out, to remove. The back part is connected by a further two bolts located at the bottom of the
seatbacks, these are immediately visible when you remove the bottom part of the seats. Undo these
bolts as well. To remove the seatbacks, push them up and then pull them towards you, they should
just come out in your hands. There will be a layer of sound insulating material behind the seatbacks,
remove this and you’ll be able to see right through to the back of the “cubby-hole” in the boot.