
Install guide


insulating tape as before – cut it cleanly about three inches before it disappears into the dashboard.
Strip both sides of the cut cable this time, as if you were going to fix the wire you just cut. Use a
standard electrical connector as before and connect it to one of the stripped ends. Now take the end
of the cable you just attached to the ISO connector, cut this cable to the length required to reach the
cable you are now working on. Strip the end of this cable. You should now have a cable connector
connected to a cable on one side and nothing on the other. You should also have two unconnected
cables with stripped ends. Twist the ends of the two unconnected cables together and connect them
up to the empty side of the connector.
That’s the difficult bit out of the way, now tape everything up with electrical insulation tape and wrap
it all up again using the standard Alfa insulating tape that you unwound before, seal the ends with
standard electrical tape. You will now find that when you refit your stereo it will turn on and off with
the ignition.
Automatic stereo illumination
Your stereo lights are supposed to dim when you turn on your headlights. For some reason this
feature never worked in my car, this is obviously down to the same manufacturing problems as the
ignition on/off issue.
You can fix this by following exactly the same procedure as I have outlined for fixing the ignition
on/off problem above. However, you will need to join the 'yellow/green' cable from the ISO
connector to a cable that switches to +12V when you turn the headlights on. Again, use a digital
multimeter to locate the appropriate cable to connect to.
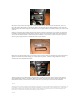
High Quality Earthing and +12V power supply
At this point I think it’s safe to assume that the quality of the standard wiring behind the stereo
leaves a lot to be desired, that doesn’t inspire confidence in the quality of the permanent +12V power
or the earth connectors. If you are serious about your ICE installation then whatever you do, do not
use the standard connectors. First of all, take the earth cable directly from the back of the head unit
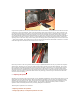
and earth it to the metal frame underneath the stereo slot (as illustrated).
You will need to remove the centre console around the gear stick area to gain access to this metal
frame, but it is worth it as the bolt is perfect for connecting a standard circular electrical connector
and this point gave me an ideal measured earth reading.
As for the +12V connector, you will need to run a cable directly from the battery to the head unit to
get a perfect connection. Please follow the instructions in Chapter 4 describing how to lay cables
through the interior in order to lay this cable. Use a good quality 4 gauge cable if you can, connect it
to the standard positive battery terminal connector, then run the cable through to somewhere near
the stereo socket. I have taken mine along the side of the centre tunnel to avoid electrical
interference (or cross-talk) with the speaker and phono cables. I suggest terminating the cable with
a simple fuse box. I have attached a small fuse box to the metal frame near the earth point using
silicon sealant.