
Install guide


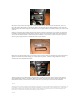


There is no getting away from the fact that the standard fit Clarion unit you have is completely
rubbish. The only good thing about it is the Alfa Romeo logo on the facia, otherwise it is absolutely
worthless, do your ears a favour and get rid of it!
The head unit is the heart of your system and is critical to the whole installation. Choosing a
replacement head unit is not easy, there is a lot out there. You should already have worked out your
budget, try to stick to it, but give yourself a little leeway, say £50 or so. First of all, you don’t want
something that’s going to look out of place, so green illumination is a must. Most units these days can
switch between amber and green illumination, but remember to check for this, a mass of glowing red
buttons will look really out of place at night in your GTV. Secondly, think about the features you want,
CD player, MP3 playback, Minidisk capability etc. Also, consider your project as a whole. For example,
if you are adding external amplifiers and a sub you will need at least three 4V pre-amp outputs (front,
rear and sub). On the other hand, if you are just changing the head unit and the speakers, then you
will want a unit with a high quality built-in amplifier. Lastly, only buy from the best manufacturers -
Always ask for advice on this one, either in the forum on this website or at your local ICE dealer. I
chose an Alpine head unit, but this does not mean they are necessarily the best, my advice is to stick
to Alpine, Blaupunkt, Kenwood or Rockford Fosgate. There are some other gems out there, certainly
Pioneer and Sony do come up with some killer head units, however they seem less consistent than
the other brands I’ve mentioned here.
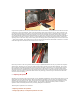
Replacing the head unit is quite simple, in fact you don’t even need to disconnect the battery. I have a
Phase I interior and the standard Clarion head unit, I bought my car new and it came with two little
metal tools for removing the head unit. These are inserted into the two holes on the top of the stereo
facia, one either side of the unit. Insert the tools and then pull them out towards you, the head unit
should simply slide out.
On the back of the unit you’ll find some connectors, unclip these and pull out the aerial plug. Put the
stereo to one side and look back into the slot where it once sat. You should see a metal “cage”
protruding into the empty hole from the edges of the slot. This is held in by pushing out metal cut-
outs on the cage, these cut-outs lodge themselves behind the dashboard so the cage (and the stereo)
won’t fall out.