
Install guide


You will want to finish things off now. Once all the electronics are all set up properly, mount some
MDF or wood blocks onto the sub enclosure that come up to the same height as the tops of the two
intruding sub-frame/rear bumper mount points at the back of the boot. In fact, if you find that your
sub box is moving about in the boot, you can mount the box to these two metal parts.
Finally, you’ll have to make one last template that will cover the whole top of the sub box, going right
out the edges of the boot. Use the same method as before and remember to mark out exactly where
the subwoofer and the amplifiers are mounted. Once you are happy with the template you can then
make up a final piece out of 100mm thick MDF. You will have to cut a hole the same diameter of the
subwoofer directly above the sub position and holes for the amplifier or amplifiers , so the top of the
amplifier(s) can fit through the hole. You should find that the top of the amps should line up pretty
well with the top of this finishing panel.
Once you are happy with this panel, mark out screw holes above the MDF (or wood) blocks you fitted
earlier and screw the panel in place. Obviously you can leave it like this, but you will probably want to
finish it off properly. You can use any type of trim you like, diamond pattern aluminium, industrial
rubber finish or carpet, whatever you think will look best. I opted for carpet and had the finishing
panel trimmed a local upholstery shop. Once trimmed I fitted a metal grille above the subwoofer hole
(purchased at Radio Shack), I also used stainless steel screws with washers to re-fit the panel and
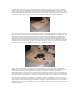
give a good looking and practical finish. The finished product looks like this: