
Install guide


the box without the back of the speaker touching the bottom of the box, try to raise it as much as
possible. You can do this easily by cutting a hole for the speaker and trimming it with a 15mm MDF
“ring”, effectively raising the sub by 15mm. Now try fitting everything in place and make sure it all
fits properly. Then take everything out again and fix it all together using wood glue and wood screws
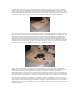
to make sure that it is air-tight. You should end up with a box that looks something like this:
Of course you will need to get the sub fitted. Get yourself a high-quality speaker terminal connector
that can be flush mounted. Now fill the enclosure with some wadding (make sure it’s fireproof) and
ideally cut a port into the top of the box. Mark out the positions of the amplifier (or amplifiers) and
the position you want to mount the speaker terminal first. Find the optimum position for all the
equipment, so that it all fits and looks as good as possible – Remember that the amplifiers and the
subwoofer will be visible when the whole installation is finished. Cut a hole for the speaker terminal
point and wire it through to the sub. Now screw them into place and use a port finisher on the port
hole. You should now have a finished box that looks something like this:
Right, that’s the box finished. Now you need to get it fitted. First of all, work out where all your
cables need to run in order to terminate at the right place near your amplifier or amplifiers. Run the
cables down behind the bootlining and cut small holes to feed the cables through near their
termination points, but below the point that the top of the sub box will reach. Use some wadding to
line the bottom of the boot in order to get a nice tight fit and then drop in the box. You will find that
there is a method to getting the box into the boot, but it should fit in there without too much bother.
Once the box is in place, fit your amplifier or amplifiers and wire everything up. You can now test
your system as essentially everything is fitted, you only have the finishing to do now. You’ll probably
want to spend some time setting up the amplifier gain levels, crossover positions and so on at this
point in order to ensure that everything is set to it’s optimum levels. Your fitted sub box will now look
something like this: