
Install guide


subwoofers tend to be rated at 2 Ohms (so they can be used in pairs). Read the manual supplied with
your speakers and amplifiers then adjust your amplifier’s settings to match your speaker ratings.
Now you’ll have to figure out where you are going to mount the amplifier. If it’s a small amplifier you
might just be able to fit it under one of the front seats, or even find some space behind the top part of
the bootlining above the fuel tank. If your amplifier is bigger then you’ll have no choice but to put it
in the boot. One thing to remember here is that you should never affix your power amplifiers directly
to the sheet metal of your car. Always make a mounting plate out of MDF, affix that to the car body
and then mount the amplifier onto the MDF mounting plate. There are some obvious places for
mounting an amplifier, such as on the back wall of the boot (with the spare tyre removed) or in the
phase II boot “cubby hole” (although you’ll have to mount your CD-Player elsewhere). Find a good
spot and get the MDF mounting plate cut to size. Attach the MDF to the car body using adhesive tape
or screws behind the boot lining and screw on the amplifier through the bootlining onto the MDF.
Before you mount the amplifier you will need to lay down and connect a number of cables. First of all,
find a good earth point in the boot, I used one of the bolts holding the boot locking mechanism in
place for this. Secondly, take another lead directly from the positive terminal of the battery to get a
clean +12V power supply. Use the highest gauge cables that your amplifier’s connectors will cope
with for these two connections. Secondly, you will need to run phono cables from the 4V pre-amp
outputs on the back of your head unit back to the amplifier. Follow the instructions detailed in
Chapter 4 for laying the CD changer cable, but run the phono cables down along the other side of the
car to avoid any unwanted interference. You will also need to hook up a remote switched power cable
through to the head unit, this just acts as a switch, telling the amps to turn on when the head unit is
switched on, you don’t need to use a very high quality cable for this function. Again, try to isolate this
cable as much as possible.
Lastly, you will need to run speaker cables from the amplifier through to your speakers (or crossovers
if you are using component speakers). This is pretty straightforward for the rear speakers, however,
you will need to run new cables through to the point where the cable run starts between the main
bodyshell and the front doors. As I mentioned before, this is socketed so you cannot run cables all the
way to the door speakers (or crossovers).
You’ll find that if you are using an improved power connection for the head unit, A CD-Changer and an
amplifier you will have a lot of cables running through to the front of the car, you need to separate
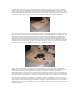
these cables as much as possible to avoid unwanted interference. In my car I am running the speaker
cables down through the left of the car and along behind the footwells, the head unit power, amplifier
remote power and CD changer cables are run along either side of the central tunnel (you will need to
remove the seats to get access to this area underneath the carpet (see photo). Whilst the phono
cables down through the right of the car, I think this is the best solution as it isolates all the cables as
much as possible.