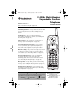
43-3815/3898.fm Page 1 Wednesday, May 7, 2003 10:31 AM www.radioshack.com™ 2.4GHz Multi-Handset Expandable Cordless Telephone OWNER’S MANUAL — Please read before using this equipment. 43-3815/43-3898 Call Waiting/Caller ID — lets you answer a call even when you’re on the phone and see who’s calling before you answer. Speakerphone — lets you conduct a hands-free conversation using the base speaker. (See “Making and Receiving Calls” on page 15.
43-3815/3898.fm Page 2 Wednesday, May 7, 2003 10:31 AM CONTENTS Introduction ................................................. 3 Important Safety Instructions ...................... 3 Battery Safety Instructions ...................... 6 Installing Your Telephone ............................. 7 Selecting a Location ................................ 7 Connecting and Charging the Battery Pack ......................................................... 9 Setting the Dialing Mode .......................
43-3815/3898.fm Page 3 Wednesday, May 7, 2003 10:31 AM INTRODUCTION ! IMPORTANT ! Cordless phones require AC power to operate. When the power is off, you cannot make or receive calls using your phone. To be safe, you should also have a corded phone that does not require AC power to operate (not a cordless phone), so you can still make and receive calls if there is an AC power failure.
3-3815/3898.fm Page 4 Wednesday, May 7, 2003 10:31 AM 4. Never install telephone jacks in wet locations unless the jack is specifically designed for wet locations. 5. Never touch uninstalled telephone wires or terminals unless the telephone line has been disconnected at the network interface. 6. Use caution when installing or modifying telephone lines. 7. Do not affix the AC power supply cord to building surfaces with metal fittings (if the product has an AC power cord). Important Safety Instructions 8.
43-3815/3898.fm Page 5 Wednesday, May 7, 2003 10:31 AM 13. Do not allow anything to rest on the power cord. Do not locate this product where the cord will be stepped on. 14. Do not overload wall outlets and extension cords as this can result in a risk of fire or electric shock. 15. Never push objects of any kind into this product through cabinet slots as they may touch dangerous voltage points or short out parts that could result in a risk of fire or electric shock.
43-3815/3898.fm Page 6 Wednesday, May 7, 2003 10:31 AM 18. Avoid using a telephone during an electrical storm. There may be a remote risk of electric shock from lightning. 19. Do not use the telephone to report a gas leak in the vicinity of the leak. BATTERY SAFETY INSTRUCTIONS • Use only the appropriate type and size battery pack specified in the instruction manual provided for this product. Important Safety Instructions • Do not dispose of the battery pack in a fire. The cell may explode.
43-3815/3898.fm Page 7 Wednesday, May 7, 2003 10:31 AM INSTALLING YOUR TELEPHONE SELECTING A LOCATION Select a location that is: • near an accessible AC outlet • near a telephone line jack (The USOC number of the jack to be installed is RJ11C or RJ11W for a wall plate jack).
43-3815/3898.fm Page 8 Wednesday, May 7, 2003 10:31 AM 3. Insert the supplied AC adapter’s barrel plug into the DC IN 9V jack on the back of the base. 4. Route the adapter’s cord through the strain relief slot on the back of the base. 5. Plug the adapter into a standard AC outlet. 6. Lift the base's antenna to a vertical position. On a Wall Plate 1. Plug one end of the supplied short modular cord into the TEL LINE jack on the back of the base. 2.
43-3815/3898.fm Page 9 Wednesday, May 7, 2003 10:31 AM 2. Plug one end of the supplied long modular cord into the TEL LINE jack on the back of the base. 3. Insert the supplied AC adapter's barrel plug into the DC IN 9V jack on the back of the base. 4. Route the adapter and modular cords through the grooves on the bottom of the base. 5. Align the base's keyhole slots with the mounting screws and slide the base downward to secure it. 6.
43-3815/3898.fm Page 10 Wednesday, May 7, 2003 10:31 AM Ô NOTES Ô • If you mounted the base on the wall, place the handset with the keypad facing out so the charging contacts make a clean connection to charge the battery pack. • Using a pencil eraser, clean the charging contacts on the handset and base about once a month. • If the battery pack becomes weak during a call, the handset beeps and Low Battery appears. You must recharge the battery pack before you can make another call.
43-3815/3898.fm Page 11 Wednesday, May 7, 2003 10:31 AM 2. Press any number other than 0 or an access code (9, for example) if required. If the dial tone stops, you have touch-tone service. If the dial tone continues, you have pulse service. Once you know which type of service you have, follow these steps to set the dialing mode. 1. Lift the handset and press MENU/MUTE. 2. Press or to select Dial Mode. 3. Press SEL/CH. The current dialing mode appears. 4. Press or to select the mode. 5. Press SEL/CH.
43-3815/3898.fm Page 12 Wednesday, May 7, 2003 10:31 AM SETTING THE HANDSET’S RINGER TONE You can choose from six ringers or four melodies. Ringers: Flicker, Clatter, Leap Frog, Ping Ball, Reminder, Soft Alert Melodies: Beethoven9 (“Ode to Joy” from Beethoven’s 9th Symphony), Elise (“For Elise”), Merry-Xmas (“We Wish You a Merry Christmas”), Hm Swt Hm (“Home Sweet Home”) 1. Lift the handset and press MENU/MUTE. 2. Press or to select Ringer Tones. 3. Press SEL/CH. 4. Press or to make selection.
43-3815/3898.fm Page 13 Wednesday, May 7, 2003 10:31 AM TURNING AUTO TALK ON/OFF Auto Talk allows you to simply pick up the phone from the base to answer a call, without pressing TALK/FLASH If the handset is away from the base, press any number key to answer a call. Your phone is not preset to use Auto Talk. 1. Lift the handset and press MENU/MUTE. 2. Press or to select Caller ID Setup. 3. Press SEL/CH. 4. Press or to select Auto Talk. 5. Press SEL/CH. 6.
43-3815/3898.fm Page 14 Wednesday, May 7, 2003 10:31 AM STORING YOUR AREA CODE You can store your local area code in the phone’s memory so the area code does not appear if you receive a local call. If you need to add or store the area code for a local number, you can add it afterwards (see “Dialing Numbers From a Caller ID Record” on Page 29). In some areas, the area code is necessary even for a local call (10-digit dialing). If you live in such an area, do not store the area code. 1.
MAKING AND RECEIVING CALLS 1. To make a call using the handset, lift the handset and press TALK/FLASH. Talk and the current volume setting appear, and the base's CHARGE/IN USE indicator lights. Then the call's elapsed time appears. Ô 2. Dial the number. The number appears on the handset as you dial. 3. To end a call, place the handset on the base or press END. You can also dial the number before you press TALK/FLASH.
43-3815/3898.fm Page 16 Wednesday, May 7, 2003 10:31 AM RINGER MUTE Making and Receiving Calls You can temporarily mute the ringer. When you receive a call with the handset off the base, press END. The phone exits Ringer Mute when the next call is received, or when you hang up the phone. ADJUSTING THE HANDSET’S VOLUME To adjust the handset's volume during a call, press or on the handset until you reach the desired volume level (Volume Low, Volume Medium, Volume High, and Volume Maximum).
43-3815/3898.fm Page 17 Wednesday, May 7, 2003 10:31 AM Making and Receiving Calls USING FLASH Flash performs the electronic equivalent of a switchhook operation for special services, such as Call Waiting. 1. If you have Call Waiting, press TALK/FLASH to answer an incoming call without disconnecting the current call. 2. Press TALK/FLASH again to return to the first call. If you do not have any special phone services, pressing TALK/FLASH while the call is in progress might disconnect the current call.
43-3815/3898.fm Page 18 Wednesday, May 7, 2003 10:31 AM Making and Receiving Calls Ô NOTES Ô Transferring a Call • If the transferred call is not picked up within 5 minutes, the call disconnects. • Returning the handset to the base does not cancel the transfer. • When the handset is off the base, if you place the handset on the base while the transfer tone sounds, you can receive a transferred call by picking up the handset (when AutoTalk is on).
43-3815/3898.fm Page 19 Wednesday, May 7, 2003 10:31 AM USING A HEADSET You can make or answer calls with hands-free convenience using an optional headset that has a 3/32 –inch (2.5-mm) plug. Your local RadioShack store carries a variety of headsets. To connect the headset, gently flip open the rubber headset jack cover on the side of the handset. Then insert the headset’s plug into the jack. Use the keys on the handset to make or answer calls.
43-3815/3898.fm Page 20 Wednesday, May 7, 2003 10:31 AM 3. To enter a name, use the letters on the number keys. Enter the last name first, since files are accessed alphabetically. For uppercase letters, press the key once for the first letter marked on the key, twice for the second letter, and so on. For lowercase letters, press four times (or five times) for the first lower case letter marked on the key, five or six times for the second letter, and so on.
43-3815/3898.fm Page 21 Wednesday, May 7, 2003 10:31 AM 11. Press SEL/CH. Distinctive Ring appears. or to select the ringer, or No Selectn if you do not want to assign a 12. Press distinctive ring. Each time you make a selection, the selected ringer or the melody sounds (unless you selected No Selectn). See “Turning Distinctive Ringer On/Off” on page 24. 13. Press SEL/CH. Speed Dial appears. If the selected location has no number, SPDn: and appear.
43-3815/3898.fm Page 22 Wednesday, May 7, 2003 10:31 AM Ô NOTES Ô Reviewing Names and Numbers in the Phonebook If no matching record is found in the phonebook, the first record that starts with the next alphabetical character appears. Storing a One-Touch Speed Dial Number • /SD appears when you Memory Dialing review the one-touch speed dial memory. /SPDn appears when you review any speed dial location. • If you receive a CIDCW message, the viewing operation is canceled.
43-3815/3898.fm Page 23 Wednesday, May 7, 2003 10:31 AM 4. Press SEL/CH. Done! appears. DIALING A NUMBER IN MEMORY To dial a number stored in the phonebook, lift the handset and press ê/SPEED DIAL/ . Then, follow Step 2 in “Reviewing Names and Numbers in the Phonebook” on Page 22 to recall the number and press TALK/FLASH to dial the number. You can also dial a phonebook number after pressing TALK/FLASH. Press ê/SPEED DIAL/ , and then or . Then press SEL/CH to dial the number.
43-3815/3898.fm Page 24 Wednesday, May 7, 2003 10:31 AM TESTING STORED EMERGENCY NUMBERS If you store an emergency service’s number (police department, fire department, ambulance) and you choose to test the stored number, make the test call during the late evening or early morning hours to avoid peak demand periods. Also, remain on the line to explain the reason for your call. DELETING A NUMBER 1. Recall the phonebook, speed dial, or one-touch speed dial number you want to delete. 2. Press DEL/TRSF.
43-3815/3898.fm Page 25 Wednesday, May 7, 2003 10:31 AM Using Caller ID Caller ID records. If the caller information is unavailable because the name and number were blocked by the caller, Private Name or Private Number appear (see “Caller ID Messages” on Page 28).
43-3815/3898.fm Page 26 Wednesday, May 7, 2003 10:31 AM Ô NOTES Ô Using Caller ID • The phone exits the menu mode if you wait more than 30 seconds between each keypress. • Voice Mail is a service available from some telephone companies. Messages are kept at the telephone company and retrieved later by calling a special number and entering the account phone number and code number. Check with your telephone company to determine if this service is available.
43-3815/3898.fm Page 27 Wednesday, May 7, 2003 10:31 AM Using Caller ID To send the second caller to voice mail (if you have voice mail), scroll down to Forward Call or press 3. If you decide to take the second call and end the first, scroll down to Answer/Drop 1st or press 4. If you decide to include the second caller in your conversation with the first caller, scroll down to Conference or press 5. 2. Press SEL/CH.
43-3815/3898.fm Page 28 Wednesday, May 7, 2003 10:31 AM REVIEWING CALLER ID RECORDS Ô NOTES Ô Using Caller ID • The Caller ID record’s number appears next to the received time. Once you have reviewed the new message, the number is cleared and disappears. • Once you view the Caller ID list in alphabetical order, you cannot switch back to chronological order unless you exit and reenter the operation.
43-3815/3898.fm Page 29 Wednesday, May 7, 2003 10:31 AM ADDING/DELETING THE AREA CODE Using Caller ID When the area code of the received call is the same as the one you stored (see “Storing your Area Code” on Page 14), the area code does not appear in the Caller ID record. If it is different, the area code appears in the record. If you want to add or remove the area code from the display, press # when the record is on the display. Press # again to remove or restore the area code.
43-3815/3898.fm Page 30 Wednesday, May 7, 2003 10:31 AM Ô NOTES Ô • You cannot store a Caller ID message in the phonebook if a phone number does not appear in the message. Deleting Caller ID Records • You cannot set the distinctive ring or speed dial in this step. If you would like to set these options, see “Turning Distinctive Ringer On/ Off” on Page 24 or “Storing/Editing Data in the Phonebook” on Page 19.
43-3815/3898.fm Page 31 Wednesday, May 7, 2003 10:31 AM THE BATTERY PACK The charger is powered by the supplied 9V, 210 mA AC adapter. Insert the supplied AC adapter's barrel plug into the DC IN 9V jack on the back of the charger. Route the cord through the strain relief slot and plug the adapter into a standard AC Outlet. Be sure you have connected the battery pack as described in "Connecting and Charging the Battery Pack" on Page 9. Then place the handset on the charger.
43-3815/3898.fm Page 32 Wednesday, May 7, 2003 10:31 AM or to move the pointer to Caller ID Setup. Then press SEL/CH. 3. Press or to select CW Deluxe. Then 2. Press press SEL/CH. 4. Press or to select CW Deluxe On or Off. Then press SEL/CH. MAKING AND RECEIVING CALLS Ô NOTES Ô Making and Receiving Calls • If your handset is out of range of the base, the call might be terminated. • When you press END on one handset, the call is disconnected on all the connected handsets.
43-3815/3898.fm Page 33 Wednesday, May 7, 2003 10:31 AM Answering System Operation ID information that arrives while the phone is onhook is stored in all handsets. ANSWERING SYSTEM OPERATION NEW MESSAGE INDICATOR The new message indicator flashes on the handset when you have new messages in your answering system. The indicator stops flashing after you play back all the new messages. The indicator flashes rapidly when you receive an incoming call, slowly when the base is paging the handset.
43-3815/3898.fm Page 34 Wednesday, May 7, 2003 10:31 AM Start again at Step 1 of the setting operation. Answering System Operation SETTING THE DAY/TIME Ô NOTES Ô • Enter each key press within about 2 minutes. Otherwise, the system exits the time setting process and you must begin again with Step 1. • If power fails, the clock retains the current time. When the power is restored, it starts counting again from the time the power failed.
43-3815/3898.fm Page 35 Wednesday, May 7, 2003 10:31 AM Answering System Operation system answers and avoid unnecessary longdistance charges. If the message memory is full, the system answers after about ten rings regardless of the ring time setting. 1. Press MENU three times. The system announces “Ring time,” and then announces the current setting. 2, 4, 6, or ts appears. 2. Repeatedly press g| or |f until the desired number appears. 3. Press SET/RING to store the setting. 4. Press PLAY/STOP to exit.
43-3815/3898.fm Page 36 Wednesday, May 7, 2003 10:31 AM 2. Repeatedly press g| or |f to select On or Of. Answering System Operation 3. Press SET/RING to store the setting. 4. Press PLAY/STOP to exit. The Message Alert tone automatically stops after you listen to all the new messages. To turn it off sooner, press any key on the base. The Message Alert tone automatically sounds when the next message is received.
43-3815/3898.fm Page 37 Wednesday, May 7, 2003 10:31 AM Answering System Operation You can also record your own message (see “Recording/Deleting an Outgoing Message”). When you record and select your own outgoing message, the system uses it for all recording time settings (1, 4, and Announce Only). To select an outgoing message (your outgoing message or one of the system's prerecorded messages), press OGM to enter the outgoing message setting mode.
43-3815/3898.fm Page 38 Wednesday, May 7, 2003 10:31 AM Answering System Operation Ô NOTES Ô Setting the System to Answer Calls When the system's message memory is full, FL appears and the system announces “No remaining time” when you try to operate it. Recording Incoming Messages When the memory is full, the caller hears the prerecorded announcement-only message (“Hello, no one is available to take your call. Please call again.
RECORDING A MEMO You can record a message to yourself or others. The system stores memos as incoming messages (see “Playing Messages” on Page 39). Hold down MEMO until the system beeps and announces “Record memo message.” When the tone sounds, speak your message. When you are finished, press MEMO or PLAY/STOP. Ô RECORDING A CONVERSATION The system lets you record both sides of a telephone conversation when you are using a handset.
43-3815/3898.fm Page 40 Wednesday, May 7, 2003 10:31 AM Answering System Operation system announces the day and time of the call at the end of each message. To play all messages after playing the new messages, press PLAY/STOP again. To skip to the next message, press g| while the message is playing. Hold down g| to quickly advance through a message. The system advances through the playback at double speed until the end of the last message. Release g| to resume normal playback.
43-3815/3898.fm Page 41 Wednesday, May 7, 2003 10:31 AM HANDSET REMOTE OPERATION You can check new incoming messages, skip, repeat, or delete your incoming messages from the handset. For example, you can install the answering system in the living room and check your incoming message from a bedroom using the handset. Ô Remote Operation While the phone is on-hook, press TAD/d on the handset. The answering system announces the current time and the number of messages stored in memory.
43-3815/3898.fm Page 42 Wednesday, May 7, 2003 10:31 AM • set the system to answer or not answer calls • listen to your messages • record a new outgoing message • record a memo • erase messages You cannot remotely operate the system using its handset or another telephone on the same line. SETTING THE SECURITY CODE Remote Operation The two-digit remote operation security code prevents unauthorized remote access to your messages. The code is preset to 80.
-3815/3898.fm Page 43 Wednesday, May 7, 2003 10:31 AM answer calls, it will answer after about ten rings and sound a series of beeps. 2. When the outgoing message begins (or the system sounds a series of beeps), press #. Then enter your security code within 2 seconds. 3. If the code is correct, the system announces the number of new and old messages, and then “To play incoming message, press # 2. For help, press # 0." If the system does not respond, try entering your code again.
43-3815/3898.fm Page 44 Wednesday, May 7, 2003 10:31 AM Press # then To 7 Record a memo. The system announces “Record memo message.” The length of a memo recorded by remote operation must be between 2 seconds and 4 minutes. Press # 7 again or # 5 to stop recording. 8 Record a new outgoing message. The system announces “Record greeting.” Press # 8 again or # 5 to stop recording. 9 Set the system to not answer calls. 0 Announces the help menu.
43-3815/3898.fm Page 45 Wednesday, May 7, 2003 10:31 AM The FCC Wants You to Know • party-line systems • most electronic key telephone systems THE FCC WANTS YOU TO KNOW This equipment has been tested and found to comply with the limits for a Class B digital device, pursuant to Part 15 of the FCC Rules. These limits are designed to provide reasonable protection against harmful interference in a residential installation.
43-3815/3898.fm Page 46 Wednesday, May 7, 2003 10:31 AM SURGE PROTECTION Your telephone has built-in protection circuits to reduce the risk of damage from surges in telephone line and power line current. These protection circuits meet or exceed the FCC requirements. However, lightning striking the telephone or power lines can damage your telephone. Lightning damage is not common.
43-3815/3898.fm Page 47 Wednesday, May 7, 2003 10:31 AM TROUBLESHOOTING We do not expect you to have any problems with your phone, but if you do, these suggestions might help. Problem The phone does not work or works poorly. Suggestion Be sure the base’s phone line cord and AC adapter are correctly and securely connected. Be sure the battery pack in the handset is connected and charged. Be sure the handset is properly registered with the base. The handset stops working or works poorly during a call.
43-3815/3898.fm Page 48 Wednesday, May 7, 2003 10:31 AM Limited One-Year Warranty This product is warranted by RadioShack against manufacturing defects in material and workmanship under normal use for one (1) year from the date of purchase from RadioShack company-owned stores and authorized RadioShack franchisees and dealers.