
Owner`s manual


6
Note: Save the screw, spacer, and
rubber washer in case you ever want
to ship the stereo. You can secure
them to the back of the stereo with a
piece of tape.
MAKING THE
CONNECTIONS
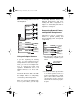
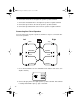
The supplied harness with the 14-pin
connector includes all the lead wires
you need to connect the stereo to
ground, power, some optional com-
ponents, and speakers.
Important: Do not cut these wires. If
you cut any wire, you cannot obtain
a refund or exchange on this prod-
uct. RadioShack will provide warran-
ty service if you cut a wire and find
the product is defective.
You might need additional wire, de-
pending on your individual auto
sound system, to complete the con-
nections. Your local RadioShack
store carries a full line of wire and
wire management accessories.
Cautions:
• For added safety and to protect
your stereo, disconnect the
cable from your vehicle battery’s
negative (–) terminal before you
begin.
• Be sure your speakers can han-
dle 22 watts of power (11 watts
per channel). Each speaker
must have an impedance of at
least 4 ohms. Your local
RadioShack store carries a full
line of speakers.
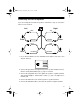
• You
must
connect the GROUND
(–), POWER LEAD (B+), and
CLOCK MEMORY wires first,
then make all other connections
as described in the following sec-
tions before you plug the harness
into the stereo. If you do not
make the connections in the
order shown, an incorrect con-
nection could damage the stereo.
• You must connect a separate
wire to each speaker terminal as
described in “Connecting Two
Pairs of Speakers” on Page 9 and
“Connecting One Pair of Speak-
ers” on Page 10. Do not use a
common wire or chassis ground
for any speaker connection.
12-2113.fm Page 6 Wednesday, July 14, 1999 12:18 PM