
Owner`s manual


5
INSTALLATION
BEFORE YOU BEGIN
THE INSTALLATION
Before you install your stereo, read
all the instructions in this owner’s
manual. You should be able to an-
swer all of these questions about
your vehicle’s electrical and sound
systems.
• Which terminal in my vehicle’s
fuse box is for accessories?
• How do I connect a wire to the
fuse box?
• Which of the stereo’s wires is
the power wire?
• Which stereo wires are speaker
outputs?
Also, be aware that installation in
your vehicle might require cutting or
modifying your vehicle.
Preparing the Mounting Area
Before you mount the stereo, make
sure you have all the necessary ma-
terials. Then confirm that the stereo
fits your vehicle’s mounting area.
Caution:
Be sure to avoid obstruc-
tions behind the mounting surface.
Notes:
• This stereo is a DIN-E size unit
that requires a 2
1
/
16
-inch (53
mm) high by 7
3
/
16
-inch (182 mm)
wide by 6
11
/
16
-inch (170 mm)
deep mounting area.
• If the mounting area is too large,
you might be able to mount the
stereo with an in-dash installa-
tion kit, available at your local
RadioShack store. Follow the
installation kit’s instructions to
mount the stereo.
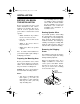
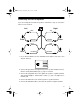
Routing Speaker Wires
If you install speakers, avoid routing
the speaker wires near moving parts
or sharp edges. You can usually route
wires along the wiring channel be-
neath the vehicle’s door facings by
carefully removing the molding that
holds the carpet in place. After you
route the wires, replace the molding.
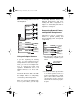
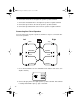
Removing the Shipping
Screw
The shipping screw helps protect the
stereo’s cassette player from being
damaged during shipment.
Before you mount the stereo, use a
Phillips screwdriver to remove the
screw, spacer, and rubber washer
from the top of the stereo. This al-
lows you to remove the mounting
sleeve from the stereo.
Screw
Spacer
Rubber Washer
12-2113.fm Page 5 Wednesday, July 14, 1999 12:18 PM