5-1919.fm Page 1 Monday, July 19, 1999 12:34 PM Cat. No. 15-1919 OWNER’S MANUAL Please read before using this equipment.
15-1919.fm Page 2 Monday, July 19, 1999 12:34 PM INTRODUCTION Your Radio Shack 6 in 1 RF Remote Control system has a remote control and RF command console that make up a complete home control system, allowing you to send commands to most IR (infrared) controlled devices from any room in your home, up to 100 feet away. You can use it to control your TV, VCR, cable box, and even lights and appliances with Plug ’n Power modules (not supplied). The 6 in 1 RF Remote Control is preprogrammed.
15-1919.fm Page 3 Monday, July 19, 1999 12:34 PM Favorite Channel Scan — lets you set up your system’s remote control to scan through a list of up to 10 channels you select. Programmable Sequence Command — lets you press a single key and send a set of commands. Plug ’n Power Controls — let you control Plug ‘n Power modules.
15-1919.fm Page 4 Monday, July 19, 1999 12:34 PM CONTENTS How the System Works .......................................... 5 A Look at the System’s Remote Control ............ 5 Setting Up the System ........................................... Installing Batteries in the Remote Control .......... Setting Up the Remote Control .......................... Setting Up the System’s RF Command Console ...................................... Operation ..............................................................
15-1919.fm Page 5 Monday, July 19, 1999 12:34 PM HOW THE SYSTEM WORKS When you press a key on the system’s remote control, it sends a powerful RF signal to the RF command console, which then sends a corresponding IR signal to IR remote controlled-devices in the same room as the command console. A LOOK AT THE SYSTEM’S REMOTE CONTROL Your system’s remote control was designed to include the functions used most often to operate TV, VCR, cable converter, CD player, satellite receiver, and audio equipment.
15-1919.fm Page 6 Monday, July 19, 1999 12:34 PM The system’s remote control also has these special keys. Key Function SET UP Sets up the system’s remote control to replace your original remote controls. CD, VCR, CBL, TV, AUX1, AUX 2, and Plug ’n Power During set up, tells the system’s remote control which remote controls you want to replace. During normal operation, tells the system’s remote control which device you want to control.
15-1919.fm Page 7 Monday, July 19, 1999 12:34 PM SETTING UP THE SYSTEM INSTALLING BATTERIES IN THE REMOTE CONTROL Your system’s remote control uses four AAA batteries (not supplied) for power. We recommend alkaline batteries, such as Radio Shack Cat. No. 23-555. Follow these steps to install the batteries. 1. Press the battery compartment cover tab and lift off the cover. 2. Install four fresh batteries, as indicated by the polarity symbols marked in the compartment. 3. Replace the cover.
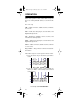
15-1919.fm Page 8 Monday, July 19, 1999 12:34 PM 3. Press down and hold SET UP until the red indicator blinks twice, then release it and enter the 3digit manufacturer’s code . 3 SETUP All Lts On CD VCR CBL AUX 1 AUX 2 A/B PWR TV Plug'n Power For example, to replace a Panasonic TV’s remote control (manufacturer’s code 051), press: TV SET UP 0 5 1 When the indicator blinks twice again, you have correctly entered the code. 4. Point the system’s remote control at your device and press PWR.
15-1919.fm Page 9 Monday, July 19, 1999 12:34 PM SETTING UP THE SYSTEM’S RF COMMAND CONSOLE After you set up the system’s remote control, just plug the RF command console’s power cord into any standard AC outlet in the same room as your IR remote controlled devices (TV, VCR, cable box, and so on) and fully extend its antenna. Make sure the command console is pointed at the devices you want to control..
15-1919.fm Page 10 Monday, July 19, 1999 12:34 PM OPERATION Each of the system’s remote control device keys are preset to control particular devices, as shown in this list.
15-1919.fm Page 11 Monday, July 19, 1999 12:34 PM Note: The command keys on the system’s remote control work the same as the keys on the device’s original remote control; however, the labeling might differ slightly. USING TWO OR MORE SIMILAR DEVICES Normally, you us each device key to control one of its listed devices (see “Operation”).
15-1919.fm Page 12 Monday, July 19, 1999 12:34 PM SPECIAL FUNCTIONS Telephone Programming The telephone programming feature lets you have the manufacturers’ codes for your remote-controlled devices programmed into your remote control by phone! Just call 1-800-950-7044 and provide the Customer Service Representative with information about your IR remotecontrolled devices. The codes are sent over the telephone lines to your remote control.
15-1919.fm Page 13 Monday, July 19, 1999 12:34 PM 4. Hold the system’s remote control up to your telephone’s earpiece. Note: You must hold the telephone’s earpiece over the remote control’s battery compartment. If you do not, the system’s remote control might not be able to properly receive the information coming over the phone. While the system’s remote control is receiving information, the red indicator blinks occasionally. When all programming is complete, the red indicator blinks twice.
15-1919.fm Page 14 Monday, July 19, 1999 12:34 PM 7. To exit the fast search mode, press SET UP. Note: You can search up to 11 codes for a particular device (TV, VCR, cable, and so on). Channel Scan The channel scan feature lets you scan through all channels on your TV, VCR, or cable box, stopping at each channel for about 3 seconds. To scan through available channels, first press the device key (TV, VCR, or CBL). Then aim the system’s remote control at the device and press SCAN.
-1919.fm Page 15 Monday, July 19, 1999 12:34 PM Notes: • You must enter a zero before a single-digit channel number (01, 02, 03, and so on). • If you normally press ENTER after entering a channel number to change to a new channel, you must press ENTER instead of SET UP. 5. Repeat Step 4 to continue entering channels you want to include in your favorite channel scan list. After you have entered the last channel number, hold down SET UP (the last time) until the red indicator light blinks twice. 6.
15-1919.fm Page 16 Monday, July 19, 1999 12:34 PM Note: If you normally press ENTER after entering a channel number, you must also include ENTER in your sequence. 4. To store the sequence, press and hold down SET UP until the red indicator light blinks twice. Whenever you press the selected sequence key (AUDIO SEQ or VIDEO SEQ), your system’s remote control sends the sequence of commands you entered. To erase a sequence, press the device key, then hold SET UP until the red indicator light blinks twice.
15-1919.fm Page 17 Monday, July 19, 1999 12:34 PM The punch-through feature does not work if the last two devices you select have the same (or similar) features. For example, most TVs and some cable converters have CHANNEL keys on their remote controls. In this case, you must press the desired device key before you use the remote control’s CH keys.
15-1919.fm Page 18 Monday, July 19, 1999 12:34 PM PLUG ’N POWER The Plug ’n Power feature lets you use the system to control lamps and appliances with Plug ’n Power modules, available at your local Radio Shack store. Follow these steps to control Plug ’n Power modules with the system’s remote control and RF command console. 1. Set the house code dial on top of your RF command console to the same letter as your Plug ’n Power modules. 2.
15-1919.fm Page 19 Monday, July 19, 1999 12:34 PM 4. To turn on all light and appliance modules with your remote control, press All Lts On (PWR ) on the remote control, or ALL LIGHTS ON on the RF command console. 3 SETUP CD All Lts On VCR CBL PWR TV Pl g'n Note: This affects all light modules and wall switch modules set to the same house code as the command console. To turn off all light and appliance modules, press All Off on the system’s remote control, or ALL UNITS OFF on the RF command console.
15-1919.fm Page 20 Monday, July 19, 1999 12:34 PM To control specific lamps and appliances directly from the RF command console, press the top button of the corresponding module number (1, 2, 3, 4 or 5, 6, 7, 8) to turn on the module. Press the bottom button to turn off the module. 6. To brighten or dim lights connected to lamp and wall switch modules, turn on the specific module (as described in Step 5).
15-1919.fm Page 21 Monday, July 19, 1999 12:34 PM MANUFACTURERS’ CODES The following list tells you which 3-digit codes to enter to set up the 6 in 1 RF Remote Control System’s remote control. Notes: • Use the supplied label to record the manufacturers’ codes for your remote-controlled devices. • The system’s remote control is not always able to produce every command of your original remote controls.
15-1919.
15-1919.
15-1919.
15-1919.
15-1919.
15-1919.
15-1919.
15-1919.
15-1919.
15-1919.
15-1919.
15-1919.
15-1919.
15-1919.
15-1919.
15-1919.
15-1919.
15-1919.
15-1919.
15-1919.
15-1919.
15-1919.
15-1919.
15-1919.
15-1919.
15-1919.
15-1919.
15-1919.fm Page 49 Monday, July 19, 1999 12:34 PM IF YOU HAVE PROBLEMS SEARCHING THE CODE LIBRARY If the 6 in 1 RF Remote Control System’s remote control does not operate your remote-controlled devices when you first set it up, you probably haven’t entered the correct 3-digit codes for your devices.
15-1919.fm Page 50 Monday, July 19, 1999 12:34 PM TROUBLESHOOTING If the system’s remote control stops working after you successfully test the control of each device, or if you are unable to get the remote control to work at all, check the following: • Use manual controls or the original remote control to confirm that your remote-controlled devices are working properly. • Be sure you pressed the device key for the device you want to control. • Replace the remote control’s batteries.
15-1919.fm Page 51 Monday, July 19, 1999 12:34 PM FCC CAUTION This equipment generates and uses radio frequency energy, and if not installed and used properly, that is, in strict accordance with the manufacturer’s instructions, may cause interference to radio and television reception.
15-1919.fm Page 52 Monday, July 19, 1999 12:34 PM CARE AND MAINTENANCE Your Radio Shack 6 in 1 Remote Control system is an example of superior design and craftsmanship. The following suggestions will help you care for your system so you can enjoy it for years. • Keep the system’s remote control and RF command console dry. If they get wet, wipe them dry immediately. Liquids can contain minerals that corrode electronic circuits. • Use and store the system only in normal temperature environments.
15-1919.fm Page 53 Monday, July 19, 1999 12:34 PM SPECIFICATIONS Remote Power....................... 4 AAA Alkaline Batteries RF Command Console Power................. 120 Volts AC Remote to RF Command Console Range.............................................100 Feet (304.8 m) RF Command Console to Device Range..........................................25 Feet (7.62 m) ±30 Remote Dimensions .27/16 × 714/16 × 11/8 Inches (HWD) RF Command Console Dimensions.................
15-1919.
15-1919.
15-1919.fm Page 56 Monday, July 19, 1999 12:34 PM RADIO SHACK LIMITED WARRANTY This security product is warranted against manufacturing defects in material and workmanship for ninety (90) days from the date of purchase from Radio Shack company owned stores and authorized Radio Shack franchisees and dealers. Within this period Radio Shack will repair the security product without charge for parts and labor. Simply bring your Radio Shack sales slip as proof-of-purchase date to any Radio Shack store.