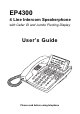
EP4300 4 Line Intercom Speakerphone with Caller ID and Jumbo Pivoting Display User’s Guide Please read before using telephone
Getting Started Congratulations! You’ve purchased a HGC EP4300 System Intercom Speakerphone that meets the highest standards for quality and convenience in the Small Office/Home Office environment. To get the most from your system, please take time to read this guide thoroughly. 1.1 Phone Features Toll Restriction Restrict specific numbers and prevent unauthorized long distance calls. Busy Lamp Field See at a glance what other extensions are in use.
Getting Started 1.2 Electrical / Operating Requirements 1.2.1 Electrical Requirements Power Adapter: 230Vac Input, 9Vdc/500mA (other input voltage applies for different market) Two supplied telephone line cords which each include two lines 1.2.2 Operating Requirements Operating temperature: 0 to 40 oC (32o to 104 oF) Storage temperature: -15o to 55 oC (5o to 131 oF) Humidity: 10 to 85% (non-condensing) 1.
Table of Contents 1. Getting Start . . . . . . . . . . . . . . . . . . . . . . . . . . . . . . . . . . . . . . . . . . . . 1.1 Phone Features . . . . . . . . . . . . . . . . . . . . . . . . . . . . . . . . . . . . . . . . 1.2 Electrical / Operating Requirements . . . . . . . . . . . . . . . . . . . . . . . . . 1.2.1 Electrical Requirements . . . . . . . . . . . . . . . . . . . . . . . . . . . . . 1.2.2 Operating Requirements . . . . . . . . . . . . . . . . . . . . . . . . . . . . 1.3 Packing List . . . . .
Table of Contents 5.13 5.14 5.15 5.16 5.17 Using Do Not Disturb . . . . . . . . . . . . . . . . . Releasing Call Privacy . . . . . . . . . . . . . . . . Using the Call Timer . . . . . . . . . . . . . . . . . Using a Headset with your Telephone . . . . Adjusting Your Telephone's Time and Date . . . . . . . . . . . . . . . . . . . . . . . . . . . . . . . . . . . . . . . . . . . . . . . . . . . . . . . . . . . . . . . . . . . . . . . . . . . . . . . . . . . . . . . . . . .
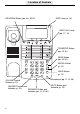
Location of Controls PROGRAM Button (pp. 4-8, 23-27) MSG Lamp (p. 18) NEW CALL Lamp (pp. 17, 18) TRANSFER Button (pp. 15-16) PAGE Button (pp. 33-34) REDIAL Button (p. 12) HOLD Button (p. 12) VOLUME Control Buttons (p. 10) HEADSET Button and Indicator (p. 22) SPEAKER Button and Indicator (pp. 11, 31-36) v Microphone (pp. 11, 31-36) MUTE Button and Indicator (p.
Location of Controls CALLER ID Button (pp. 17-18) LINE Buttons and Indicators (pp. 9, 11, 20) LEFT ARROW Button (pp. 17-18, 26-28) DELETE Button (pp. 11, 17-18) RIGHT ARROW Button (pp. 17-18, 26-28) INTERCOM Button and Indicator (pp. 9, 31-34) DIAL Button (pp. 17-18, 26-28) CONFERENCE Button (p. 15) FLASH Button (pp. 19, 24) MEMORY Buttons (p. 25) NETWORK SERVICES Button (p. 40) LOWER Button (p. 25) POWER L1/L2 L3/L4 Battery Compartment (p. 41) Line Jacks (p. 1) AC Adapter Jack (p.
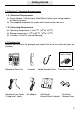
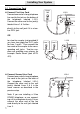
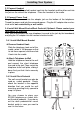
Installing Your System 3.1 Connect Line Cord Connect First Line Cord Connect one end of a long telephone line cord to the jack on the bottom of the telephone labeled L1/L2. Connect the other end to the jack(s) labeled Lines 1 & 2 either: Lines 1&2 L1/L2 directly to the wall jack if it is a twoline RJ14 jack OR to a two-line coupler (not provided) if you have two single-line RJ11 jacks for lines 1 and 2. Then connect the two cords of the coupler to the corresponding wall jacks.
Installing Your System 3.2 Connect Handset Plug either end of the coiled handset cord into the handset and the other end into the jack on the side of the telephone. Place the handset in the cradle. 3.3 Connect Power Cord Plug the AC power cord into the adapter jack on the bottom of the telephone. Thread the power cord into the recessed groove. Plug the AC adapter into an electrical outlet not controlled by a wall switch. 3.
Installing Your System 3.5 Setting User PIN To Enter User Mode 1 Press PROGRAM button. 2 Press the soft key under NEXT, then “ Enter Code:” appears in the display. 3 To enter User mode, simply enter the User password. - The default User password is *718. Note: If in case that the Toll restriction access code password is forgotten, please contact your local dealer or the support centre, for master reset. This will bring the passwords back to 1234. 3.
Setting Up Your System 4.1 Setting Up Your System At A Glance The following must be done at each station: Program Factory Setting Page None Set 4 No Restrictions 5-8 Ring 34 Program Factory Setting Page Set Toll Restriction Access Code 1234 5 Store Shared Directory Dial Numbers None Stored 27 Name Stations None Named 37 Set Distinctive Ringing Toll Restriction Select Intercom Ring, Voice or Handsfree The following must be done at Station #11: 4.
Setting Up Your System 4.3 Setting Up Toll Restriction 4.3.1 To set the system’s toll restriction access code: At Station #11: 1 Press PROGRAM NEXT Enter code: *718. 2 Press the soft key under NEXT repeatedly, until “ Toll Restriction” appears in the display, and then press ENTER. - The display will read “ Access Code:****. ” 3 Press the soft key under CHANGE if you wish to store a new access code. 4 Enter a 4 digit number. 5 Press PROGRAM to exit.
Setting Up Your System 4.3.2 To set the restricted numbers at a particular telephone: 1 Press PROGRAM NEXT Enter code: *718. 2 Press the soft key under NEXT repeatedly, until “ Toll Restriction” appears in the display, and then press ENTER. - The display will read “ Enter Code: ” 3 Enter the 4 digit toll restriction access code which was set at Station #11 (See preceding page).
Setting Up Your System 4.3.3 To set the allowed numbers at a particular telephone: 1 Press PROGRAM NEXT Enter code: *718. 2 Press the soft key under NEXT repeatedly, until “ Toll Restriction” appears in the display, and then press ENTER. - The display will read “ Enter Code: ” 3 Enter the 4 digit toll restriction access code which was set at Station #11 (See page 5). - You will hear a confirmation beep and the display will read “ Set Restricted #” 4 Press the soft key under NEXT.
Setting Up Your System 4.3.4 To completely restrict specific lines at a telephone: 1 Press PROGRAM NEXT Enter code: *718. 2 Press the soft key under NEXT repeatedly, until “ Toll Restriction” appears in the display, and then press ENTER. - The display will read “ Enter Code:” 3 Enter the 4 digit toll restriction access code which was set at Station #11 (See page 5).
Operating Your System 5.
Operating Your System 5.2 Adjusting Volume Levels To adjust the ringer volume: While the phone is on-hook and idle: 1 Press the up and down VOLUME buttons to set desired ringer volume. With each press, the phone will ring once at the new volume. VOLUME Press to raise volume Press to lower volume To adjust the handset volume: While using the handset: 1 Listen to dial tone or voice. 2 Press the up and down VOLUME buttons to set desired handset volume.
Operating Your System 5.3 Making and Answering a Call To make and answer calls using the handset: 1 Lift the handset. If you wish to override automatic line selection, press desired LINE button before lifting the handset. 2 Replace the handset in the cradle to hang up. You can lift the handset to make a call, the phone selects a line according to its automatic line selection setting. If you lift the handset while your phone is ringing, your phone will automatically select the ringing line.
Operating Your System 5.4 Using Redial 1 Press REDIAL. 2 Press the right arrow button under the display to scroll through a list of the last five numbers dialed, along with the date, time and duration of each call. The Redial feature enables you to redial or simply view any of the last five telephone numbers you dialed, along with the time, date and duration of each call.
Operating Your System 5.6 Using Another Line During a Conversation 1 Press HOLD to place the first call on hold. 2 Press another LINE button to make a call on that line. 3 Or, press the flashing LINE button to answer the incoming call. While having a conversation on one line, you may make a call on another line. Press HOLD to place your first call on hold and then press another LINE button to make a second call.
Operating Your System 5.7 Conferencing Calls To conference two outside calls: 1 Make or answer a call. CONFERENCE 2 Press HOLD. 3 Make or answer a call on another line. FLASH The Conference button allows you to join two outside calls, or another station to an outside call 4 When the second call is connected, press the CONFERENCE button. The lines are immediately conferenced. 5 To end a conference call, hang up. Both parties will be disconnected.
Operating Your System 5.8 Transferring Calls 5.8.1 Transferring an Outside Call to Another Station To transfer a call after first announcing it to the other station: 1 Place an intercom call to the desired station. The outside call is automatically placed on hold. 2 Wait for an answer. Announce that you are transferring the call. 3 Press the TRANSFER button.
Operating Your System 5.8.2 Transferring an Outside Call to All Stations To use the transfer ring: 1 Press TRANSFER twice. All the other phones will now ring with the transfer ring. To use one of eight personal rings: 1 Press TRANSFER and then the desired dial pad number buttons (from 31-38). All the other phones will now ring with the personal ring represented by that number.
Operating Your System 5.9 Using Caller ID 1 Press CALLER ID. Press CALLER ID and the arrow buttons to view the caller list 2 Use the right and left arrow buttons under the display to view the caller list. 3 To dial a number in the caller list, lift your handset, or press DIAL, or SPEAKER, or a LINE button when the desired number is displayed.
Operating Your System 5.10 Using Telephone Company Voice Mail To use your MSG lamp to indicate voice mail messages: 1 Subscribe to voice mail service from your local Telephone Company. 2 Follow the instructions at right to set your voice mail detector to the proper line. - The MSG lamp will now flash whenever you have new messages. To access your voice mail messages: 1 Dial the number for your Telephone Company voice mail service.
Operating Your System 5.11 Using Flash 1 Press FLASH instead of the switch-hook when using custom calling services or when activating certain Centrex or PBX features. Press the FLASH button instead of pressing the switchhook to activate services such as Call Waiting or 3-Way Calling, or to activate certain PBX or Centrex features. You may be required to press other buttons before or after you press FLASH.
Operating Your System 5.13 Using Do Not Disturb (DND) To activate Do Not Disturb: 1 Press PROGRAM NEXT Enter code: *718. 2 Press the soft key under NEXT repeatedly, until “Don’t Dsturb:OFF” appears in the display. 3 Press the soft key under CHANGE. The display will now read “Don’t Dsturb:ON”. 4 Press PROGRAM to exit. You will notice that your phone’s DND indicator in the display is now on, and your telephone’s display will read “Do Not Disturb.
Operating Your System 5.14 Releasing Call Privacy If your system is set to have call privacy normally ON, it will automatically be on during each call. The CONFERENCE button is 1 Press the CONFERENCE button also used to release Call Privacy any time you wish to turn the call off during a call privacy OFF during a particular call. “Privacy Released” will appear in the display to indicate that call privacy is temporarily off.
Operating Your System 5.15 Using the Call Timer To view the elapsed time during your call: Simply view the display, which will automatically display the elapsed time during a call. To restart the timer from zero: Press the left arrow (<)button, which is found directly below the display. To view the length of your previous five calls: While the phone is on-hook and idle, press REDIAL. The display will show the elapsed time of the previous call, along with its time and date.
Operating Your System You can use your headset to make or answer an outside call, an intercom call or a page. Simply press the HEADSET button instead of lifting the handset. During a call, you may switch back and forth between handset and headset and speakerphone as much as you like. Note that whenever the HEADSET indicator is on, you may hang up the handset without disconnecting your call. 5.17 Adjusting Your Telephone’s Time and Date 1 Press PROGRAM NEXT Enter code: *718.
Memory Dialing 6.1 Memory Features Your EP4300 telephone can store up to 66 of your most often dialed numbers in its memory.
Memory Dialing 6.2 Using Memory Dial 6.2.1 To store a memory dial number: 1 Press PROGRAM. 2 Press the soft key under MEM. - The display will read “Select Location” Press Memory button to dial numbers in white spaces Press LOWER, then Memory button to dial numbers in gray spaces 3 Press the Memory button where you wish to store the number, or press LOWER followed by the desired memory button if you wish to store the number in a lower memory location.
Memory Dialing 6.3 Using Personal Directory Dial 6.3.1 To store a personal directory dial number: 1 Press PROGRAM. 2 Press the soft key under MEM. - The display will read “ Select Location” 3 Press the “ # ” button. - The display will read “ Empty Location, ” or indicate that your personal directory is full. 4 Press the soft key under CHANGE if you wish to store a new number, or press NEXT repeatedly until you see the previously stored entry you would like to change, and then press CHANGE.
Memory Dialing 6.3.2 To dial a personal directory number: 1 While the phone is on-hook and idle, press the “ # ” button. - The display will read “ Personal Dir. ” 2 Use the right and left arrow buttons below the display to view the personal directory entries. Note: The directory is organized alphabetically, and you may jump to your desired entry, or one close to it, by pressing the corresponding dialpad number.
Memory Dialing 7 Press the soft key under SAVE. The Shared Directory Dial feature allows you to store an additional 40 telephone numbers into memory at Station #11 and dial them from any phone in the system. Note that you can enter hyphens in your numbers for easy reading, as well as flashes and pauses (see page 29). If you would like to erase the shared directory numbers, please follow the instructions found on page 30.
Memory Dialing 6.5 Special Memory Features Storing a hyphen into memory: You can store hyphens in your memory dial numbers for easy reading. To insert a hyphen into a number you are storing, press PAGE. Each press of PAGE will insert a hyphen. Storing a dialing pause into memory: You can store a pause in a memory location for use with certain banking and long distance services.
Memory Dialing Storing a Caller ID number into memory: To store a caller ID number into memory, follow the instructions for entering a number into memory, simply press REDIAL button. You may then press the soft key under SCROLL to scroll through the Caller ID list. Press the memory button, where you wish to store the number. Note that you can store caller ID names and numbers into private and shared directories as well into memory button locations.
Intercom Operation 7.1 Making Intercom Calls To intercom another station: 1 Press the INTERCOM button, then dial the two-digit station number of the station you wish to intercom. Use the INTERCOM button and the dialpad to make intercom calls to other stations 2 To end the conversation, hang up or press the SPEAKER button. To intercom another station while you are on an outside call: 1 Press the INTERCOM button. The outside call is automatically placed on hold.
Intercom Operation 7.2 Answering Intercom Calls 7.2.1 To answer an intercom call: A If your phone is set to INTERCOM RING: Press the SPEAKER button or lift the handset and begin talking. B If your phone is set to INTERCOM VOICE: You will hear one ring, then an alert tone followed by the caller’s voice. To answer the voice call at any time, press the SPEAKER button or lift the handset and begin talking.
Intercom Operation 7.3 Making Pages To page another station: 1 Press PAGE. 2 Dial the two-digit station number of the station you wish to page. 3 After you hear the paging tone, speak towards the telephone or lift the handset and make your announcement. Press PAGE followed by a station button to make a page to that station TRANSFER Press PAGE twice to make an All Page PAGE REDIAL To make an All Page: 1 Press the PAGE button twice.
Intercom Operation 7.4 Answering Pages To answer a page directed to your station or an All Page: 1 Lift the handset or press the SPEAKER button, or press the flashing INTERCOM button. 2 Hang up the call. Once you hear the announcement, you may answer a page directed to your station by pressing the flashing INTERCOM button. You may answer an All Page by pressing the flashing INTERCOM button. In either case you will then be connected to the caller in a private intercom conversation.
Intercom Operation 3 Press the soft key under CHANGE repeatedly, until the desired intercom setting is displayed. The choices are: Intcm: RING (factory setting) Intcm: VOICE Intcm: HANDSFREE 4 Press PROGRAM to exit. INTERCOM RING: When someone makes an intercom call to you, your telephone will ring repeatedly with the intercom ring. You may respond to the call by lifting the handset or pressing the SPEAKER button.
Intercom Operation Your EP4300 telephone will allow you to make an intercom call to another station, even if that station is busy on an outside call. Your voice will be heard through the speaker of the called station without interrupting their call in progress. Note: If the station you are calling is busy on the speakerphone or has blocked Off Hook Voice Announcements, you will still be able to alert the station with a single ring, but you will not be able to make your voice announcement.
Intercom Operation The remote station must be set to INTERCOM HANDSFREE. When you call this phone on the intercom, its speakerphone activates and remains on, allowing you to hear sounds in that room until you hang up. To prevent sounds in your room from being transmitted to the room you are monitoring, you must press MUTE on your phone. 7.8 Naming Stations At Station #11: 1 Press PROGRAM NEXT Enter code: *718.
Centrex Operation 8.1 Using the Dial Prefix 1 Press the desired LINE button. 2 Press CALLER ID. 2 Use the right and left arrow buttons under the display to view the caller list. 9,5551830 00:03 3 To dial a number in the caller list, press DIAL to make an outside call. - The display will show the prefix number such as “9,”, and the number you desired.
Additional Information 9.1 Using Other Telephones With Your EP4300 Telephone Using other EP4300 intercom telephones Your EP4300 telephone is fully compatible with other EP4300 intercom phones. You may mix and match basic, voice mail, and cordless versions as well as mixing and matching EP4300 telephones with different numbers of lines. The EP4300 system boasts flexibility as well as expandability.
Additional Information 9.2 Using the Data/Fax Jack To connect a modem or a fax machine to your EP4300 phone: 1 Simply plug your modem or fax machine into the data/fax jack on the side of the telephone. The data/fax jack is found on the right side of your Ep4300 phone For added convenience, you may connect modems or fax machines to the telephone line by plugging them into the data/fax jacks, which are found on the right side of the EP4300 telephones. Note that the data/fax jack is connected to Line 2. 9.
Additional Information 9.4 Replacing Your Battery Your EP4300 telephone uses AC power from a standard wall outlet. As long as the telephone is connected to a wall outlet, it will operate using the AC power. Please remember to plug your telephone into a wall outlet that is not controlled by a wall switch. If AC power is disconnected or there is a power failure, the telephone automatically switches to battery operation for approximately two hours.
42
EP4300 UG Feb 2007 Version 1.