4-Line System Speakerphone Please read before using this equipment.
ˆ Important Information This phone is ETL listed to UL standards and meets all applicable FCC standards. WARNING: To reduce the risk of fire or shock hazard, do not expose this product to rain or moisture. CAUTION RISK OF ELECTRIC SHOCK. DO NOT OPEN. ! CAUTION: TO REDUCE THE RISK OF ELECTRIC SHOCK, DO NOT REMOVE COVER OR BACK. NO USER-SERVICEABLE PARTS INSIDE. REFER SERVICING TO QUALIFIED PERSONNEL.
You must not connect your phone to: • coin-operated systems • party-line systems • most electronic key phone systems This phone complies with the limits for a Class B device as specified in Part 15 of the FCC Rules. These limits provide reasonable protection in a residential area. However, your phone might cause TV or radio interference even when it is operating properly. To eliminate interference, you can try one or more of the following corrective measures.
ˆ Contents Features .................................................................................................................................. 6 Installation .............................................................................................................................. Installing Backup Batteries ................................................................................................ Selecting a Location .........................................................................
Intercom and Paging Operation ......................................................................................... Making an Intercom Call ................................................................................................. Answering an Intercom Call ............................................................................................ Paging One Station ........................................................................................................ Paging All Stations ......
ˆ Features Your RadioShack 4-Line System with Caller ID and Headset Jack is a complete four-line telephone system that shows the caller's telephone number (and name, if available in your area) and the date and time of each call, as provided by your local telephone company to Caller ID service subscribers. You can connect up to four separate telephone numbers to up to 12 individual system phones and use each number as an extension telephone station to make and receive calls.
ˆ Installation To fully use the phone's features with all 4 lines, you must connect it to four separate telephone lines, each with its own telephone number. However, you can choose to connect the phone to only one, two, or three telephone lines. Important: You must connect the phone to the telephone lines before you plug in its AC adapter.
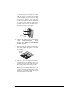
1. Use a Phillips screwdriver to remove the screw from the battery compartment cover, then remove the cover by pressing the cover's tab and lifting the cover off. Cautions: You must use a Class 2 power source that supplies 12V DC and delivers at least 400 mA. Its center tip must be set to positive and its plug must fit the phone's POWER 12VDC 400mA jack. The supplied adapter meets these specifications. Using an adapter that does not meet these specifications could damage the phone or the adapter. ! 2.
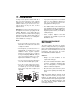
4. Insert the tabs on the narrow end of the mounting bracket into the upper slots near the center of the base, push the wide end of the bracket until it clicks into place, then place the phone on the desk. 1. Remove the mounting bracket from the bottom of the base by pressing and holding in both spring tabs, then gently pulling the wide end of the bracket and lifting it off. Wide End 5.
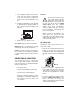
To mount the phone directly on a wall, with the power cord and the modular cords hanging over the bracket, align the phone's keyhole slots with the screws and slide the phone downward to secure it, then plug the ends of the modular cords into the modular phone line jack(s) for Line 1 through 4. 6. Plug the AC adapter into a standard AC Initializing.. briefly outlet. appears, then JAN 01 12:00 AM/EXT 11 FRI appears. 7.
ˆ Preparation SETTING EXTENSION NUMBERS for another station, the phone rings and displays EXT 00 until you select an available extension number. When you connect more than one phone, you must also set a different extension number for each station so you can use the paging and intercom features. SETTING THE DIALING MODE Follow these steps to set the extension number for each phone station. Follow these steps to set the phone for the type of service you have — tone or pulse.
Notes: 4. Press 1 to enable or 0 to disable the telephone line. • You must enter two digits for the month, date, hour, and minute. • The clock uses the 12-hour format. 5. Press HOLD. The phone beeps once. SETTING THE AREA CODE Follow these steps to set the time and date. 1. Press CLOCK/FORWARD. SET DATE/ TIME 00:00 6 00:00 AM appears. 2. Enter the desired values. The telephone rings after you enter the last setting.
RESETTING THE PHONE 3. Press PRIVACY to store the setting. The phone rings. Follow these steps to clear the stored information in the phone. 1. Press PROGRAM. MEMORY appears. 2. Press ∗ # ∗ #. Item Note: The first phone you connect to Line 1 is automatically set to Extension 11. Any additional 4-Line System Speakerphones you connect to Line 1 and reset continues to ring and displays EXT 00 until you set a new extension number (see “Setting Extension Numbers” on Page 11).
ˆ Telephone Operation LINE STATUS Each line’s button has a status indicator. Indicator Status Off Not in use Flashes once every 2 seconds In use Flashes once every 2 seconds Incoming call Flashes 4 times every second A call is on hold Flashes once every second A call is on hold at another station Note: The indicator’s flashing duration when the line is in use is longer than the flashing duration for an incoming call.
SWITCHING BETWEEN THE HANDSET AND THE SPEAKERPHONE To switch from the handset to the speakerphone during a call, press SPKR PHONE. The SPKR PHONE indicator lights. Then place the handset on the base. To switch from the speakerphone to the handset, just lift the handset and resume your conversation. The speakerphone and the SPKR PHONE indicator automatically turn off. Note: When you use the speakerphone, only one extension can talk over the phone line at a time.
USING HOLD Notes: • Be sure to cancel auto redial if you leave the area of your telephone. Otherwise, your phone will hang up 30 seconds after the called person answers, then will redial again 30 seconds later, up to ten times. This could be annoying to the called person and, if you are calling a long-distance number, you are charged for each call. • You can also use auto redial to automatically redial a number from a Caller ID record up to ten times.
Note: After the timer reaches 59 minutes, 59 seconds, it starts counting again from 0 minutes, 0 seconds unless you stop it. With One Outside Caller and One or More Internal Stations To stop the timer, press TIMER/BACKWARD again. Follow these steps to have a conference call with one outside caller and any or all other internal stations. The display automatically returns to the current time display within 6 seconds after you stop the timer or hang up the phone. 1.
Notes: • If you call a station that is using DND, you hear a busy signal. • If you are using DND when an intercom call comes in, the intercom indicator blinks rapidly and the caller's number appears on the display. If you choose to answer the call, press INTERCOM. USING TONE SERVICES ON A PULSE LINE Some special services, such as bank-byphone, require tone signals. If you have pulse service, you can still use these special tone services by following these steps.
Clearing Memory Numbers To clear a number stored in an upper memory position, press PROGRAM then the desired memory location button. To clear a number stored in a lower memory position, press PROGRAM, LOWER then the desired memory location button. The telephone rings once to indicate the number is cleared. Entering a Pause In some telephone systems, you must dial an access code (9, for example) and wait for a second dial tone before you can dial an outside number.
5. When you finish the conversation, press SPKR PHONE to hang up. Note: Connecting a headset disconnects the handset's earpiece and microphone. Be sure to replace the headset jack's rubber cover when you finish using a headset. ˆ Intercom and Paging Operation You can call other stations connected to the same phone line using either the intercom or the paging feature. appears, and you hear a steady tone through the speaker or headset.
3. When the person answers, talk into the speakerphone or handset. 4. To end an intercom call, press SPKR PHONE or hang up the handset. 3. Lift the handset and speak your announcement or talk into the speakerphone. Notes: ANSWERING AN INTERCOM CALL • You can change from an individual page to an intercom call by pressing INTERCOM.
TRANSFERRING A CALL 2. Press INTERCOM (or PAGE). INTERCOM indicator flashes. If a caller asks to speak to someone at another extension, you can transfer the call using either the intercom or paging function. 3. Dial the extension number. 1. Press HOLD to place the call on hold. The 4. When the person answers, tell the person which line to pick up, then hang up the handset or press SPKR PHONE.
Display Out of Area Error Description The caller is not within a Caller ID service area. No caller information appears. Appears when the Caller ID information is garbled, or when there is an error during the transmission of Caller ID information. Private The caller has blocked the Caller ID information from being sent. MSG WAIT: X You have a message waiting (if you subscribe to your phone company’s message waiting service). X indicates the line number that received the message.
1. Press LOWER, then repeatedly press TIMER/BACKWARD CLOCK/FORor WARD until the record you want to delete appears. DND/DELETE. Deleted? 2. Press appears. Press DND/DELETE again. The phone rings once and Deleted appears. Follow these steps to delete all Caller ID records. 1. Press LOWER then press TIMER/BACKWARD or CLOCK/FORWARD once. TOTAL: XX NEW CALLS: XX appears. 2. Press DND/DELETE. Delete All? appears. Press DND/DELETE again. ALL Deleted appears to indicate all call records are deleted. 2.
ˆ Troubleshooting We do not expect you to have any problems with your phone, but if you do, these suggestions might help. Problem Suggestion Cannot set up the dialing mode, date and time, area code, ringer volume, speakerphone extension number and speakerphone/headset/handset volume levels You cannot proceed to set up while you are talking or reviewing the Caller ID information. The stored information, such as the dialing mode, area code, or ringer volume is cleared.
Problem The phone does not work or works poorly. Suggestion Be sure the phone line cords and AC adapter are properly and securely connected. Be sure the batteries are fresh and are properly installed (see “Installing Backup Batteries” on Page 7). Be sure TONE/PULSE is set to the correct mode. The phone does not work while using the headset. Be sure the headset is securely connected. If you still have problems, disconnect the phone.
ˆ Notes Notes 27
Limited One-Year Warranty This product is warranted by RadioShack against manufacturing defects in material and workmanship under normal use for one (1) year from the date of purchase from RadioShack company-owned stores and authorized RadioShack franchisees and dealers.