Please read before using this equipment.
Contents Features ................................................................................. 3 Safety Warning System ................................................... 4 A Quick Look ......................................................................... 6 Installation ............................................................................. 7 Selecting a Mounting Location ........................................ 7 Windshield Mounting .......................................................
Features Your RadioShack 360° Laser/Radar Detector can alert you to all known police traffic radar and laser systems with its distinct visual and audio alerts. It receives X-, K-, and Ka-band radar signals, and detects both the instant-on and laser systems many police departments use to measure vehicle speed. Your detector can also give you advance warning of potential road hazards by detecting signals from transmitters that broadcast Safety Warning System alerts.
VG-2 Protection — makes your detector invisible to the VG-2 radar-detector when it senses VG-2 operation. City/Highway Modes — let you minimize alerts when you are in areas that have false radar sources. City/Highway Selector and City/Highway Indicator — displays the mode currently selected. FAST (False Alert Suppression Technology) — helps prevent false alarms caused by non-traffic radar sources. Tutorial Mode — helps you learn to recognize the detector’s tones and displays.
The system has the potential to dramatically decrease the occurrence of traffic accidents by increasing drivers’ awareness of local road hazards. Having this safety alert compatible radar/laser detector will ensure that you can benefit from this system wherever it is in use.
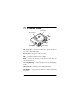
A Quick Look DC 12V Jack 360° Laser Eye CITY MUTE DIM Display VOLUME/OFF LED Compass 360° Laser Eye — receives incoming laser signals directed at your vehicle from all directions DC 12V Jack — the power cord connection DIM — controls the brightness of the display MUTE — silences the alert tone for about 20 seconds after the current signal is lost CITY (City/Highway) — switches between the city and highway modes LED Compass — indicates your heading information VOLUME/OFF — lets you turn the detector o
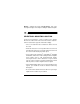
Display — indicates the mode (City/Highway), type of signal, signal strength, and compass heading for detected signals. Installation SELECTING A MOUNTING LOCATION For the best performance, select a location for the detector where it has a direct view of the road. The detector’s radar antenna is located at the opposite end from the display. • Choose a location that does not block the driver’s view of the road.
Caution: When not in your vehicle, place your detector out of view to help discourage theft and to protect it from high temperatures. Note: Though the detector has a 360° laser and radar detection range, radar detection is more sensitive in the front range. WINDSHIELD MOUNTING The supplied suction-cup windshield bracket lets you easily mount the detector on the windshield.
3. To adjust the mounting angle, remove the detector from the bracket. Then remove the bracket from the windshield and adjust it by carefully bending it. HOOK-AND-LOOP MOUNTING In some vehicles, the dashboard may be the best location to mount the detector. For this mounting, use the supplied hookand-loop tape as follows: 1. Use a damp cloth to clean the bottom of the stand and the dashboard. Let both surfaces dry.
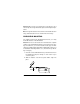
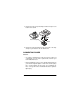
3. Remove the tape’s paper backing and stick the tape to the bottom of the stand. Tabs Hook and Loop Tape Stand 4. Remove the paper backing from the other side of the tape and press your detector onto the dashboard. CONNECTING POWER Caution: • Use only the supplied power cord. If your power cord is lost or damaged, you can order a replacement cord from your local RadioShack store.
• Unplug the power cord’s plug from the vehicle’s cigarettelighter socket when you turn off the ignition. This prevents the vehicle’s battery from being drained if the detector is left on when the ignition is turned off. Plug the supplied power cord’s barrel plug into the detector’s DC 12V jack. Then plug the cord’s cigarette-lighter plug into your vehicle’s cigarette-lighter socket.
You must calibrate the detector when: • It is being used for the first time. • It is moved to a different location within the vehicle, or if it is removed and placed in another vehicle. • DISTORT appears. Note: You must complete the circles in less than 2 minutes. Otherwise, begin again from step1. Follow these steps to calibrate your detector. 1. Hold down CITY for about 2 seconds until CAL.... appears. TURN and TWICE flash alternately. 2.
testing, heading information and HWY appear. (See “Selecting the City and Highway Modes” on Page 14.) To turn off the detector, rotate VOLUME/OFF toward OFF until it clicks and the display turns off. ADJUSTING THE VOLUME Rotate VOLUME/OFF toward VOLUME to increase volume, or toward OFF to decrease volume. USING THE TUTORIAL Use the tutorial mode to familiarize yourself with the display. 1. Hold down DIM and CITY (at the same time) then turn on the detector. TUTORIAL and MODE flash alternately. 2.
OPERATION SETTINGS Selecting the City and Highway Modes Your detector has two operating modes: city and highway. In city mode, the detector requires a stronger X-, K-, or Ka-band signal before it sounds or displays an alert. Notes: • City mode helps prevent false alerts in highly populated areas, where radar signals can bounce off surrounding structures. • The city mode has no effect on laser alerts or instant-on radar. The highway mode provides maximum sensitivity for open-road driving.
Muting the Audio Alert When the detector sounds a radar or safety alert signal, press MUTE to temporarily silence the detector. When you press MUTE, M appears. The detector resets MUTE to go off 20 seconds after the signal stops. Or, press MUTE again before it resets, and M disappears. The laser alert signal remains audible even if you press MUTE. Selecting VG-2 Mode VG-2 mode is preset to off. To turn on VG-2, hold down MUTE until VG2-ON appears. To turn VG-2 off, hold down MUTE until VG2-OFF appears.
When your detector senses an Ultralyte laser signal, ULTRALYTE LASER scrolls and the Ultralyte laser alert tone sounds. When your detector senses a VG-2 signal, VG-2 appears and the VG-2 alert tone sounds. When your detector senses a SWS signal, a message describing the detected signal appears and an alert tone sounds.
Category 2: Highway Hazard Zone Advisory I STATIONARY POLICE VEHICLE AHEAD TRAIN APPROACHING/AT CROSSING LOW OVERPASS AHEAD DRAW BRIDGE UP OBSERVE BRIDGE WEIGHT LIMIT ROCK SLIDE AHEAD SCHOOL ZONE AHEAD ROAD NARROWS AHEAD SHARP CURVE AHEAD PEDESTRIAN CROSSING AHEAD Category 3: Highway Hazard Zone Advisory II DEER/MOOSE CROSSING BLIND/DEAF CHILD AHEAD STEEP GRADE AHEAD/TRUCK USE LOW GEAR ACCIDENT AHEAD POOR ROAD SURFACE AHEAD SCHOOL BUS LOADING/UNLOADING NO PASSING ZONE DANGEROUS INTERSECTION AHEAD STATIONA
Category 4: Weather Related Hazards HIGH WIND AHEAD SEVERE WEATHER AHEAD HEAVY FOG AHEAD HIGH WATER/FLOODING AHEAD ICE ON BRIDGE AHEAD ICE ON ROAD AHEAD BLOWING DUST AHEAD BLOWING SAND AHEAD BLOWING SNOW WHITE OUT AHEAD Category 5: Travel Information/Convenience I REST AREA AHEAD REST AREA WITH SERVICE AHEAD 24 HOUR FUEL SERVICE AHEAD INSPECTION STATION OPEN INSPECTION STATION CLOSED REDUCE SPEED AREA AHEAD SPEED LIMIT ENFORCED HAZARDOUS MATERIALS EXIT AHEAD CONGESTION AHEAD/EXPECT DELAY EXPECT 10 MINUTE
Category 6: Travel Information/Convenience II EXPECT 20 MINUTE DELAY EXPECT 30 MINUTE DELAY EXPECT 1 HOUR DELAY TRAFFIC ALERT/TURN ON AM RADIO PAY TOLL AHEAD TRUCKS EXIT RIGHT TRUCKS EXIT LEFT Category 7: Fast/Slow Moving Vehicles EMERGENCY VEHICLE IN TRANSIT POLICE IN PURSUIT OVERSIZED VEHICLE IN TRANSIT SLOW MOVING VEHICLE Operation 19
Troubleshooting If you have problems operating your detector, these suggestions might help. If you cannot solve the problem after trying these suggestions, take your detector to your local RadioShack store for assistance. Problem The detector does not turn on. Suggestion Be sure all power connections are secure. The cigarette-lighter socket might be dirty. Clean it with fine emery cloth to ensure a good, clean connection. Check the fuse in the power cord’s cigarettelighter plug.
Problem The detector performs the self-test, but does not respond to radar signals when you see a police car. The detector has poor laser detection range. Suggestion A police car might not be equipped with radar (see the supplied booklet, Questions and Answers About Vehicle Speed Detection). Police might be using VASCAR-type speed detection (see the supplied booklet, Questions and Answers About Vehicle Speed Detection). Be sure the laser detection lens is not blocked.
Modifying or tampering with the detector’s internal components can cause a malfunction and might invalidate its warranty. If your detector is not performing as it should, take it to your local RadioShack store for assistance. REPLACING THE FUSE If the detector stops operating, follow these steps to check the fuse in the power cord's cigarette-lighter plug and replace it with a 2-amp, 11/4 × 1/4 fast-acting fuse.
3. Check the fuse. If it has blown, replace it. 4. Replace the metal tip inside the ring, making sure the spring is intact, then place the fuse inside the adapter and screw the ring back onto the adapter. Make sure the tip is visible when you reassemble the adapter. Caution: Never use pliers or other tools to retighten the ring on the cigarette-lighter plug.
Limited One-Year Warranty This product is warranted by RadioShack against manufacturing defects in material and workmanship under normal use for one (1) year from the date of purchase from RadioShack company-owned stores and authorized RadioShack franchisees and dealers.