2.4 GHz Digital Spread Spectrum Cordless Telephone Please read before using this equipment.
ˆ Read This First This phone has been tested and found to comply with all applicable UL and FCC standards. Where Caller ID is offered, one or more options are generally available: • caller’s number only WARNING: To reduce the risk of fire or shock hazard, do not expose this product to rain or moisture. • caller’s name and number. IMPORTANT SAFETY INSTRUCTIONS CAUTION RISK OF ELECTRIC SHOCK. DO NOT OPEN.
ers or aerosol cleaners. Use a damp cloth for cleaning. 9. Do not use this product near water, for example, near a bath tub, wash bowl, kitchen sink, or laundry tub, in a wet basement, or near a swimming pool. 10. Do not place this product on an unstable cart, stand, or table. The product may fall, causing serious damage to the product. 11. Slots and openings in the telephone’s cabinet and the back or bottom are provided for ventilation.
BATTERY SAFETY INSTRUCTIONS draw as the phone’s ringer equivalence number, or REN. The REN is on the bottom of your phone. CAUTION: TO REDUCE THE RISK OF FIRE OR INJURY, READ AND FOLLOW THESE INSTRUCTIONS. 1. Use only the appropriate type and size battery pack specified in the instruction manual provided for this product. 2. Do not dispose of the battery pack in a fire. The cell may explode. Check with local codes for possible special disposal instructions. 3. Do not open or mutilate the battery pack.
THE FCC WANTS YOU TO KNOW Lightning In the unlikely event that your phone causes problems on the phone line, the phone company can temporarily discontinue your service. If this happens, the phone company attempts to notify you in advance. If advance notice is not practical, the phone company notifies you as soon as possible and advises you of your right to file a complaint with the FCC.
ˆ Contents Features .................................................................................................................................. 7 Installation .............................................................................................................................. 8 Mounting the Phone ............................................................................................................. 8 Selecting a Location .................................................................
ˆ Features Your RadioShack 2.4 GHz Digital Spread Spectrum Cordless Telephone uses advanced technology to give you superior audio quality and extended range. The phone’s Caller ID unit records each caller’s telephone number (and name, if available in your area) and the date and time of the call, as provided by your local phone company to Caller ID service subscribers.
ˆ Installation MOUNTING THE PHONE Selecting a Location You can place the phone’s base on a desk or table, or mount it on a standard wall plate or directly on a wall. Choose a location that is: • near an AC outlet • near a telephone line jack • out of the way of normal activities • away from electrical machinery, electrical appliances, metal walls or filing cabinets, wireless intercoms, alarms, and room monitors • away from other cordless phones The base’s location affects the handset’s range.
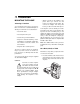
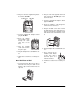
2. Plug one end of the supplied long modular cord into TEL LINE. DC IN 9V Jack TEL LINE 2. Plug one end of the supplied short modular cord into the TEL LINE jack on the back of the base. 3. Insert the supplied AC adapter’s barrel plug into DC IN 9V. 4. Route the adapter’s cord through the strain relief slot on the base. 3. Insert the supplied AC adapter’s barrel plug into DC IN 9V. 5.
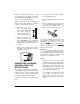
Note: To mount the phone directly on a wall, you need two screws of at least 13/8 inch long (not supplied) with heads that fit into the keyhole slots on the bottom of the base. Follow the steps under “On a Wall Plate or Wall” on Page 9, then apply these additional instructions for placement on a wall. 1. Drill two holes 3 15/16 inches (100 mm) apart. Then thread a screw into each hole, letting the heads extend about 1/8 inch (3 mm) from the wall. /8" 1 1.
• Using a pencil eraser, clean the charging contacts on the handset and base about once a month. • If the battery pack becomes weak during a call, the handset beeps every 3 seconds and Bem 8Wjj[ho flashes. When this happens, you cannot make a call. • About once a month, fully discharge the battery by keeping the handset off the base until Bem 8Wjj[ho flashes. Otherwise, the battery pack loses its ability to fully recharge. • If the display is blank and the phone does not work, recharge the battery pack.
4. Press TALK or place the handset on the base to hang up. 2. Press SELECT/CH to change the auto talk setting. Ed or E\\ appears. 3. Return the handset to the base or press FUNC to store the new setting. SETTING THE RINGER TONE/VOLUME You can select one of four different ringer tone/volume settings on the handset. At any time, except during a call, repeatedly press VOL/CID 8 or 9 to select the desired ringer setting.
Follow these steps to store your area code. 1. Lift the handset and press FUNC. 2. Press 3 or VOL/CID 7h[W 9eZ[. 9 twice to select 3. Press SELECT/CH, then enter your three-digit area code. If you make a misor #/7 to take, repeatedly press 6/ move the cursor over the incorrect digit, then enter the correct number. Note: If an area code is already stored, it appears on the display. To delete the area code, press SELECT/CH, press DEL three times, then enter your area code. 4.
ˆ Operation A QUICK LOOK AT YOUR PHONE The handset window has plastic film on it to protect it during shipment. Carefully peel off the film before using your phone for the first time. VOL 8/9#— To adjust the handset’s volume during a call, press VOL/CID 8 or 9 to select Lebkc[ CWn_ckc, Lebkc[ >_]^, Lebkc[ C[Z_kc, or Leb# kc[ Bem. The phone maintains the setting even after you hang up the phone.
USING TONE SERVICES ON A PULSE LINE Each number can be up to 20 digits, and each name can be up to 13 characters. Some special services, such as bank-byphone, require tone signals. If you have pulse service, you can still use these special tone services by following these steps. Storing a Number and Name in Memory 1. Be sure PULSE-TONE is set to PULSE. 2. Dial the service’s main number. 3. When the service answers, press TONE/ 6/ ). Any additional numbers you dial are sent as tone signals.
Finally, press 6 five times; lower case d appears. Editing or Deleting a Number in Memory To enter two letters from the same key in a row, press #/7 to move the cursor to the next position. For example to enter AB, press 2; 7 appears. Then press #/ 7, the cursor moves to the next position, then press 2 twice so 8 appears. Follow these steps to edit or delete a memory number. To enter a space, press #/7 twice without entering any character.
entry. You can add more pause entries for a longer pause. press MEM and enter the number for the location where the additional information is stored. Reviewing Memory Numbers To review your MEM. The list of (01–20) appears each number (or store a name). memory numbers, press memory location numbers with the name stored with 2C[cehod 2C[cehodd4 if you did not To see the stored phone numbers, press #/ 7. An arrow to the right of the number means it is longer than 13 digits.
• You can use a handset holder (available from your local RadioShack store) to hang the handset on your belt for greater convenience. ˆ Caller ID Operation If you subscribe to Caller ID service from your phone company, the phone company sends information about the call, as well as the time and date, between the first and second rings of every call you receive. The phone displays this information after the second ring, and it stores up to 50 Caller ID records for later review.
tion voice mail, if available. Je Le_Y[ CW_b appears on your phone. Note: Voice Mail is a service available from some telephone companies. A call for a subscriber can be kept at the telephone company and retrieved later on by calling the special number and entering the caller’s phone number and code number. Check with your telephone company to determine if this service is available. Answer/Drop 1 — Disconnects the first call, and connects automatically to the new caller. 7dim[h%:hef 'ij appears.
through the records. To scroll quickly through the records, hold down VOL/CID 8 or 9. When you scroll past the last record, the total record number appears, then the first record. When you scroll past the first record, the total record number appears, then the last record. The top line of each record shows the date, time and the number of calls from that number. The second line shows the caller’s name, and the third line shows the caller’s phone number. To exit the Caller ID record display, press CID.
confirm the replacement. Move the cursor to O[i or De, then press SELECT/CH. DELETING CALLER ID RECORDS You can delete Caller ID records individually or all at once. Follow these steps to delete a single Caller ID record. 1. Press CID then VOL/CID 8 or 9 to recall the record you want to delete. 2. Press DEL. :[b[j[ C[iiW][5 appears, prompting you to confirm the deletion. 3. Press VOL/CID 8 to move the cursor to O[i, then press SELECT/CH or DEL. The phone beeps once indicating that the record was deleted.
ˆ Troubleshooting We do not expect you to have any problems with your phone, but if you do, these suggestions might help. Problem The phone does not work or works poorly. Suggestion Be sure the base’s phone line cord and AC adapter are correctly and securely connected. Be sure the battery pack in the handset is connected and charged. Return the handset to the base for about 5 seconds to reset the security access-protection code. The handset stops working or works poorly during a call.
Problem The handset does not ring or receive a page. Suggestion Move the handset closer to the base. Lift the base’s antenna to a vertical position. Be sure the battery pack in the handset is connected and charged. Move the base away from other electrical devices. You have an incoming call, but do not receive any Caller ID information. Let the phone ring twice before you answer so the phone has time to record the Caller ID information. Check that the phone is correctly and securely connected.
Limited One-Year Warranty This product is warranted by RadioShack against manufacturing defects in material and workmanship under normal use for one (1) year from the date of purchase from RadioShack company-owned stores and authorized RadioShack franchisees and dealers.