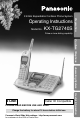
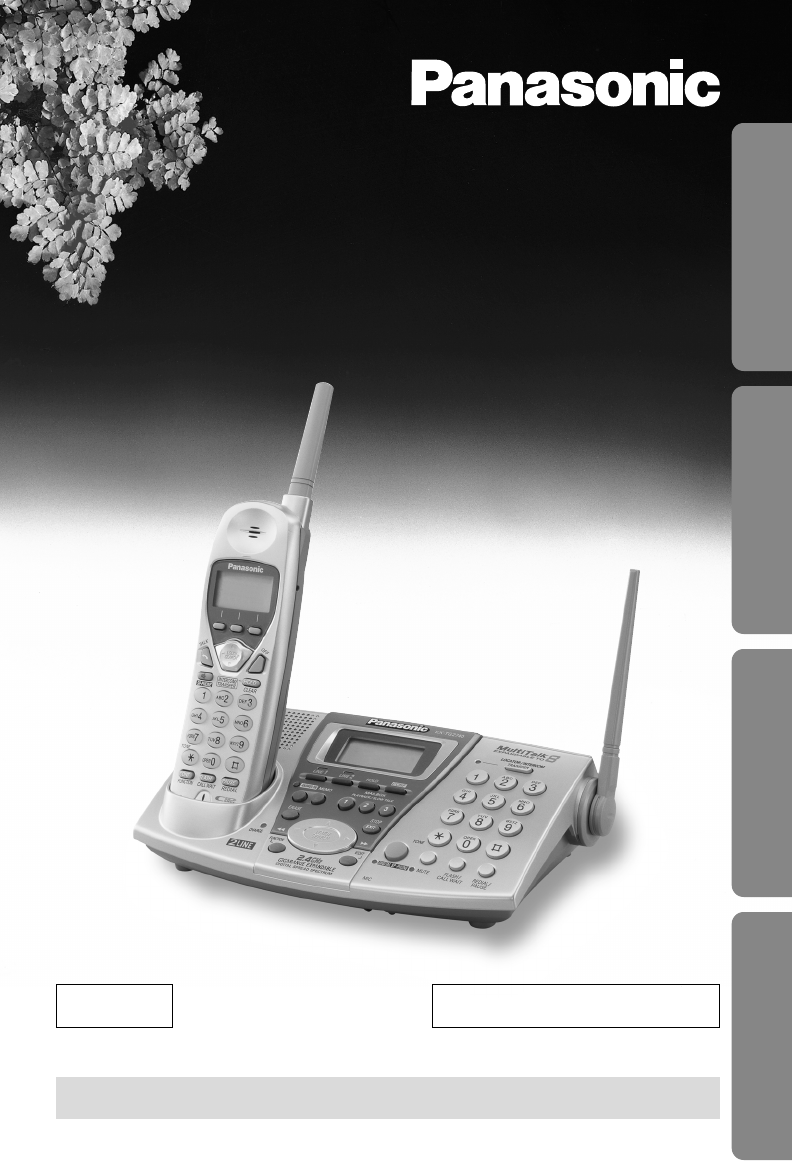
Operating Instructions Model No. KX-TG2740S Preparation 2.4GHz Expandable Cordless Phone System Pulse-or-tone dialing capability Cordless Telephone Answering System Caller ID Compatible PLEASE READ BEFORE USE AND SAVE. Charge the battery for about 15 hours before initial use. Panasonic World Wide Web address: http://www.panasonic.
Thank you for purchasing your new Panasonic cordless telephone. Please read IMPORTANT SAFETY INSTRUCTIONS on page 114 before use. Read and understand all instructions. Caller ID and Call Waiting Service, where available, are telephone company services. After subscribing to Caller ID, this phone will display a caller’s name and phone number.
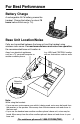
For Best Performance Battery Charge A rechargeable Ni-Cd battery powers the handset. Charge the battery for about 15 hours before initial use (p. 14). Base Unit Location/Noise Calls are transmitted between the base unit and the handset using wireless radio waves. For maximum distance and noise-free operation, the recommended base unit location is: Away from electrical appliances such as a TV, personal computer or other cordless another cordlessphone. phone.
Contents Location of Controls ............ 6 Answering Calls ....................38 Handset .................................39 Base Unit...............................39 Displays................................. 9 Caller ID Service ....................40 Installation ............................ Connecting the AC Adaptor.... Connecting the Telephone Line Cord............ Installing the Battery in the Handset .................................... Battery Charge .....................
Belt Clip ..................................99 Optional Headset ...................99 Wall Mounting.......................100 Adding Another Phone ........102 Battery Replacement............103 Canceling Registration/ Re-registration......................104 Canceling the Handset Registration ..........................104 Re-registering the Handset ..105 Cordless Telephone Answering System Useful Information Preparation Special Features ....................76 Muting Your Conversation.....
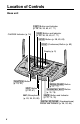
Location of Controls Base unit (LINE1) Button and Indicator (p. 36, 38, 39, 63, 67, 71) (LINE2) Button and Indicator (p. 36, 38, 39, 63, 67, 71) CHARGE Indicator (p. 14) (HOLD) Button (p. 38, 63, 69) (CONF) (Conference) Button (p. 69) Display (p.
Preparation (LOCATOR/INTERCOM/TRANSFER) Button and Indicator (p. 65, 66, 67, 68, 90) MAILBOX Buttons (p. 86, 87, 89) (MEMO) Button (p. 89) Antenna (p. 3, 11) (ANSWER!ON) Button and Indicator (p. 85, 88) Antenna (p. 3, 11) Charge Contacts (p.
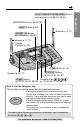
Location of Controls Handset Back side Antenna Speaker (p. 33, 64, 73, 91) Receiver (p. 34) Display (p. 10) Headset Jack (p. 99) OFF T (TALK) Button (p. 32, 39, 66) K AL SP -PH ONE 1 (Speakerphone) Button (p. 33, 39, 66, 91) (TONE) Button (p. 76) 4 7 E TON F C ON TION FUNC CONF (Conference)/FUNCTION OM INTERC SFER TRAN 2 5 8 HOLD R CLEA 3 6 9 0 H FL AS WAIT CALL E PAUS REDIAL Soft Keys (p. 9, 16, 43, 47, 51, 56, 76, 91) Navigator Key ( , , , ) (p.
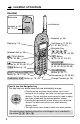
How to use the handset soft keys: Example SP PRIVACY [1] Preparation Three soft keys are used to select functions displayed directly above the keys. Functions displayed above the keys will change depending on the state of usage. For example, on the left display, “ LINE1 ”, “ LINE2 ” and “ PLAY ” are displayed above the soft keys. To operate “ LINE1 ”, press the left soft key. To operate “ LINE2 ”, press the middle soft key. LINE1 LINE2 P L A Y To operate “ PLAY ”, press the right soft key.
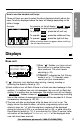
Displays Handset # $% & L1 L2 SP + PRIVACY ' ( [1] Received calls G ) LINE1 LINE2 P L A Y * 01 #“ L1 ” and “ L2 ” (Line status icons) function as follows. Off (invisible) On Flashing The line is free. The line is being used. A call is on hold within this system (handset or base unit) or the Answering System is responding to a call (p. 84). Flashing quickly A call is being received.
Installation Connecting the AC Adaptor Preparation Raise the antennas. Fasten the AC adaptor cord to prevent it from being disconnected. Hook Power Outlet (AC 120 V, 60 Hz) AC Adaptor •USE ONLY WITH Panasonic AC ADAPTOR PQLV10 (Order No. PQLV10Z). •The AC adaptor must remain connected at all times. (It is normal for the adaptor to feel warm during use.) •To connect a standard telephone on the same line, see page 102.
Installation Connecting the Telephone Line Cord Connect the telephone line cord(s) to the unit as follows.
To connect two single-line telephone jacks Preparation Single-Line Telephone Jacks (RJ11C) 2-Wire Telephone Line Cord with TRANSPARENT Plugs LINE 2 LINE 1/2 LINE 2 4-Wire Telephone Line Cord with GREEN Plugs GREEN Plug LINE 1 TRANSPARENT Plug If you use the unit as a single-line telephone only Single-Line Telephone Jack (RJ11C) LINE 2 LINE 1/2 2-Wire Telephone Line Cord with TRANSPARENT Plugs LINE 1 TRANSPARENT Plug For assistance, please call: 1-800-211-PANA(7262) 13
Installation Installing the Battery in the Handset Insert the battery into the handset as shown, matching the correct polarity (#). Press the battery down until it places into the compartment ($). When finished, close the cover. 2 1 Battery Charge Place the handset on the base unit and charge for about 15 hours before initial use. •The CHARGE indicator lights, a beep sounds and “Charging” will be displayed on the handset.
Recharge SP PRIVACY [1] Recharge battery LINE1 LINE2 P L A Y •If you DO NOT recharge the handset battery for more than 15 minutes, the display will continually indicate “Recharge battery” and/or “ ” will flash when the handset is lifted off the base unit. Preparation Recharge the battery when: —“Recharge battery” is displayed on the handset, —“ ” flashes on the display, or —the handset beeps intermittently while it is in use.
Programmable Settings Handset Programming Guidelines and Function Menu LINE1 LINE2 SAVE The handset has programmable functions. Most of them are selected from the function menu on the display (p. 17). Navigator key has four active areas that are indicated by arrows. The key is indicated by the arrows Ñ, Ö, Ü or á in the Operating Instructions. LINE1 LINE2 SAVE The right soft key works as the SAVE key when “ SAVE ” displays above it.
Useful information: Preparation •“---------------” indicates the beginning or end of the function menu. •You can go back to the previous display by pressing Ü except when entering characters or numbers. To return to the main menu from the sub-menu I or sub-menu II, press Ü. •You can exit the programming mode any time by pressing (OFF). •If you do not press any buttons for 60 seconds, the handset will exit the programming mode. •If the unit detects a problem, an error message will be displayed (p. 106).
Programmable Settings Base Unit Programming Guidelines and Function Menu The base unit has programmable functions. Most of them are selected from the function menu on the display (p. 19). (FUNCTION) Navigator key has four active areas that are indicated by arrows. The key is indicated by the arrows Ñ, Ö, Ü or á in the Operating Instructions. (STOP/EXIT) How to select a function item from the menu Make sure the base unit is not being used. 1. Press (FUNCTION). •The main menu is displayed (p. 19).
Base unit function menu table Preparation •You can go back to the previous display by pressing Ü except when entering characters or numbers. To return to the main menu from the sub-menu I or sub-menu II, press Ü. •You can exit the programming mode any time by pressing (STOP/EXIT). •If you do not press any buttons for 60 seconds, the base unit will exit the programming mode. •If the unit detects a problem, an error message will be displayed (p. 106).
Programmable Settings Date and Time Voice Day/Time Stamp: During playback, a synthesized voice will announce the day and time that each message was recorded. Use the base unit. Make sure the base unit is not being used. 1 2 3 4 Press (FUNCTION). --------------- HSave directory Ringer setting Scroll to “Date and time” by pressing Ö or Ñ. Ringer setting HDate and time Copy directory Press á. Date:2002.01.
Dialing Mode With the base unit Make sure the base unit is not being used. 1 2 3 4 5 6 7 Press (FUNCTION). Preparation If you have touch tone service, set to “Tone”. If rotary or pulse service is used, set to “Pulse” using either the base unit or handset. Your phone comes from the factory set to “Tone”. --------------- HSave directory Ringer setting Scroll to “Initial setting” by pressing Ö or Ñ, and press á.
Programmable Settings Line Mode If the line is connected to a low voltage system such as a PBX, set to “B” using either the base unit or handset. Your phone comes from the factory set to “A”. With the base unit Make sure the base unit is not being used. 1 2 Press (FUNCTION). --------------- HSave directory Ringer setting Scroll to “Initial setting” by pressing Ö or Ñ, and press á. Copy directory HInitial setting --------------- 3 Scroll to “Set tel line” by pressing Ö or Ñ, and press á.
Auto Talk Feature 1 Press (CONF/FUNCTION). Preparation The Auto Talk feature allows you to answer a call by lifting the handset off the base unit without pressing or . If you purchase an additional handset (p. 31), you can answer a call by lifting it off the charger. If you want to use this feature, turn the feature ON by programming. Your phone comes from the factory set to OFF. Use the handset. Make sure the handset is not being used.
Programmable Settings Ringer Volume Handset You can select the handset ringer volume for each line. Set to HIGH, MEDIUM, LOW or OFF. If set to OFF, the handset will not ring for the line(s). Your phone comes from the factory set to HIGH. Make sure the handset is not being used. 1 2 3 4 5 6 Press (CONF/FUNCTION). Scroll to “Ringer setting” by pressing Ö or Ñ, and press á. Save directory HRinger setting Copy directory Press á at “Ringer volume”.
Base unit 1 2 3 4 5 Press (FUNCTION). Scroll to “Ringer setting” by pressing Ö or Ñ, and press á. Save directory HRinger setting Date and time Press á at “Ringer volume”. --------------- HRinger volume Ringer tone Press Ö (Line 1) or Ñ (Line 2) to select the line. Select the desired volume by pressing Ö or Ñ. •Each time you press Ö or Ñ, the volume will change and ring. •To turn the ringer OFF: press Ö repeatedly until “Off ?” displays.
Programmable Settings LCD Contrast You can program the handset and base unit LCD contrast (6 levels). Your phone comes from the factory set to level 3. Handset Make sure the handset is not being used. 1 2 3 Press (CONF/FUNCTION), and scroll to “Initial setting” by pressing Ö or Ñ, and press á. Press á at “LCD contrast”. Select the desired contrast by pressing Ö or Ñ. •Each time you press Ö or Ñ, the LCD contrast will change. •The number of steps shows the LCD contrast level.
Preparing the Answering System Caller’s Recording Time 1 2 Press (FUNCTION). Scroll to “Initial setting” by pressing Ö or Ñ, and press á. Preparation You can select “1 minute”, “2 minutes”, “3 minutes” or “Greeting only” for the caller’s recording time. Your phone comes from the factory set to “3 minutes”. Use the base unit. Make sure the base unit is not being used. Copy directory HInitial setting --------------- 3 Scroll to “Set answering” by pressing Ö or Ñ, and press á.
Preparing the Answering System Greeting Message You can record a personal greeting message of up to 2 minutes for each line or a common greeting message for both lines. If a greeting message is not recorded for a line, one of two pre-recorded greetings will be played when a call is received (p. 29). All messages (greeting, incoming, memo, etc.) are stored in digital memory (p. 29). The total recording time is about 15 minutes.
6 Greeting record L1&L2 •The display shows the elapsed recording time. •If you record for over 2 minutes, the unit will automatically stop recording and play back the greeting. When finished, press á (End). Greeting check L1&L2 •The unit will automatically play back the GF recorded greeting. •You can also finish recording by pressing (STOP/EXIT). •To change the greeting or record a greeting for the other line, start again from step 4.
Preparing the Answering System Number of Rings You can select the number of times the unit rings before the Answering System answers a call, from “2” to “7” or “Toll saver”*. Your phone comes from the factory set to “4”. Use the base unit. Make sure the base unit is not being used. 1 2 Press (FUNCTION). Scroll to “Initial setting” by pressing Ö or Ñ, and press á. Copy directory HInitial setting --------------- 3 Scroll to “Set answering” by pressing Ö or Ñ, and press á.
Registration for Additional Handsets KX-TG2740S Preparation KX-TG2740S includes a handset with the base unit. You can expand the system by adding up to 7 optional handsets to the system. A maximum of 8 handsets can be registered at the base unit. Generally a maximum of 3 extensions excluding or including the base unit can operate at a time. If 3 other extensions are in use, such as conducting external/internal calls, you may not be able to use your unit. “System is busy. Please try again later.
Registration for Additional Handsets •You can stop registration by pressing (OFF) on the handset and pressing (MUTE) on the base unit. To re-register a handset to a different base unit of the same model, see pages 104 and 105. Making Calls Two calls can be handled simultaneously on separate telephone lines by the handset and the base unit, or by two handsets (when the system has one or more additional handsets, p. 31).
•To use “ PRIVACY ” and “ MUTE ” features using the soft key (p. 9), see pages 71 and 76. •To use the Reception Booster feature, see page 34. To have a hands-free phone conversation (Using Digital Duplex Speakerphone) 1 3 . L1 SP PRIVACY •A free line is automatically selected and the line status icon is displayed. (To change the line selection, see page 80.) •“SP-phone” is displayed. SP-phone Dial a phone number. SP-phone •The dialed number is displayed.
Making Calls To adjust the receiver volume (HIGH, MEDIUM or LOW) or speaker volume (6 levels) while talking To increase, press Ñ. To decrease, press Ö. •Each time you press Ö or Ñ, the volume level will change. •The number of steps indicates the volume level. •The display will return to the length of the call. Ex.
To redial the last number dialed on the handset Press or , and press (PAUSE/REDIAL). •You can select a line by pressing the left soft key ( LINE1 ) or the middle soft key ( LINE2 ), instead of pressing . To redial using the redial list (Memory Redial) The last 5 phone numbers dialed with the handset are stored in the redial list. 1. Press (PAUSE/REDIAL). 333-4444 GF --Redial list1-- 2. Scroll to the desired number by pressing Ö or Ñ.
Making Calls Base Unit (Digital Duplex Speakerphone) Line buttons and Indicators (HOLD) (REDIAL/PAUSE) , 1 MIC (DIGITAL!SP-PHONE) and Indicator Press (DIGITAL!SP-PHONE). SP-phone Line1 Dial a phone number. SP-phone Line1 •After a few seconds, the display will show the length of the call. 1112222 3 When the other party answers, talk into the MIC (microphone). SP-phone Line1 00-00-00 I =Privacy 4 To hang up, press (DIGITAL!SP-PHONE). Off 00-01-00 2 •The DIGITAL SP-PHONE indicator lights.
To adjust the speaker volume (8 levels) while talking To increase, press Ñ. To decrease, press Ö. •The number of steps indicates the volume level. Ex. Level 8 Loud Low GF High To dial after confirming the entered number 1 Enter a phone number. 2 Press (DIGITAL!SP-PHONE) or a line button. SP-phone •After a few seconds, the display will show the length of the call. 3334444 3 4 When the other party answers, talk into the MIC (microphone).
Making Calls To put a call on hold Press (HOLD). •The DIGITAL SP-PHONE indicator light goes out and the line indicator flashes. •The line status icon on the handset also flashes. •If a call is kept holding for 6 minutes, an alarm tone will start to sound. After 4 additional minutes on hold the call will be disconnected. Ex. Line 1 on hold. Hold Line1 To release the hold From the base unit, press the line button whose indicator is flashing.
Handset 1 Press . •The called line status icon stops flashing. •You can also answer a call by pressing any dialing button (0) to (9), (*) or (#) (Any Key Talk). •You can answer a call by pressing the left soft key ( LINE1 ) or the middle soft key ( LINE2 ), instead of pressing . Soft Key ( LINE1 ) Soft Key ( LINE2 ) (OFF) Microphone 2 To hang up, press (OFF). Auto Talk If you set the Auto Talk feature to ON (p.
Caller ID Service This unit is compatible with a Caller ID service offered by your telephone company. If you subscribe to a Caller ID service, the calling party’s information will be shown on the handset and base unit after the first ring. The handset and base unit can record information of up to 50 different callers for both lines combined, including the time and date received, the called line, and the number of times called, in the Caller List.
Using the Caller List If you have received new calls, “Received calls” will be displayed. Handset on the base unit SP PRIVACY Handset off the base unit [1] SP PRIVACY [1] Received callss G Received callss G LINE1 LINE2 P L A Y Base unit 8:30AM APR. 8 Received callss G LINE1 LINE2 P L A Y •If the battery need to be charged, “Received calls” will not display on the handset (p. 15). Viewing the Caller List Base unit Make sure the handset is not being used. Press Ö or Ñ to enter the Caller List.
Using the Caller List What “ 1 ” and “ 2 ” mean Indication of which line the caller information was received from. SMITH,JACK 1-222-333-4444 1 3:10P JUN.10 What “√” means When the display shows “√”, you have already viewed this calling information, answered the call or called back the caller. When you played back the message (p. 86, 91), “√” will be added to the information in the base unit Caller List. If the same caller calls again, the call entry with “√” will be replaced with the new call entry.
Editing the Caller’s Phone Number You can edit a phone number into one of 3 patterns to call back or store it into the directory. The Caller ID Number Auto Edit Feature (p. 45) This feature will allow the unit to edit a Caller ID number into one of 3 patterns you desired for you automatically in the Caller List. For details and activation please see page 45. Handset 1 2 Press Ö or Ñ to enter the Caller List. Caller's list 3 new calls GF =Directory list H Scroll to the desired caller by pressing Ö or Ñ.
Using the Caller List Base unit Make sure the base unit is not being used. 1 Press Ö or Ñ to enter the Caller List. Caller's list 3 new calls GF H =Directory list 2 Scroll to the desired caller by pressing Ö or Ñ. PARKER,FRED 3 Press (EDIT) to select a pattern. 1-234-321-5555 1 11:20A JAN.12 √ a •Each time you press (EDIT), the number is rearranged into one of 3 patterns. a Phone no. b 1 321-5555 11:20A JAN.12 √ b Area code – Phone no.
The Caller ID Number Auto Edit Feature Cordless Telephone There are 3 patterns of phone number (a, b, and c, p. 43, 44). This feature allows your phone to automatically edit an in-coming Caller ID number into one pattern you preferred, and display the Caller ID number with that pattern automatically.
Using the Caller List Base unit Make sure the base unit is not being used. 1. Press (FUNCTION). 2. Scroll to “Initial setting” by pressing Ö or Ñ, and press á. Copy directory HInitial setting --------------- 3. Scroll to “Caller ID edit” by pressing Ö or Ñ, and press á. Room monitor HCaller ID edit Set tel line 4. Select “On” or “Off” by pressing Ö or Ñ. 5. Press á (Save). •A beep sounds. •To exit the programming mode, press (STOP/EXIT).
Storing Caller List Information in the Directory You can store phone numbers that are in the Caller List into the directory. Handset Make sure the handset is not being used. Press Ö or Ñ to enter the Caller List. Caller's list 10 new calls GF H =Directory list 2 Scroll to the caller you want to store in the directory by pressing Ö or Ñ. TURNER,CINDY •If the number requires editing, press the right soft key ( EDIT ) (p. 43). LINE1 LINE2 E D I T 3 Press á. 4 Press á again.
Using the Caller List Base unit Make sure the base unit is not being used. 1 Press Ö or Ñ to enter the Caller List. Caller's list 10 new calls GF H =Directory list 2 Scroll to the caller you want to store in the directory by pressing Ö or Ñ. TURNER,CINDY 3 Press á. 4 Press á again. •If the number requires editing, press (EDIT) (p. 44). •To stop storing, press Ü. •A beep sounds. •To continue storing other items, repeat from step 2. •To exit the programming mode, press (STOP/EXIT).
Erasing Caller List Information After checking the Caller List, you can erase some or all of the entries. To erase a specific caller from the Caller List Handset: Make sure the handset is not being used. Press Ö or Ñ to enter the Caller List. Caller's list 10 new calls GF =Directory list H 2 Scroll to the caller you want to erase from the Caller List by pressing Ö or Ñ. REAGAN,TOM 3 Press (HOLD/CLEAR). •A beep sounds and the information is erased. •To erase other items, repeat from step 2.
Using the Caller List To erase all entries in the Caller List Before erasing all entries, make sure that “0 new call” is displayed. Handset: Make sure the handset is not being used. 1 Press Ö or Ñ to enter the Caller List. Caller's list 0 new call GF H =Directory list 2 Press (HOLD/CLEAR). All clear? 3 •To stop erasing, press Ü. I =No CLEAR=Yes Press (HOLD/CLEAR) again. •A beep sounds and all entries in the Caller List are erased. All clear Base unit: Make sure the base unit is not being used.
Directory You can store up to 50 names and phone numbers in both the handset and base unit directories. All of the directory items are sorted by the first word in alphabetical order. You can make a call by selecting a name on the display. You can also send the directory items between the handset and the base unit (p. 59). When the system has one or more additional handsets (p. 31), each handset has the directory list individually, and you can send the directory items from your handset to another handset.
Directory •If a pause is required for dialing, (PAUSE/REDIAL) can be stored in a phone number counting as one digit (p. 77). •You can exit the programming mode any time by pressing (OFF). •If the display shows “Directory Full” in step 2 on page 51, press (OFF) to exit the programming mode. To erase other stored items from the directory, see page 58. Base unit Make sure the base unit is not being used. 1 2 Press (FUNCTION). --------------- HSave directory Ringer setting Press á at “Save directory”.
•If a pause is required for dialing, (REDIAL/PAUSE) can be stored in a phone number counting as one digit (p. 77). •You can exit the programming mode any time by pressing (STOP/EXIT). •If the display shows “Directory Full” in step 2 on page 52, press (STOP/EXIT) to exit the programming mode. To erase other stored items from the directory, see page 58. Selecting characters to enter names The dialing buttons ((0) to (9)) can be used to enter letters and symbols.
Directory If you make a mistake while entering a name: Press Ü or á to move the cursor to the incorrect character, press (HOLD/CLEAR) on the handset or (ERASE) on the base unit to delete and enter the correct character. Each time you press (HOLD/CLEAR) or (ERASE) a character is erased. To erase all characters, press and hold (HOLD/CLEAR) or (ERASE). Dialing from the Directory Handset Make sure the handset is not being used. 1 Press Ü or á to enter the directory list.
Base unit Make sure the base unit is not being used. 1 Press Ü or á to enter the directory list. •The display shows the number of stored items in the directory. Directory list 30 items GF H =Caller's list 1 2 . Press Ö. Scroll to the desired item by pressing Ö or Ñ. 2 3 Press Ñ. Alphabet letter To search for a name by initial: #Press the dialing button for the first letter of the desired name until any name with the same initial is displayed (see the Index table below.
Directory Editing Handset Make sure the handset is not being used. 1 Press Ü or á to enter the directory list. 2 Scroll to the directory item you want to change, by pressing Ö or Ñ. [1] SP PRIVACY Directory list 10 items GF H =Caller's list SP PRIVACY •To search for the item by initial, see page 54. Jane 456-7890 Press the right soft key ( EDIT ). Enter name [1] LINE1 LINE2 E D I T 3 4 5 6 7 8 Jane IH Edit the name using the dialing buttons, up to 16 characters (p. 53).
Base unit Make sure the base unit is not being used. 1 Press Ü or á to enter the directory list. Directory list 10 items GF H =Caller's list 1 2 Scroll to the directory item you want to change, by pressing Ö or Ñ. •To search for the item by initial, see page 55. Jane 456-7890 2 3 2 3 G 1 Press (EDIT). 4 Edit the name using the dialing buttons, up to 16 characters (p. 53). Enter name •To move the cursor, press Ü or á. •If you do not need to change the name, press Ö and go to step 6.
Directory Erasing Handset Make sure the handset is not being used. 1 Press Ü or á to enter the directory list. 2 Scroll to the directory item that you want to erase by pressing Ö or Ñ. 3 4 •To search for the item by initial, see page 54. Press (HOLD/CLEAR). •To stop erasing, press Ü. [1] SP PRIVACY Directory list 10 items GF H =Caller's list SP [1] PRIVACY Helen 1-234-567-8901 Clear? I =No CLEAR=Yes Press (HOLD/CLEAR). Clear •A beep sounds and the item is erased.
Sending the Directory You can send a directory item or all the items between the handset and the base unit. Entries copied to the destination unit are added to its directory. (Phone Directory Sharing) When the system has one or more additional handsets (p. 31), you can send a directory item or all the items from your handset to another handset. •If an external call is being received during the directory transfer, the transfer will be stopped. You will need to re-send the item(s).
Directory •If “---Incomplete---” and “Directory full” are displayed with the item in step 7 on page 59, the destination unit directory memory is full. To exit the directory sending mode, press (OFF). To re-send the item, erase an unnecessary item from the destination unit (p. 58), and make sure the destination unit is not in use and try again. •You can exit the directory sending mode by pressing (OFF). To send one directory item from the base unit to the handset 1 2 Press (FUNCTION).
To send all items in the directory from the handset to another user 1 2 Press (CONF/FUNCTION). Scroll to “Copy directory” by pressing Ö or Ñ, and press á. Ringer setting HCopy directory Initial setting 3 Scroll to “Copy all items” by pressing Ö or Ñ, and press á. SP PRIVACY [1] Copy 1 item all items --------------- 4 5 Select the destination extension number by pressing Ö or Ñ.
Directory To send all items in the directory from the base unit to the handset 1 2 Press (FUNCTION). Scroll to “Copy directory” by pressing Ö or Ñ, and press á. Date and time HCopy directory Initial setting 3 Scroll to “Copy all items” by pressing Ö or Ñ, and press á. Copy 1 item HCopy all items --------------1 4 5 2 3 Select the destination extension number by pressing Ö or Ñ. Enter extension# •You can also select the extension number by pressing the dialing button ((1) to (8)).
Using the Other Line During a Conversation During a conversation, if you hear two tones, and the line indicator on the base unit and the line status icon on the handset display will flash quickly, an incoming call is being received on the other line. You can answer the second call while holding the first call. You can also make a call without terminating the first call.
Intercom A 2-way intercom is possible between the handset and the base unit. When the system has one or more additional handsets (p. 31), a 2-way intercom is also possible between two handsets. You can call all handsets from the base unit at once. The handset included with the base unit has the extension number 1 which has “[1]” on the display, and the base unit has the extension number 0. Each additional handset is assigned the number at registration (p. 31).
Base unit Using this feature, you can also locate a misplaced handset. Press (LOCATOR/INTERCOM/TRANSFER). 2 To page the handset, enter the extension number, using the dialing button ((1) to (8)). 3 When the paged party answers, talk into the MIC. •The LOCATOR/INTERCOM/TRANSFER indicator and the DIGITAL SP-PHONE indicator light. •The handset will ring for 1 minute. •To stop paging, press (DIGITAL!SP-PHONE) or (LOCATOR/INTERCOM/TRANSFER). Presseextension# toocall 0000MUTE=Monitor H =D Ex.
Intercom Answering Intercom Calls Handset When an intercom call is being received, the handset rings and the display shows the calling extension. Press , or (HOLD) (INTERCOM). •You can also answer the call by pressing any dialing button (0) to (9), (*) or (#) (Any Key Talk). To end the intercom, press (OFF) or place the handset on the base unit or the charger. SP PRIVACY [1] Call from [0] Intercom 01 LINE1 LINE2 M U T E Auto Talk: If you set the Auto Talk feature to ON (p.
Transferring a Call You can transfer an external call between the base unit and the handset. When the system has one or more additional handsets (p. 31), you can transfer an external call between two handsets. To transfer a call from the handset 1 During a call, press (HOLD) (TRANSFER). Ex. Line 1 on hold •The line status icon and “ LINE1 ” or “ LINE2 ” flash on the display and the call is put on hold.
Transferring a Call To transfer a call from the base unit 1 During a call, press 2 To page the handset, enter the extension number using the dialing button ((1) to (8)). To page all handsets (when the system has additional handsets, p. 31), press (0). If required, wait for the handset user to answer, and you can announce the transfer. If not required, go to step 4. 3 (LOCATOR/INTERCOM/TRANSFER). •The call is put on hold and the LINE indicator flashes.
Conference Conference with two external calls While having a conversation on one line, you can make or answer a second call on the other line and then combine the calls to make a conference call. Handset: Base unit: During a call, press (HOLD/CLEAR) twice to put the first call on hold. 2 To make or answer a second call, select the other line by pressing the relevant soft key ( LINE1 or LINE2 ). 3 When the second call is connected, press (CONF/FUNCTION) to make a conference call.
Conference Conference with an external call and intercom call While you are talking with an outside caller, you can call the base unit or the handset to make a conference call. When the system has one or more additional handsets (p. 31), you can make a conference call with your handset and another handset. Base unit Handset: 1 During a call, press (HOLD) (TRANSFER). 2 To page the base unit, press (0). 3 •The call is put on hold. OR To page another handset (when the system has additional handsets, p.
Call Share This feature allows the handset or the base unit to join the existing external call. When the system has one or more additional handsets (p. 31), a handset user can join another handset user’s conversation. To join a conversation (Call Share) Handset: Press the relevant soft key ( LINE1 or LINE2 ). Ex. Using Line 1 on Handset [1] L1 SP PRIVACY L1 Base unit: Press the relevant line button.
Room Monitor Feature This feature allows you to monitor a room through the handset or the base unit by using the intercom feature. For example you can monitor a baby from different areas of the house. You can call the handset or the base unit using the extension number, to monitor the room. The called unit will not ring. When the system has one or more additional handsets (p. 31), a handset user can monitor through another handset.
To monitor with the handset 1 Press (HOLD) (INTERCOM). [1] SP PRIVACY Press extension# to call 2 Press the right soft key ( MONITOR ). Press extension# for room monitor 3 To call the base unit, press (0). To call another handset (when the system has additional handsets, p. 31): Enter the extension number using the dialing button ((1) to (8)). Room monitor LINE1 LINE2 MONITOR •Your handset will start to monitor the room through the destination unit and “Room monitor” will display.
2-Way Radio Communication (When the System Has Additional Handsets) If you purchase one or more additional handsets (p. 31), you can use this feature (except for KX-TGA272S). A handset user can talk with another handset user regardless of the base unit location. 2-Way Radio communication, which is the direct communication between a pair of handsets, does not need the base unit interface. You need to turn the mode on on the handsets.
To call another handset Make sure the mode is on on your handset and the destination handset and the displays show “2Way radio mode”. 1 Press , or (HOLD) (INTERCOM). [1] SP PRIVACY Press extension# to call 2Way radio mode 2 SeaSearching •The called handset will ring for 1 minute. •To stop calling, press (OFF). 2Way radio mode Calling [3] 2Way radio mode 3 4 When the called party answers, talk into the handset. •After a few seconds, the display will show the length of the call.
Special Features Muting Your Conversation During a call, you can make the other party not listen to you. When muting your conversation, you can hear the other party. Ex. Call on Line 2 with Handset Talk Line2 00-00-50 For the handset; press the right soft key ( MUTE ). 00 I =Booster •“Mute” will be displayed for a few seconds and “ MUTE ” will flash. •To release the mute, press the right soft key ( MUTE ). •When you switch between the receiver and speaker, the mute will be released.
How to Use the PAUSE Button (For PBX Line/Long Distance Calls) We recommend you press (PAUSE/REDIAL) on the handset or (REDIAL/PAUSE) on the base unit if a pause is required for dialing with a PBX or to make a long distance call. Ex. Line access number (9) (PBX) (9) \ (PAUSE/REDIAL) or (REDIAL/PAUSE) \ Phone number Ringer Tone You can select one of 6 ringer tones for each line from your handset or from your base unit individually.
Special Features Base unit Make sure the base unit is not being used. 1 2 Press (FUNCTION), and scroll to “Ringer setting” by pressing Ö or Ñ, and press á. Scroll to “Ringer tone” by pressing Ö or Ñ, and press á. Save directory HRinger setting Date and time Ringer volume HRinger tone Incoming call 3 4 5 Press Ö (Line 1) or Ñ (Line 2) to select the line. •The line’s current setting will be displayed. Select the desired ringer tone by pressing Ö or Ñ.
With the base unit Make sure the base unit is not being used. 1 2 Press (FUNCTION). Scroll to “Initial setting” by pressing Ö or Ñ, and press á. Copy directory HInitial setting --------------- 4 Scroll to “Set flash time” by pressing Ö or Ñ, and press á. 5 Press Ö (Line 1) or Ñ (Line 2) to select the line. 6 7 Caller ID edit HSet tel line Set answering Set dial mode HSet flash time Set line mode •The line’s current setting will be displayed. Select the desired time by pressing Ö or Ñ.
Special Features Line Selection The handset and base unit will automatically select a free line when you make a call by pressing or on the handset or (DIGITAL!SP-PHONE) on the base unit. The unit will also select the in-coming called line when you answer the in-coming call. You can change the line selection of the handset and base unit. There are three options as following: Line 1: Line 1 will be selected. Line 2: Line 2 will be selected.
Incoming Call Tone While using one line, you can be informed if another call arrives on the other line by two tones. During an intercom call (p. 64) or while using the Room Monitor feature (p. 72) or while listening to messages (p. 86, 91), you can also be informed by two tones if a call arrives. If you set to ON, this incoming call tone will be heard for as long as the line rings. To delete the incoming call tone, set to OFF. To set the incoming call tone to sound twice, set to “2”.
Mailbox Features The system accommodates three voice mailboxes. You can share the mailboxes with other members of your family or office, in your convenience. Callers from touch tone phones can specify one of three mailboxes to leave a message there. If callers do not specify a mailbox or call from rotary telephones, messages will be recorded into Mailbox 1. When a caller calls The caller will hear the greeting message (p. 28) if the Answering System is on for the line (p. 84).
Setting the Mailbox Password (for Mailbox 2 and 3) You can use Mailbox 2 or 3 for your personal mailbox, and prevent unauthorized people from accessing the mailbox and listening to the messages. Assign 2-digit password (00–99) to Mailbox 2 or 3. Each password and the remote code (p. 95) must be unique. Once the password is assigned to Mailbox 2 or 3, no one can access the mailbox to listen to messages without entering the password. Use the base unit. Make sure the base unit is not being used.
Automatic Answering Operation The Answering System allows the unit to answer calls with a greeting message. Callers can then leave a message in a mailbox (p. 82). While recording, “-Answering-” and the called line will flash on the base unit display and the mailbox icon is displayed. Ex. Caller calls Line 1 and records in Mailbox 1. -Answering--L1PRIVACY 1 2 3 MAILBOX Setting the Unit to Answer Calls First select the line(s), then turn the Answering System on for the line(s).
To turn on the Answering System for the selected line(s) Press (ANSWER!ON). •The ANSWER ON indicator lights. •“Answer set” with the line(s) and the current day and time will be announced. •The unit will announce the remaining recording time if it is less than 5 minutes. •If you hear “Memory full”, “ ALL MAILBOX FULL ” is displayed on the base unit and the ANSWER ON indicator flashes rapidly, erase some, or all, of the messages (p. 88). Ex.
Listening to Messages If the ANSWER ON indicator flashes, new messages have been recorded. The mailbox icons ( 1 , 2 and 3 ) which have new messages also flash on the base unit display. Ex. Mailbox 1 has new messages; Mailbox 2 has old messages; Mailbox 3 has no messages. 4:50PM JAN. 3 Received calls G •If only old messages exist in a mailbox, the mailbox icon will display but will not flash. PRIVACY 1 2 3 MAILBOX To listen to messages with the handset, see page 91. To play back messages Ex.
To adjust the speaker volume: 9 levels (0–8) are available during playback. To increase, press Ñ. To decrease, press Ö. Slow Talk message playback For easier listening of recorded messages, you can slow down the playback speed. Press the MAILBOX button ((MAILBOX!1), (MAILBOX!2) or (MAILBOX!3)) whose message is being played. •The playback speed will slow down by 30% and “-slow-” will display. •To return to the normal speed, press the MAILBOX button again during playback.
Erasing Messages The unit will announce the remaining recording time after playback, if it is less than 5 minutes. New messages cannot be recorded when: —“Memory full” is heard. —“ ALL MAILBOX FULL ” is displayed on the base unit. —the ANSWER ON indicator flashes rapidly (only when the Answering System is on). Erase some, or all, of the messages. We recommend you erase unnecessary messages after each playback. Erasing a specific message Press (ERASE) while the message you want to erase is being played (p.
Recording a Memo Message You can record your own voice memo message of up to 3 minutes, in the desired mailbox for other users or yourself. 1 2 Press (MEMO). •“Please select Mailbox” is heard. Within 5 seconds, press a mailbox button ((MAILBOX!1), (MAILBOX!2) or (MAILBOX!3)). Select MAILBOX to record a memo message Ex. Mailbox 2 is selected. Memo record Mailbox2 00-00 STOP=End PRIVACY 3 After a long beep, talk clearly approximately 8 inches (20 cm) away from the MIC.
Transferring a Call to a Mailbox When you answered a call, and the caller wants to talk to someone who the caller knows is not available, you can place the caller into one of the mailboxes, where the caller can leave a message. The following is how calls must be transferred to a mailbox: After you answered a call, you may announce that person the caller wishes to speak to is not available, and remind the caller to press the # sign and the mailbox number if necessary.
Remote Operation with the Handset You can access the mailboxes from your handset and listen to messages. If “ PLAY ” flashes on the handset, there are new messages in the mailboxes. Concerning new message indications on the base unit, see page 86. LINE1 LINE2 PLAY Soft Key ( PLAY ) (OFF) To listen to messages 1 2 •A beep sounds and “Please select Mailbox” will be heard from the speaker. To switch to the receiver, press . To switch back to the speaker, press .
Remote Operation with the Handset Voice menu If no commands are entered after you listened to new messages in the mailbox and heard “End of final message”, the handset will start the following voice menu. “Press 4 to play back new messages. Press 5 to play back all messages.” •You can enter direct commands even if the voice menu has started. •You can switch to another mailbox by pressing (#) and the mailbox number ((1) to (3)) during the remote operation.
Direct commands NEW MESSAGE PLAYBACK (4) ALL MESSAGE PLAYBACK (5) REPEAT (During playback) SKIP (During playback) CHANGING PLAYBACK SPEED (During playback) (1) (2) •The current message is skipped. The next message is played. •You can also press á to skip a message. (3) SELECTING ANOTHER MAILBOX (*) (4) •Each time you press the button, the playback speed will change to slow/normal. “slow” will display for the slow speed. •Operation is stopped temporarily.
Remote Operation from a Touch Tone Phone You can operate the Answering System from any touch tone phone. A synthesized voice menu will guide you on how to operate the unit (p. 96). •To skip the voice menu and operate the unit directly, see page 97. Summary of remote operation Call your unit from a touch tone phone. To access Mailbox 1, enter the remote code (p. 95) during or after the greeting message. •“Mailbox 1” and the number of new messages of Mailbox 1 are heard, and the new messages will be played.
Remote Code The remote code prevents unauthorized people from accessing your unit and listening to your messages. Choose any 2-digit number (00–99). The factory preset remote code is “11”. If you do not program your own remote code, you can use “11”. Use the base unit. Make sure the base unit is not being used. 1 2 Press (FUNCTION). Scroll to “Initial setting” by pressing Ö or Ñ, and press á Copy directory HInitial setting --------------- 3 Scroll to “Set answering” by pressing Ö or Ñ, press á.
Remote Operation from a Touch Tone Phone Voice Menu The shaded parts are voice prompts. Press 1 to play back all messages. Press 2 for other functions. Press (1). All recorded messages in the mailbox are played back. At the end of the last message, “End of final message” is heard. The unit will announce the remaining recording time if it is less than 5 minutes. Press (2). Press 1 to play back new messages. Press 2 for other functions. Press (1). New message playback.
Direct Remote Operation Once you have accessed one of the mailboxes (p. 94), you can also control your unit by direct commands instead of using the voice menu. To end the remote operation, hang up anytime. Direct commands NEW MESSAGE PLAYBACK (4) ALL MESSAGE PLAYBACK (5) •Only new messages are played back. •All messages are played back. REPEAT (During playback) (1) •The current message is repeated. •If you press within 5 seconds of playback, the previous message will be played.
Remote Operation from a Touch Tone Phone SELECTING ANOTHER MAILBOX (#) (1) •Mailbox 1 is selected and the number of new messages is heard. (#) (2) •If Mailbox 2 has the password (p. 83), enter it. Mailbox 2 is selected and the number of new messages is heard. (#) (3) •If Mailbox 3 has the password (p. 83), enter it. Mailbox 3 is selected and the number of new messages is heard. Turning on the Answering System Call your unit and wait for 15 rings.
Belt Clip You can hang the handset on your belt or pocket using the belt clip. To attach the belt clip To remove the belt clip While pressing the top of the clip (A), pull the right edge in the direction of the arrow (B). A B Optional Headset Plugging the optional headset into the handset allows a hands-free phone conversation. Please use only the Panasonic KX-TCA88 headset. To order, call the accessories telephone number on page 2.
Wall Mounting This unit can be mounted on a wall phone plate. 1 Connect the AC adaptor. To Power Outlet 2 Tuck the telephone line cord inside the wall mounting adaptor (#). Connect the telephone line cord ($). Fasten the telephone line cord to prevent it from being disconnected (%). Bottom of the unit # Hooks % $ 3 Insert A and B hooks on the wall mounting adaptor into the holes on the base unit.
4 Adjust the adaptor to hold the base unit, aligning the arrow C on the base unit with the adaptor. Arrow C C 5 While keeping the adaptor held to the base unit, slide the wall mounting adaptor to the left until it clicks into place. C Bottom of the unit with the adaptor locked into position 6 •Raise the antennas. To charge the handset battery: Place the handset on the base unit. •The CHARGE indicator lights.
Wall Mounting To remove the wall mounting adaptor Push up the RELEASE LEVER (#) with your thumb and slide the adaptor to the right ($) with the tab kept up to release the lock. Remove the adaptor. $ VER E LE EAS REL RELEASE LEVER # Bottom of the unit with the adaptor released Adding Another Phone This unit will not function during a power failure. To connect a standard telephone on the same line, use the Panasonic T-adaptor KX-J66. To order, call the accessories telephone number on page 2.
Battery Replacement Battery will need to be replaced, even if you cleaned the charge contacts and charged the battery fully, but after a few telephone calls, “Recharge battery” is displayed and/or “ ” continues to flash, or “Charge for 15HRS” and “ ” are displayed. Please order a new Panasonic PQPP511SVC (P-P511) battery at the telephone number shown on page 2. 1 Press the notch on the handset cover firmly and slide it as indicated by the arrow. 2 Remove the old battery.
Canceling Registration/Re-registration Canceling the Handset Registration If you no longer need to use the handset or if you need to register the handset to a different base unit of the same model, it may be necessary to cancel the registration. Only one handset can be canceled at a time near the base unit. Make sure the handset and the base unit are not being used. 1 2 3 4 Press (CONF/FUNCTION). Scroll to “Initial setting” by pressing Ö or Ñ, and press á.
Re-registering the Handset If you want to re-register the handset to the base unit or a different base unit of the same model, you need to register it to that base unit. The handset will be given a new extension number of that base unit. Only one handset can be registered at a time. Make sure the base unit and the other handsets are not being used. Registration must be completed within 1 minute. If you have canceled the handset registration at the previous base unit (p. 104), start from step 5.
If the Following Appear... If the unit detects a problem, one of the following messages will be displayed on the handset or the base unit. Error beeps or a busy tone will sound. Display message Cause & Remedy Recharge battery (handset only) The battery needs to be charged. Recharge the battery (p. 15). Charge for 15HRS (handset only) The battery has been discharged. The handset will not work. Charge the battery fully (p. 15). No link to base. Walk closer to base and try again.
Cause & Remedy System is busy. Please try again later. • If the radio communication between the handset and the base unit is partially impaired, this display will be shown. • If more than one unit is in use, such as conducting external/internal calls or listening to messages, you may not be able to use another unit. Try again later. • When you try to program with the base unit and the handset is in the remote operation mode, this display will be shown. Try again later.
If the Following Appear... Display message Not found Cause & Remedy (handset only) When you tried to call another handset in the 2-Way Radio mode; – the handset is too far from your handset. Walk closer to the handset. – 2-Way Radio mode on the handset is off (p. 74). – The called handset is talking with another handset in the 2-Way Radio mode. Invalid. Please register to the base unit The handset you tried to make a call has not been registered to the base unit. Register it (p. 31, 105).
Troubleshooting Cordless Telephone Problem Cause & Remedy •You are too far from the base unit. Walk closer to the base unit and try again. •Plug in the AC adaptor. •Raise the base unit antennas. Static, sound cuts in/out, fades. Interference from other electrical units. •Locate the handset and the base unit away from other electrical appliances (p. 3). •Walk closer to the base unit. •Raise the base unit antennas. •Press Ü on the handset to turn on the Reception Booster feature (p. 34).
Troubleshooting Problem 110 Cause & Remedy You cannot make a call even if there is a free line. •If more than one other user is using the handsets and base unit, you may not be able to make a call. Try again later. The unit does not display the caller’s name and/or phone number. •You need to subscribe to a Caller ID service. •Other telephone equipment may be interfering with your phone. Disconnect it and try again.
Answering System Cause & Remedy The Answering System is on, but incoming messages are not recorded. •The recording time is set to “Greeting only”. Select “1 minute”, “2 minutes” or “3 minutes” (p. 27). •Memory is full. Erase some, or all, of the messages (p. 88). “ ALL MAILBOX FULL ” is displayed and the ANSWER ON indicator flashes rapidly, and no new messages are recorded. •Memory is full. Erase some, or all, of the messages (p. 88). You cannot access a mailbox from the base unit or the handset.
Troubleshooting Problem You cannot erase messages in the mailbox. Cause & Remedy •While another user is accessing the mailbox or a caller is leaving a message in the mailbox, you cannot erase messages in the same mailbox. When you play back •The date may be set wrong. Adjust the date messages or you turn the (p. 20). Answering system on, the unit announces the wrong day. Caller ID information does not display during message playback (p. 87, 92).
Problem Cause & Remedy •Charge the battery fully (p. 14). •The maximum of 8 handsets have already been registered to the base unit. •This base unit has the memory of the handset currently registered to another base unit. Erase the handset memory from the base unit. For KX-TG2740S base unit: (1) Press (FUNCTION), (2) Press (MUTE), (3) Enter “335#” and (4) Enter that handset number (1 to 8). “Recharge battery” is displayed, “ ” flashes or the handset beeps intermittently. •Charge the battery fully (p. 14).
Important Safety Instructions When using this unit, basic safety precautions should always be followed to reduce the risk of fire, electric shock, or personal injury. 11. Read and understand all instructions. 12. Follow all warnings and instructions marked on this unit. 13. Unplug this unit from AC outlets before cleaning. Do not use liquid or aerosol cleaners. Use a damp cloth for cleaning. 14. Do not use this unit near water, for example, near a bathtub, washbowl, kitchen sink, or the like. 15.
CAUTION: To reduce the risk of fire or injury to persons, read and follow these instructions. 1. Use only the battery(ies) specified. 2. Do not dispose of the battery(ies) in a fire. They may explode. Check with local waste management codes for special disposal instructions. 3. Do not open or mutilate the battery(ies). Released electrolyte is corrosive and may cause burns or injury to the eyes or skin. The electrolyte may be toxic if swallowed. 4.
FCC and Other Information If requested by the telephone company, inform them as follows: Registration No. ....................................................(found on the bottom of the unit) Ringer Equivalence ...........................................................................................0.2B The particular telephone lines to which the equipment is connected. This unit must not be connected to a coin operated line. If you are on a party line, check with your local telephone company.
CAUTION: Any changes or modifications not expressly approved by the party responsible for compliance could void the user’s authority to operate this device. Note: This equipment has been tested and found to comply with the limits for a Class B digital device, pursuant to Part 15 of the FCC Rules. These limits are designed to provide reasonable protection against harmful interference in a residential installation.
FCC and Other Information •Environment — do not place the unit in a room where the temperature is less than 5°C (41°F) or greater than 40°C (104°F). Allow 10 cm (4") clearance around the unit for proper ventilation. Avoid excessive smoke, dust, mechanical vibration, shock, or direct sunlight. •Medical — consult the manufacturer of any personal medical devices, such as pacemakers or hearing aids, to determine if they are adequately shielded from external RF (radio frequency) energy.
Specifications ■ Base unit Power Supply: Power Consumption: AC Adaptor (120 V AC, 60 Hz) Standby: Approx. 3.2 W Maximum: Approx. 6 W Frequency: 2.40 GHz – 2.48 GHz Dimensions (H x W x D): Approx. 71 mm x 248 mm x 140 mm (2 13⁄16" x 9 3⁄4" x 5 1⁄2") Mass (Weight): Approx. 530 (1.17 Ib.) ■ Handset Power Supply: Ni-Cd battery (3.6 V, 850 mAh) Frequency: 2.40 GHz – 2.48 GHz Dimensions (H x W x D): Approx. 242 mm x 53 mm x 40 mm (9 17⁄32" x 2 3⁄32" x 1 9⁄16") Mass (Weight): Approx. 220 (0.48 Ib.
Index A Accessories......................................... 2 Answering Calls ................................ 38 Answering System ............................ 84 Auto talk Feature......................... 23, 39 B Backlit LCD ....................................... 10 Base Unit Location.............................. 3 Battery Charge.............................. 3, 14 Battery information ............................ 15 Battery Replacement ...................... 103 Battery strength........................
For assistance, please call: 1-800-211-PANA(7262) Useful Information P PAUSE .............................................. 77 Phone Directory Sharing.............. 59-62 Power failure................... 9, 20, 29, 102 Privacy Feature ................................. 71 Pulse service..................................... 76 R Reception Booster..............................34 Recording Time................................. 27 Redial .......................................... 35, 37 Redial list ............
For product service •Call 1-800-211-PANA(7262) for the location of an authorized servicenter. •Panasonic’s e-mail address for customer inquiries: consumerproducts@panasonic.com for customers in the USA or Puerto Rico ONLY When you ship the product •Carefully pack your unit, preferably in the original carton. •Attach a letter, detailing the symptom, to the outside of the carton. Symptom •Send the unit to an authorized servicenter, prepaid and adequately insured.
If you need assistance with the set-up or operation, please call 1-800-211-PANA(7262) Panasonic Consumer Electronics Company, Division of Matsushita Electric Corporation of America One Panasonic Way, Secaucus, New Jersey 07094 Panasonic Sales Company, Division of Matsushita Electric of Puerto Rico, Inc. Ave. 65 de Infantería, Km. 9.