
Handbook

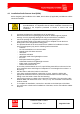

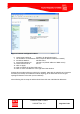
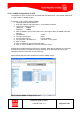
Table Of Contents
- 1 Introduction
- 2 ClearFill®Star System Description
- 3 System Design Guidelines
- 3.1 CDMA Basics (in preparation)
- 3.2 Required information for system design
- 3.3 Design step by step
- 3.4 Estimated RF Coverage per RRH
- 3.5 Right-sizing - the beacon feature (in preparation)
- 3.6 Capacity demand - number for BSIs (in preparation)
- 3.7 System Architecture
- 4 System Installation
- 4.1 General
- 4.2 System Installation (Hardware Installation)
- 4.3 Installation Radio Remote Head (RRH)
- 4.4 Installation Gigabit Ethernet Switch (GES)
- 4.5 Installation Base Station Interface (BSI)
- 4.6 Installation NMS Server (Hardware)
- 4.7 Commissioning of NMS
- 5 NMS Overview
- 5.1 Introduction
- 5.2 Starting the NMS
- 5.3 Tools and Utilities of NMS server
- 5.4 Main Window of NMS Application Client (structure)
- 5.5 The NMS client functionality
- 5.6 Right Click Menus
- 5.7 RRH Configuration
- 5.8 BSI Configuration
- 6 Configuration Management
- 7 System Supervision
- 8 Remote Management and Supervision
- 9 Operational used cases/Maintenance
- 10 System Specifications and Technical Data
- 11 Conformance Statements
- 11.1 United States
- 11.1.1 Introduction
- 11.1.2 Federal Communications Commission (FCC)
- 11.1.3 FCC Part 15 Class A
- 11.1.4 RF approval
- 11.1.5 IEC product safety conformance
- 11.1.6 Indoor applications
- 11.1.7 Antenna exposure
- 11.1.8 Radiofrequency radiation exposure Information
- 11.1.9 Packaging collection and recovery requirements
- 11.1.10 Recycling / take-back / disposal of products and batteries
- 11.2 Canada
- 11.1 United States
- 12 Appendix

ClearFill Star CDMA
1100187 Rev. 1.0
Page 58 of 152
4.7.3.1 IP Address Configuration
First of all the IP configuration has to be done for the whole network.
The GES are set to fixed IP addresses, the BSIs and RRHs are using dynamic IP addresses.
The NMS server is running a DHCP server to provide the dynamic IP participants with IP
addresses.
All GES are delivered with the same default IP address: 192.168.1.1.
Because of that the GESs have to be switched on one after another. Every time a new switch
has been switched on it has to get assigned a unique fixed IP address.
RFS recommends using switch addresses between 192.168.1.20 – 192.168.1.50, but users
are free to choose the fixed addresses according to their specific setups.
Procedure to set a fixed address to a GES
1. Open Microsoft Internet Explorer.
2. Enter the address “http://192.168.1.1” in the address window.
3. Login to the switch by using
Username: admin
Password: admin
Figure 26 GES Login Menu
4. Click on System in the left-hand sides menu.
5. Click on IP in the opening sub menu.