Rev. 5/16, Ver.
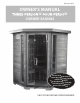
TABLE OF CONTENTS ASSEMBLY TIPS & WARNINGS 3 PARTS IDENTIFIER 4 ASSEMBLY INSTRUCTIONS 5-10 OPERATION INSTRUCTIONS 11 ENJOYING YOUR SAUNA 12 HEALTH & SAFETY WARNINGS 13 CLEANING & MAINTANENCE 14 TROUBLESHOOTING GUIDE 14-15 REPLACEMENT PARTS 16-23 WARRANTY INFORMATION 24 The information contained in this manual is subject to change without notice.
ASSEMBLY TIPS & WARNINGS • Before you begin, read all assembly instructions and safety warnings carefully. • This sauna requires at least 3 adults to complete assembly. • Remove all of the contents from boxes and verify that you have all of the parts shown on the Parts Note: Some parts may be pre-installed or pre-assembled. may not look exactly like your product. • Retain this Owner’s Manual for future reference.
PARTS IDENTIFIER (NOT TO SCALE) This manual is used for the assembly of several sauna models; therefore, some images or drawings may not look exactly like your product.
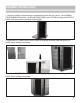
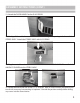
ASSEMBLY INSTRUCTIONS 1. Begin assembly by determining an appropriate location for your sauna – see ASSEMBLY TIPS & WARNINGS for details. Attach the FRONT PANEL to the FLOOR by lining up the FRONT PANEL with the groove in the front of the FLOOR. 2. Attach the LEFT PANEL to the FRONT PANEL by aligning the hooks and sliding the LEFT PANEL down, locking it into place. 3. Attach the RIGHT PANEL to the FRONT PANEL by aligning the hooks and sliding the RIGHT PANEL down, locking it into place.
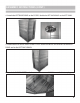
ASSEMBLY INSTRUCTIONS (CONT.) 4. Attach the LEFT BACK PANEL to the FLOOR. Buckle the LEFT BACK PANEL to the LEFT PANEL. 5. Attach the RIGHT BACK PANEL to the FLOOR. Buckle the RIGHT BACK PANEL to the RIGHT PANEL and to the LEFT BACK PANEL. 6. Attach the FLOOR HEATER to the FLOOR with 1-1/2” SCREWS. Connect the heater plug.
ASSEMBLY INSTRUCTIONS (CONT.) 7. Slide the LONG BENCH HEATER PANEL into place between the LEFT BACK PANEL and RIGHT PANEL. Connect the heater plug. Note: It may be necessary to unbuckle the RIGHT PANEL from the RIGHT BACK PANEL in order to slide the LONG BENCH HEATER PANEL into place. 8. Slide the SHORT BENCH HEATER PANEL into place between the LONG BENCH HEATER PANEL and LEFT PANEL. Connect the heater plug.
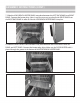
ASSEMBLY INSTRUCTIONS (CONT.) 10. Attach SHORT BENCH SEAT with 2” SCREWS. 11. Lift the ROOF above the sauna, feeding the control panel and heater cables through the corresponding holes. Feed the cables for the AM/FM CD PLAYER through the hole in the bottom of the ROOF. Secure the ROOF to the sauna with 1-1/8” SCREWS. Connect the control panel and heater plugs. 12. Feed the main power cable through hole in ROOF and plug securely into receptacle on back of POWER SUPPLY box .
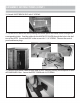
ASSEMBLY INSTRUCTIONS (CONT.) 13. Attach the DOOR HANDLE to the GLASS DOOR. 14. Gently pull the cables for the AM/FM CD PLAYER through the opening in the front of the STEREO SHELF. Attach the STEREO SHELF with 3/4” SCREWS. 15. Plug the controller and antenna into the back of the AM/FM CD PLAYER. Slide and lock the AM/FM CD PLAYER into the STEREO SHELF. 16. Attach the MAGAZINE RACK with 1-1/2” SCREWS. Note: A sticker indicates the optimal position for this accessory, but attaching it is optional.
ASSEMBLY INSTRUCTIONS (CONT.) 17. Attach the CUP HOLDER(S) with 3/4” SCREWS. Note: A sticker indicates the optimal position for this accessory, but attaching it is optional. Consider the position carefully before driving any screws into the sauna interior. 18. Attach the DOUBLE TOWEL HOOK with 3/4” SCREWS. Note: A sticker indicates the optimal position for this accessory, but attaching it is optional. Consider the position carefully before driving any screws into the sauna interior. 19.
OPERATION INSTRUCTIONS SAUNA CONTROL PANEL Note: The sauna controls are the same for both the interior and exterior Control Panels. 1. Press POWER to turn ON the sauna. 2. Set the desired TEMPERATURE with the (+) and (-) buttons. 3. Press and hold both (+) and (-) to switch between °F (Fahrenheit) and °C (Celsius). 4. Set the desired TIME with the (+) and (-) buttons. 5. Press INSIDE or OUTSIDE to turn on or off the corresponding light. 6. When the TIME reaches 00, the heaters will turn OFF automatically.
ENJOYING YOUR SAUNA 1. Prior to initial use, wipe down all interior surfaces of the sauna with a damp cloth. 3. Always drink plenty of water before, during and after your sauna session to stay properly hydrated. 4. A normal sauna session should last 30 minutes or less. 5. Allow approximately 15 to 25 minutes for the sauna to warm up before entering. 6. Perspiration will begin within 15 to 25 minutes after entering the sauna. 7. Limit the use of lotions or oils on your body while using your sauna.
HEALTH & SAFETY WARNINGS 1. Review all instructions and warnings before operating your sauna. A sauna is not a toy. Serious injury may result from negligence, intentional misuse and failure to follow safety instructions. 2. Hyperthermia Danger: Hyperthermia occurs when the body absorbs more heat than it can dissipate. When the elevated body temperatures are sufficiently high, hyperthermia is a medical emergency and requires immediate treatment to prevent disability or death.
CLEANING & MAINTENANCE 1. Always unplug the sauna and allow it to cool down before performing any cleaning or maintenance. 2. Use furniture polish or furniture oil when cleaning the sauna exterior. 3. The sauna interior surfaces should only be wiped down with a damp cloth. Do NOT use chemicals, abrasive cleaners or solvents on the unfinished interior wood. 4. As with all natural wood products, variations in the color and the grain as well as irregularities such as knots and fine cracks may be present.
TROUBLESHOOTING GUIDE (CONT.) Problem THE CONTROL PANEL DOES NOT WORK Solution 1. Check that all the connections are tight. 2. If the numbers are scrambled or the buttons are unresponsive, replace the Control Panel. 3. If the temperature indicator does not work or reads “--” or “EP”, replace the Control Panel. Problem THE LIGHTS ARE NOT WORKING 1. Check that all the connections are tight. Solution 2. If one light does not work, replace the bulb. during installation. 3.
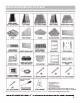
R E PL ACE ME NT PAR TS R ev . 5/ 1 6 S A1 3 1 2 THR E E -PE R S ON CE DAR COR NE R R E F .
SA1312 17
R E PL ACE ME NT PAR TS S A1 3 2 0 F OUR -PE R S ON CE DAR R E F . # DE S CR I PTI ON R ev .
SA1320 19
R E PL ACE ME NT PAR TS S A2 4 1 2 DX THR E E -PE R S ON HE ML OCK R ev . 5/ 1 6 COR NE R R E F .
SA2412DX 21
R E PL ACE ME NT PAR TS S A2 4 2 0DX F OUR -PE R S ON HE ML OCK R ev . 5/ 1 6 COR NE R S AUNA R E F .
SA2420DX 23
SAUNA WARRANTY REGISTRATION CARD 1. This sauna has a 7-Year Limited Warranty against defects in materials and workmanship from date of purchase. To receive the warranty, the card below must be filled out completely and returned within thirty (30) days from date of purchase. This 7-Year Limited Warranty covers the wood structure*. Heating elements and all electronics are covered by a 5-Year Limited Warranty. The radio/CD player (if included with your sauna) is covered by a limited 1-Year Warranty.
Rev. /1 , Ver MANUEL DE L’UTILISATEUR SAUNAS DE COIN POUR 3 À 4 PERSONNES Contactez no tre serv ice à la c lientè le 800-759-0977 au av ec des q ue stions sur le montage ou l' utilisatio n de ce p rod uit.
TABLE DES MATIÈRES CONSEILS ET MISES EN GARDE AVANT L’ASSEMBLAGE 3 IDENTIFICATION DES PIÈCES 4 INSTRUCTIONS D’ASSEMBLAGE 5-10 INSTRUCTIONS DE FONCTIONNEMENT 11 COMMENT APPRÉCIER VOTRE SAUNA 12 MISES EN GARDE EN MATIÈRE DE SANTÉ ET DE SÉCURITÉ 13 NETTOYAGE ET ENTRETIEN 14 GUIDE DE DÉPANNAGE 14-15 PIÈCES DE RECHANGE 16-23 RENSEIGNEMENTS SOUS LA GARANTIE 24 2
CONSEILS ET MISES EN GARDE AVANT L’ASSEMBLAGE • Avant de commencer, veuillez lire attentivement les instructions d’assemblage et les mises en garde en matière de sécurité. • Au moins trois adultes sont requis pour assembler ce sauna. • Avis : certaines pièces sont déjà préinstallées ou préassemblées. • Ce manuel est utilisé pour l’assemblage de plusieurs modèles de sauna; donc, certains plans et certaines illustrations ne sont pas conformes à votre produit.
IDENTIFICATION DES PIÈCES (pas à l’échelle) PANNEAU AVANT AVEC PORTE VITRÉE PANNEAU GAUCHE PANNEAU ARRIÈRE GAUCHE TOIT REVÊTEMENT DU TOIT PANNEAU GAUCHE PLANCHER PANNEAU DE CHAUFFAGE DE LA BANQUETTE LONGUE BANQUETTE PANNEAU GAUCHE COURTE PANNEAU DE CHAUFFAGE DE LA BANQUETTE COURTE DOSSIER POIGNÉE DE PORTE ÉTAG RE POUR RADIO ET LECTEUR CD LECTEUR AM/FM/ CD/USB 1 PORTE-GOBELET PORTE-REVUES PORTE-SEVIETTE DOUBLE PANNEAU DE COMMANDE DE CHROMOTHÉRAPIE IONISATEUR ’OXYGÈNE VIS 50 mm (2”) 2 VIS
INSTRUCTIONS D’ASSEMBLAGE 1. Pour commencer, choisissez l’emplacement exact pour installer votre sauna. Lisez les CONSEILS ET MISES EN GARDE AVANT L’ASSEMBLAGE pour obtenir plus de détails. Fixez le PANNEAU AVANT au PLANCHER en alignant le PANNEAU AVANT dans la rainure à l’avant du PLANCHER. 2. Fixez le PANNEAU GAUCHE au PANNEAU AVANT en alignant les crochets et en glissant le PANNEAU GAUCHE vers le bas pour le fixer en place. 3.
INSTRUCTIONS D’ASSEMBLAGE (suite) 4. Fixez le PANNEAU ARRIÈRE GAUCHE au PLANCHER. Attachez le PANNEAU ARRIÈRE GAUCHE au PANNEAU GAUCHE. 5. Fixez le PANNEAU ARRIÈRE DROIT au PLANCHER. Attachez le PANNEAU ARRIÈRE DROIT au PANNEAU DROIT et au PANNEAU ARRIÈRE GAUCHE. 6. Fixez l’élément chauffant du PLANCHER à l’aide de vis de VIS de 40 mm. Branchez l’élément chauffant.
INSTRUCTIONS D’ASSEMBLAGE (suite) 7. Insérez le PANNEAU CHAUFFANT DE LA BANQUETTE LONGUE entre les PANNEAUX ARRIÈRE GAUCHE et DROIT. Branchez l’élément chauffant. Avis : vous aurez peut-être à détacher le PANNEAU DROIT du PANNEAU ARRIÈRE DROIT afin d’insérer de fixer en place le PANNEAU CHAUFFANT DE LA BANQUETTE LONGUE. 8. Insérez le PANNEAU CHAUFFANT DE LA BANQUETTE COURTE entre les PANNEAUX CHAUFFANTS DE LA BANQUETTE LONGUE et le PANNEAU GAUCHE. Branchez l’élément chauffant.
INSTRUCTIONS D’ASSEMBLAGE (suite) 10. Fixez la BANQUETTE COURTE à l’aide de vis de 50 mm. à l’arrière du PANNEAU DE COMMANDE. Fixez le REVÊTEMENT DU TOIT à l’aide de VIS de 20 mm.
INSTRUCTIONS D’ASSEMBLAGE (suite) 13. Fixez la POIGNÉE à la PORTE DE VERRE. 14. Retirez doucement les câbles d’alimentation de l’ouverture située à l’avant de l’ÉTAGÈRE du LECTEUR AM/FM/CD. Fixez l’ÉTAGÈRE à l’aide de VIS de 20 mm. 15. Branchez le contrôleur et l’antenne à l’arrière du LECTEUR AM/FM/CD. Insérez et fixez le LECTEUR AM/FM/CD sur l’ÉTAGÈRE. 16. Fixez le PORTE-REVUE à l’aide de VIS de 40 mm.
INSTRUCTIONS D’ASSEMBLAGE (suite) 17. Fixez les PORTE-GOBELETS à l’aide de VIS de 20 mm. Avis : un autocollant indique la position optimale de cet accessoire, par contre, la fixation de cet accessoire optionnel n’est pas requise. Considérez avec soin les endroits où fixer les vis à l’intérieur du sauna. 18. Fixez le PORTE-SERVIETTE DOUBLE à l’aide de VIS de 20 mm. Avis : un autocollant indique la position optimale de cet accessoire, par contre, la fixation de cet accessoire optionnel n’est pas requise.
INSTRUCTIONS DE FONCTIONNEMENT Panneau de commande du sauna Avis : les commandes du sauna sont les mêmes pour les Panneaux de commande à l’intérieur et à l’extérieur. 1. Appuyez sur le bouton POWER pour ALLUMER le sauna. 2. Choisissez la TEMPÉRATURE voulue à l’aide des boutons (+) et (-). 3. Appuyez sur les boutons (+) et (-) simultanément pour passer du °F (Farenheit) au °C (Celsius). 4. Sélectionnez la DURÉE souhaitée à l’aide des boutons (+) et (-). 5.
COMMENT APPRÉCIER VOTRE SAUNA 1. Avant la première utilisation, essuyez toutes les surfaces à l’intérieur du sauna avec un linge humide. 2. Allumez le sauna et réglez la température à 40 °C pour une heure afin de brûler toute poussière provenant de l’usine. 3. Afin de bien rester hydraté, toujours boire de l’eau avant, pendant et après la séance de sauna. 4. La durée normale pour une séance de sauna est de 30 minutes ou moins. 5. Accordez environ de 1 à 25 minutes pour préchauffer le sauna avant d’y entrer.
MISES EN GARDE EN MATIÈRE DE SANTÉ ET DE SÉCURITÉ 1. Révisez toutes les instructions et les mises en garde avant de faire fonctionner votre sauna. Un sauna n’est pas un jouet. La négligence, la mauvaise utilisation du produit et le non-respect des instructions de sécurité peuvent entraîner de graves blessures. 2. L’hyperthermie se produit lorsque le corps perd plus de chaleur qu’il ne peut en fabriquer.
ENTRETIEN ET MAINTENANCE 1. Toujours débrancher le sauna et le laisser refroidir avant d’effectuer tout entretien ou nettoyage. 2. Appliquez un poli à meuble ou un fini à base d’huile pour nettoyer l’extérieur du sauna. 3. Les surfaces à l’intérieur du sauna doivent être nettoyées avec un linge humide. NE PAS utiliser de produits chimiques, de nettoyants abrasifs ou de solvants sur les surfaces de bois non traité. 4.
GUIDE DE DÉPANNAGE (suite) Problème Solution Problème Solution LE PANNEAU DE COMMANDE NE FONCTIONNE PAS 1. Assurez-vous que tous les raccords sont serrés. 2. Si les chiffres sont brouillés ou si les boutons ne répondent pas aux commandes, remplacez le panneau de commande. 3. Si l’indicateur de la température ne fonctionne pas ou s’il affiche «-» ou «EP», remplacez le panneau de commande par le capteur de température. LES LUMIÈRES NE FONCTIONNENT PAS 1. Assurez-vous que tous les raccords sont serrés. 2.
PIÈCES DE RECHANGE SA1312 N° DE RÉF. 1 2 3 4 5 6 7 8 9 10 10 10 12 13,14 13,14 15 15 15 15 16,17 16,17 18 19 20 21 22 23 24 24,27 25 26 26 27 28 29,39 30 31 32 32 33 34 35 36 37 37 37 37 38 --------------- Rev.
SA1312 17
PIÈCES DE RECHANGE SA1320 N° DE RÉF. Rev.
SA1320 19
PIÈCES DE RECHANGE SA2412DX N° DE RÉF. 1 2 3 4 5 6 7 8 9 10 10 10 12 13,14 13,14 15 15 15 15 16,17 16,17 18 19 20 21 22 23 24 24,27 25 26 26 27 28 29,39 30 31 32 32 33 34 35 36 37 37 37 37 38 --------------- Rev.
SA2412DX 21
PIÈCES DE RECHANGE SA2420DX N° DE RÉF. Rev.
SA2420DX 23
FORMULAIRE D’ENREGISTREMENT DE LA GARANTIE DU SAUNA 1. Ce sauna est couvert par une garantie de 7 ans contre les défauts matériels et la main d’œuvre à partir de la date d’achat. Pour bénéficier de la garantie, la carte ci-dessous doit être complétée et retournée dans les trente (30) jours à partir de la date d’achat. Cette garantie limitée de 7 ans couvre la structure en bois*. Les éléments chauffants et toute l’électronique sont couverts par une garantie limitée de 5 ans.