
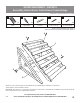
Instructions / Assembly


OPERATION INSTRUCTIONS
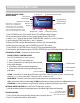
SAUNA CONTROL PANEL -
MAIN SCREEN
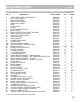
1. Press POWER to turn ON Control Panel. This will open Main Screen.
3. Select °C or °F and set the desired TEMPERATURE with the (+) and (-) buttons.
4. Set the desired TIME with the (+) and (-) buttons.
6. After your sauna session, press POWER to turn OFF the sauna.
7. Press INSIDE or OUTSIDE to turn ON or OFF the corresponding light.
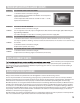
1. Press ION to release negatively charged ions to purify the air.
2. Press O3 to disinfect the air with ozone.
OXYGEN IONIZER
1. & 6. Power
Return to Last Screen
Home Screen
Volume
3. Set °C or °F
Main
Screen
3. Set
Temperature
7. Lights (Inside & Outside)
4. Set Time
8. Secondary Screen
5. Temperature &
Time Readings
2. Heater Switch
2. Press center Heater Switch to turn Sauna Heater Panels ON or OFF .
8. Use bottom right button to get to SECOND SCREEN for music and color therapy light controls.
5. When the TIME reaches 00, the heaters will turn OFF automatically.
1. Use the remote control to make adjustments to interior light color and intensity.
INTERIOR MOOD LIGHTING (this is NOT Color Therapy Light, see above)
Reset
TUNER - Use buttons to select AM and FM radio signal (FM1, FM2, FM3, AM1 or AM2), scroll through
channels (<>), or auto seek (AMS). Channels can be saved in P1- P6.
BLUETOOTH - Use touch controls to select and play music once connected to source.
CALENDAR - Use arrow buttons on right side of screen to set date and time, then press SAVE.
USB - Can be used with thumb drive only. Will NOT activate with any other input. Best to use Bluetooth for music.
1. Press ON or OFF in top white bar.
2. Press cycled color, or individual color desired,
using color buttons.
3. Use dimer switch to control brightness.
4. Cycle switch can be used to go through colors
and select.
SECONDARY SCREEN - Use button to select function
COLOR THERAPY CONTROL PANEL
(use LED COLOR button to reach controls)
3. Dimer Switch
1. On/O Switch
2. Color Selection
3. Color Cycle
Interior Mood Lighting
can be controlled by this remote >
ONLY, NOT control panel.
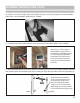
NOTE: Please see info below on
USB. This is the extra black wire,
with USB connection on end, going
to Control Panel. This is NOT used to
connect Control Panel and, if not using,
can be tucked behind panel out of way.
11