CEDAR ELITE PREMIUM SAUNA 3-Person Corner with Touch Screen OWNER’S MANUAL Please Do N ot Hesitate to Contact Our Consumer H otline at 800-759-0 9 7 7 with Any Qu estions That May Arise During Assembly or Use of This P roduct! Ver.
TABLE OF CONTENTS ASSEMBLY TIPS & WARNINGS 3 PARTS IDENTIFIER 4 5-9 ASSEMBLY INSTRUCTIONS BACKREST ASSEMBLY INSTRUCTIONS 10 OPERATION INSTRUCTIONS 11 ENJOYING YOUR SAUNA 12 HEALTH & SAFETY WARNINGS 13 CLEANING & MAINTANENCE 14 TROUBLESHOOTING GUIDE 14-15 SAUNA USE DISCLAIMER 15 REPLACEMENT PARTS 16 WARRANTY INFORMATION 17 If you would like a French version of this manual, please contact our Customer Service Department at 800-759-0977 or custserv@splashnetxpress.
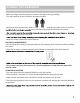
ASSEMBLY TIPS & WARNINGS • Before you begin, read all assembly instructions and safety warnings carefully. • This sauna requires at least 2 adults to complete assembly. • Remove all of the contents from boxes and verify that you have all of the parts shown on the Parts Note: Some parts may be pre-installed or pre-assembled. may not look exactly like your product. • Retain this Owner’s Manual for future reference.
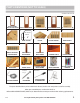
PARTS IDENTIFIER (NOT TO SCALE) Illustrations Not to Scale 1 2 3 FRONT PANEL WITH GLASS DOOR LEFT FRONT PANEL 6 7 4 LEFT BACK PANEL 8 5 RIGHT FRONT PANEL RIGHT BACK PANEL 9 10 1/16” wood veneer B A ROOF 11 ROOF COVER 12 13 SHELF RIGHT BACK PANEL BENCH SUPPORT HEATER PANEL 16 17 BACKREST 21 OXYGEN IONIZER FLOOR 22 14 SHELF LEFT BACK PANEL 18 TOWEL HOOK Individual pc breakdown on Pg.
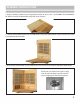
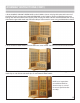
ASSEMBLY INSTRUCTIONS 1. Begin assembly by determining an appropriate location for your sauna – see ASSEMBLY TIPS & WARNINGS for details. Place the FLOOR PANEL on the floor in this location. 2. Place the RIGHT BACK PANEL on the FLOOR PANEL, lining up the BACK PANEL against the floor trim piece on the backside of the FLOOR. 3. Place the LEFT BACK PANEL on the FLOOR in the same manner and buckle it to the RIGHT BACK PANEL.
ASSEMBLY INSTRUCTIONS (CONT.) 4. Place the BENCH SUPPORT HEATER PANEL on the FLOOR as shown and plug the heater cord into one of the back wall cords. Position the FLOOR HEATER PANEL on the FLOOR as shown and feed the power cord through the slot in the bottom of the support panel and plug into other wall cord. Place the BENCH SEAT on top of the bench support with wood strip over back wall lip and secure with 2” screws using pre-drilled holes in bench. 5.
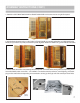
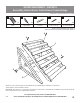
ASSEMBLY INSTRUCTIONS (CONT.) 7. Attach the SHELF RIGHT BACK PANEL to FRONT DOOR PANEL in the same manner as right front panel. 8. Use the three connector rods on side of SHELF LEFT BACK PANEL to insert in bracket holes on SHELF RIGHT BACK PANEL, and push down on panel, to connect two panels together. Attach LEFT PANEL using same method and buckles. 9. Lift the ROOF above the sauna, feeding the control panel and heater cables through the corresponding holes.
ASSEMBLY INSTRUCTIONS (CONT.) 10. Feed the main power cable through hole in ROOF and plug securely into receptacle on back of POWER SUPPLY box. Secure the ROOF COVER with 3/4” SCREWS. 11. Connect touch screen control panel as shown and mount frame to BACK PANEL with 2” SCREWS. NOTE: Please see info on Page 11 about USB cable usage. This is the extra black wire, with USB connection on end, coming out of back of the Control Panel.
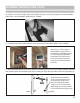
ASSEMBLY INSTRUCTIONS (CONT.) 13. Remove the back cover of the OXYGEN IONIZER by turning it as indicated. Unwrap and install the fragrance patch, then reattach the back cover. Attach the OXYGEN IONIZER in the designated position with 3/4” SCREWS. Plug the power cable into the OXYGEN IONIZER as shown. 14. Attach the DOUBLE TOWEL HOOK with 3/4” SCREWS. Note: attaching hook is optional, but if you do, consider the position carefully before driving any screws into the sauna interior. 15.
SA7003 BACKREST - SAP2818 Assembly Instructions / Instructions d’assemblage Images Not to Scale / llustrations non à l'échelle 1 2 SAP2818 3 SAP2818 x1 Backrest Dossier 4 SAP2818 x2 x1 Side Support Support latéral Brace Entretoise 5 SAP7019* SAP7019* x4 x4 1-1/8” (30mm) Screw Vis 1-1/8 po (30mm) 2” (50mm) Screw Vis de 2 po (50 mm) *Items included in Hardware Pack, SAP7019 *Pièces incluses dans la trousse de quincaillerie, SAP7019 4 4 1 3 4 2 4 5 5 2 NOTE: Two 2-3/4” (70mm) Screws ar
OPERATION INSTRUCTIONS SAUNA CONTROL PANEL MAIN SCREEN 1. & 6. Power 3. Set °C or °F 7. Lights (Inside & Outside) Home Screen 5. Temperature & Time Readings Return to Last Screen NOTE: Please see info below on Volume USB. This is the extra black wire, Reset with USB connection on end, going to Control Panel. This is NOT used to connect Control Panel and, if not using, 3. Set can be tucked behind panel out of way. Temperature 2. Heater Switch Main Screen 4. Set Time 8. Secondary Screen 1.
ENJOYING YOUR SAUNA 1. Prior to initial use, wipe down all interior surfaces of the sauna with a damp cloth. 3. Always drink plenty of water before, during and after your sauna session to stay properly hydrated. 4. A normal sauna session should last 30 minutes or less. 5. Allow approximately 15 to 25 minutes for the sauna to warm up before entering. 6. Perspiration will begin within 15 to 25 minutes after entering the sauna. 7. Limit the use of lotions or oils on your body while using your sauna.
HEALTH & SAFETY WARNINGS 1. Review all instructions and warnings before operating your sauna. A sauna is not a toy. Serious injury may result from negligence, intentional misuse and failure to follow safety instructions. 2. Hyperthermia Danger: Hyperthermia occurs when the body absorbs more heat than it can emergency and requires immediate treatment to prevent disability or death. It is very important not to allow your body’s core temperature to rise above 103° F.
CLEANING & MAINTENANCE 1. Always unplug the sauna and allow it to cool down before performing any cleaning or maintenance. 2. Use furniture polish or furniture oil when cleaning the sauna exterior. 3. The sauna interior surfaces should only be wiped down with a damp cloth. Do NOT use 4. As with all natural wood products, variations in the color and the grain as well as irregunatural beauty of the wood and should not be considered defective.
TROUBLESHOOTING GUIDE (CONT.) Problem Solution THE CONTROL PANEL DOES NOT WORK 1. Check that all the connections are tight. 2. If the numbers are scrambled or the buttons are unresponsive, replace the Control Panel. 3. If the temperature indicator does not work or reads “--” or “EP”, replace the Control Panel. Problem THE LIGHTS ARE NOT WORKING Solution 1. Check that all the connections are tight. 2. If one light does not work, replace the light fixture.
REPLACEMENT PARTS SA7003 REF. # Rev.
SAUNA WARRANTY REGISTRATION CARD 1. This sauna has a 7-Year Limited Warranty against defects in materials and workmanship from date of purchase. To receive the warranty, the card below must the wood structure*. Heating elements and all electronics are covered by a 5-Year Limited Warranty. The radio/CD player (if included with your sauna) is covered by a limited 1-Year Warranty. The light fixtures are covered for 90 days. 2. This product is intended to be utilized for private, non-commercial use.