
User guide


Of course, once you get these amps connected together, you have to
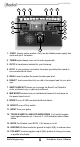
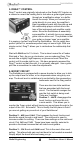
control them! This is where the Switchbone also shines! The Switch-
bone is easy to use. The foot switch layout and LED readout follows
a ‘common sense’ and intuitive approach that is very natural. We
have also added a boost circuit to allow you to ‘step-up’ the output to
both amps simultaneously for a solo or extra saturation when playing
through a distorted sound. We have even added a separate output for
your tuner. This also takes the tuner out of the audio circuit thus ensur-
ing you get the direct tone of your guitar.
CAUTION:
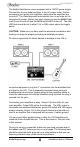
When connecting two amplifiers together you must ensure that they
are properly grounded as per the electrical code!
Unfortunately, we are unable to test every amplifier on the market and
cannot assure that the electrical system in your house or venue has
been wired correctly. You must ensure that proper electrical codes
have been maintained and only equipment that has been certified by
your country’s electrical code is being used.
3. GETTING STARTED
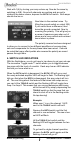
An important note about grounding:
Since guitar circuits are high-gain and high impedance,
RF noise, hum and buzz are easily induced. Connect-
ing equipment with different grounding schemes often
results in ground loops and more noise. The Radial JX2
addresses these problems by employing a floating ground
architecture which requires an earth ground. This is ac-
complished via the Channel-1 output. Channel-1 provides
an electrical ground from the JX2 chassis to the primary
guitar amplifier, therefore always connect Channel-1 to
a guitar amp with a 3-prong grounded A/C power cord
to enable a proper ground and keep noise out.
To ensure an ungrounded (2 prong) amplifier does
not present a shock hazard: Test for voltage potential
by connecting a voltmeter between the amplifier chassis
and the JX2 chassis. If voltage is present, reverse the
amplifier’s A/C supply polarity and test again.
4
Radial Engineering Switchbone Owner’s Manual
True to the Music True to the Music