
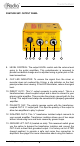
User Manual


Radial Engineering Ltd.
X-AMP Reamper™
True to the Music
®
5
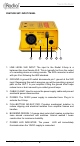
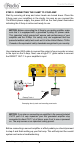
STEP-2: CONNECTING THE X-AMP TO YOUR AMP
Start by ensuring all amp and mixer levels are turned down. Place the
X-Amp near your amplifi ers in the studio. As soon as you connect the
15v/400mA power supply, the power LED on the front panel illuminates
indicating the X-Amp is active and ready to use.
NOTICE: Before connecting the X-Amp to your guitar amplifi er, make
sure that it is equipped with a grounded 3-prong AC power cable.
This important safety ground will ensure safe performance of your
amplifi er and the X-Amp. For safety, only use equipment that has
passed electrical safety tests such as UL in the United States, CSA in
Canada or the equivalent safety standards recognized in your country.
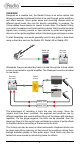
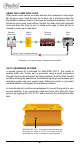
Use a balanced XLR cable to connect the output of your recorder or mixer
to the input on the X-Amp. Next, use a high-Z ¼” guitar cable to connect
the DIRECT OUT-1 to your amplifi er’s input.
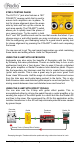
Recorder
Dry Track
Reamp Track-1
Amp
Mic-1
Reamping the dry track and recording new tracks.
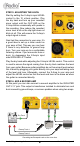
NOTICE: If you plan on connecting an amplifi er to the second isolated
OUT-2 jack it is very important your fi rst grounded amplifi er stay
connected to direct OUT-1 at all times, even if not in use or powered
on. The amp serves as an important safety ground.
Before connecting a second amplifi er or effect pedals you should proceed
to step-3 and fi nish setting up your fi rst amp. This will help test the overall
system and reduce troubleshooting.