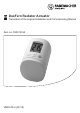
Radiator Actuator EN DuoFern Translation of the original Installation and Commissioning Manual Item no. 3500 30 64 VBD 678-2 (05.
i Contents EN 1. This manual...................................................................... 4 2. Hazard symbols............................................................... 5 2.1 Symbols and depictions used.........................................5 2.2 Glossary - definition........................................................5 3. Included in delivery......................................................... 6 4. General view ..........................................................
i Contents EN 11. Deleting all settings and resetting to the factory settings.............................................................. 23 12. Error messages and troubleshooting.......................... 24 13. Cleaning / maintenance................................................ 25 14. Simplified EU declaration of conformity..................... 25 15. Information about environmental protection.............. 26 16. Warranty terms and conditions....................................
i 1. This manual... EN ...describes how to install, commission and operate the DuoFern Radiator Actuator. How to use this manual ◆◆ Before you begin, please read this manual through completely and follow all the safety instructions. ◆◆ Please also read the instruction manuals for the loggedon DuoFern devices and the respective connected appliance. ◆◆ This manual is part of the product. Store the manual in an easily accessible place.
i 2. Hazard symbols EN Danger area / dangerous situation i 2.1 Symbols and depictions used Depiction i Description Further useful information Please read the respective manual. i 2.2 Glossary - definition DuoFern ◆◆ RADEMACHER radio system for controlling compatible products. HomePilot® ◆◆ The HomePilot® is a central controller unit for RADEMACHER radio products.
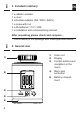
i EN 3. Included in delivery 1 x radiator actuator 1 x cover 3 x Danfoss adapter (RA / RAV / RAVL) 1 x screw with nut 2 x AA batteries 1.5 V / LR6 1 x installation and commissioning manual After unpacking please check and compare... ... the contents of the package with those specified above. i 1) 2) 4.
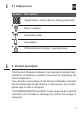
i 4.1 Display icons Symbol EN Description Target value / actual value or setting parameter Menu / settings Automatic mode Low battery Child protection function / operating lock i 5. Product description The DuoFern Radiator Actuator is an electronic radiator thermostat for controlling a radiator valve and for regulating the room temperature. The operation and setting of the DuoFern Radiator Actuator can be performed on site directly on the device, via a smartphone app or with a computer.
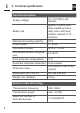
i EN 6. Technical specifications General information Supply voltage: 2 x 1.5 V (DC), AA, alkaline Battery life: approx. 2 years (with three switching times daily and a set transmission interval of 15 minutes) Mechanical loading capacity: 70 N Linear stroke: 2 - 3 mm Connection thread: M 30 x 1.
i 7. Safety instructions EN The use of defective devices and improper use can lead to property damage. ◆◆ Never use defective or damaged devices. ◆◆ Check the DuoFern Radiator Actuator for damage. ◆◆ Consult our customer service department in the event that you discover damage, see page 28. ◆◆ Train all persons to use the DuoFern Radiator Actuator safely. ◆◆ Children must not play with the device. i 7.1 Intended use Only use the DuoFern Radiator Actuator for controlling a heating valve.
i i 8. Initial commissioning EN 8.1 Insert the enclosed batteries The use of rechargeable batteries or incorrect batteries can damage the DuoFern Radiator Actuator. ◆◆ Only use leak-proof 1.5 V AA batteries (LR6). ◆◆ If a battery has leaked, we recommend replacing the DuoFern Radiator Actuator with a new device. ◆◆ Pay attention to the correct polarity when inserting the batteries. 2 x AA 1.5 V (LR6) i 10 Registering mode is then active.
i 8.2 Logging on to the HomePilot® EN If no login is to take place, continue with 8.3. 1. 2. Switch the HomePilot® to registering mode. Login takes place automatically. The logged-on HomePilot® appears as “1” on the display after a successful login. If no login takes place within 2 minutes, “0” appears on the display. i The DuoFern Radiator Actuator must be installed immediately after logging on to the HomePilot®.
i EN 8.4 Mounting on the radiator valve 1. Attach the DuoFern Radiator Actuator to the valve or the adapter and tighten the union nut. i The DuoFern Radiator Actuator has minimal flexibility after the installation in order to be able to optimise the view on the display. You should therefore not overtighten the union nut. i You can use one of the enclosed adapters for mounting on Danfoss radiator valves.
8.5 Performing an installation run (InS) 1. EN Activate installation mode (InS) by briefly pressing the menu button. The drive then automatically performs an installation run to define the end positions. 2. The normal display appears with the set target temperature after a successful installation run. The DuoFern Radiator Actuator is now ready for operation.
i 9. Settings on the ready-to-use device EN The display switches off automatically to save energy. / Pressing any button switches on the display again and switches the DuoFern Radiator Actuator to operating mode. The normal display then appears with the set target temperature. i / 9.1 Setting the target temperature / You can adjust the desired target temperature in 0.5 °C steps by briefly pressing the button. Pressing and holding a button causes the numbers to progress quickly.
i 9.2 Child protection function / operating lock EN First activate the normal display by pressing any button, see page 14. Activating the child protection function + Press briefly 1 x, until the lock symbol flashes. Manual operation is still possible. After the display goes off and is reactivated, the lock symbol is displayed continuously and the device cannot be operated.
i 10. Introduction to opening the menus and setting the functions EN Different settings can be made and functions can be activated (On) or deactivated (OFF) in the DuoFern Radiator Actuator menu. Navigation in the menu Setting parameters, see next chapter The settings are saved by pressing the menu button. Return to the normal view ◆◆ Automatically after approx. 10 seconds without any input. ◆◆ By pressing and holding the menu button.
10.1 Automatic function (Aut) EN Automatic mode On (factory setting) All control commands are permitted from a HomePilot®. Automatic mode OFF = manual mode Only on-site changes or manual changes are implemented by the HomePilot®. 10.2 Boost function (boS) The boost function enables the room to be heated for a short time and is automatically deactivated after 15 minutes. You can activate the boost process in the normal display with or .
10.3 DuoFern menu (duo) Logging on / logging off / clearing You can log the HomePilot® onto the DuoFern Radiator Actuator in this menu (duo). i You can log on a maximum of one HomePilot®. Please also read the instruction manual for the HomePilot®. Logging on to / logging off the HomePilot® 1. Open the DuoFern menu (duo) in the radiator actuator. A logged-on device is displayed, if available. 2. Switch the HomePilot® to registering or log-off mode as required. 3.
10.
10.3 DuoFern menu (duo) Logging on / logging off / clearing 5 sec. EN Clearing the DuoFern Radiator Actuator The radio connection to a HomePilot® that can no longer be accessed is deleted. LED signals during the clearing process ◆◆ Flashes red: during the clearing process ◆◆ Lights up green for 2 seconds: after completing the clearing process 10.
10.4 Internal window open detection (dEt) EN Window open detection takes place irrespective of whether the DuoFern Radiator Actuator is in manual or automatic mode. If an open window is detected, this message (OPn) appears for the duration of the process. i i Alternatively, you can also use an external DuoFern window/door contact (Item no. 3200 31 64) for control purposes via the HomePilot® in case of an unfavourable installation position (e.g. in a niche). 10.
10.6 Rotating the information on the display (dIS) (180°) EN Factory setting = OFF It may be beneficial to rotate the information shown on the display through 180° depending on the installation. The display is rotated only after confirming with the menu button, see page 16. 10.7 Viewing the battery charge level (bAt) 10.
i 11. Deleting all settings and resetting to the factory settings EN 1. First activate the normal display by pressing any button, see page 14. 2. Deactivate the child protection function if it is active, see page 15. 3. + Press and hold, additionally press and hold. Be sure to follow the specified sequence. 4. Release the buttons when the text on the display 5. Confirm the reset by pressing the button. 6.
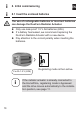
i 12. Error messages and troubleshooting EN Errors that have occurred are shown on the display with an error code. E1 = The drive is not installed ◆◆ Install the DuoFern Radiator Actuator at a suitable place. E2 = Error in the mechanics An error has been detected during the installation run. ◆◆ Repeat the installation run. E3 = Installation run too short ◆◆ Check the installation position of the DuoFern Radiator Actuator. ◆◆ Adjust the installation with an adapter if necessary.
i 13. Cleaning / maintenance EN Chemical solvents may damage the DuoFern Radiator Actuator. ◆◆ Use only a soft, slightly damp cloth to clean the device. i 14. Simplified EU declaration of conformity RADEMACHER Geräte-Elektronik GmbH, hereby declares that the DuoFern Radiator Actuator complies with the Directive 2014/53/EU (Radio Equipment Directive). The full text of the declaration of conformity is available at the following website: www.rademacher.
i 15. Information about environmental protection Removal of the batteries prior to the final disposal The batteries must be removed again prior to disposal Disposal of used batteries Batteries may not be disposed of in domestic waste and must be disposed of separately.
i 16. Warranty terms and conditions EN RADEMACHER Geräte-Elektronik GmbH provides a 24-month warranty for new devices that have been installed in compliance with the installation instructions. All construction faults, material defects and manufacturing defects are covered by the warranty. Your statutory warranty claims remain unaffected by this warranty.
Geräte-Elektronik GmbH Buschkamp 7 46414 Rhede (Germany) info@rademacher.de www.rademacher.de Service: * 30 seconds free of charge, subsequently Hotline 01807 933-171* 14 cents / minute from German fixed line Fax +49 2872 933-253 networks and max. 42 cents / minute from service@rademacher.de German cellular networks. Subject to technical modifications, misprints and errors excepted. Illustrations not binding.