
System information


Chapter 4 Configuring Typical Applications User's Manual
4-4 Configuration Sequence RADview-SC/TDMoIP IPmux-11
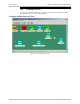
4.2 Connecting IPmux-11 to the Management Station
IPmux-11 can be managed by a Network Management Station (NMS) that is
located on the LAN (hub or switch) connected to the one of the unit’s Ethernet
ports.
To connect IPmux-11 to the Network Management Station:
1. Connect a Network Management Station to the LAN (hub or switch).
2. Connect one of the IPmux’s Ethernet ports to the LAN.
4.3 Configuration Sequence
Several basic configuration steps need to be followed when deploying any IPmux
unit:
1. IP Configuration – Setting the IPmux-11 host IP address and the manager IP
address
2. Physical layer configuration – Setting the TDM parameters (line type, clocking,
etc.) according to the application requirements and topology
3. Creating circuits via the Service Center.
IPmux-11 can be managed by a network management station that is located on
the LAN connected to the one of the unit’s Ethernet ports. In order to establish a
proper connection, it is necessary to configure IPmux with a basic configuration.
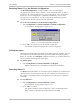
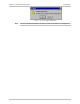
To perform the preliminary IPmux-11 configuration:
1. Connect an ASCII terminal to the IPmux-11 RS-232 control port.
2. Log in as Superuser (su).
3. Assign an IP address to IPmux-11.
4. Assign a subnet mask and a default gateway.
5. You can also enable or disable the IPmux-11 DHCP client.
6. Set read, trap, and read/write communities to public.
7. Set a manager IP address and location.
8. Reset IPmux-11.
Make sure that you save your settings at each configuration screen.
Note