
Installation guide


5. The License Agreement appears. After reading the agreement, check the box that indicates you accept the
terms, and then click Next.
6.
Indicate the location in which Halogen should be installed. By default, Halogen is installed in C:\P-
rogram Files\Rane Corporation\Halogen (If running 64-bit Vista or Windows 7 Halogen is
installed in the Program Files (x86) directory). Select or deselect the options to create a desktop icon
and/or a quick launch icon. Click Next.
7. Click Next again to begin the installation of Halogen. The installation application uninstalls the previous
version of Halogen (if necessary), installs any needed components, and then installs the Halogen appli-
cation. This process may take several minutes.
NOTE: There are a number of processes that are required for Halogen to function properly. It is impor-
tant to verify that none of these files were blocked by your firewall or virus protection software. For
details see "Required Processes " on page 91.
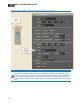
8. When the installation is complete, the following dialog box appears:
Click Finish to complete the installation and open Halogen.
9.
NOTE: There are two versions of the Halogen installer on the Rane website. The web installer and
the single file installer. The web installer is a smaller download, but during the installation it
requires an Internet connection to complete the installation. Sometimes this approach fails or is
impossibly slow. If your web install is slow or fails, spend the extra time to download the larger, sin-
gle file installer. It often avoids the speed bumps possible with the web install version.
Also, use the single file installer or copy the install DVD contents to a network server to most effi-
ciently install Halogen on multiple computers
Starting Halogen
1. Start the application using your favorite method, such as double clicking on the Halogen desktop icon.
A splash screen displays until the application loading completes.
HAL SYSTEM DESIGN GUIDE
163