
Installation guide


Paging stations and paging zones are probably familiar concepts, but you may not have worked
with the concept of a paging scenario before—so now is a good time to pay attention! The first
rule to absorb is that you ALWAYS page into Scenarios. "You mean I don't page into zones?" No,
you don't. Your paging zones are the building blocks for creating Paging Scenarios. A Scenario
can contain one zone, all of your zones, or a subset of zones. In other words, Scenarios allow you
to slice and dice your paging zones in a variety of ways—without ever touching a matrix mixer!
Let's say you're designing a system for a large restaurant with many different paging needs. The
hostess paging station, for example, may need to page into the lobby only, into the entire res-
taurant, into the kitchen only, outside the front door, and more. Using Paging Scenarios, you can
easily configure a variety of zone combinations. In addition, Scenarios maintain their paging status
(Ready, Busy, Caution), which is visible on the RAD pager hardware. You can also assign a prior-
ity to Scenarios, which tells the system what to do when paging conflicts occur. And, finally, you
can assign a unique identifier to each Scenario which makes it possible to create identical Sce-
narios that can be accessed by different paging stations at different priorities.
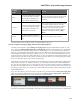
The Paging Manager which is a unique dialog box that serves as the central loca-
tion for configuring the routing and priority of your pages
The Paging Manager (there is only one in a HAL System) is where you work with all the building
blocks to create the paging system you want. In essence, it is in the Paging Manager that you
route your paging input to your paging output. To accomplish this routing, you perform two key
tasks (within the Paging Manager):
1. Create Paging Scenarios, which involves specifying the Paging Zones that belong in each
Scenario and optionally prioritizing your Scenarios. Although typically unnecessary, you
can also customize each Scenario's unique identifier.
2. Designate which Scenarios a Paging Station can page into.
The Paging Manager user interface contains three sections: a list of available paging stations, a list
of available paging zones, and the list of configured paging Scenarios. To configure a Scenario,
you add it and then, with it highlighted, select the checkbox next to each paging zone to include
in the Scenario. The process is similar for designating which Scenarios a paging station can page
into. You simply highlight the paging station and then select the checkbox next to each Scenario
that should be available from the paging station. For details on this process and others, see Paging
Tasks in the Halogen Help System.
So how do you populate the Paging Manager with the necessary building blocks (paging stations
and paging zones)? The HAL System takes care of this for you. Whenever you add a paging sta-
tion or a paging zone to your Processing Map (via a Zone Processor, Room Processor, PAGER1, or
standalone paging station or paging zone block), that paging station or zone is automatically
added to the Paging Manager.
To review the process of creating a HAL paging system from start to finish, see the work flow
question on page 103.
How do I work with Scenario priorities and numbers? What is their purpose and how should I use
them?
Each Scenario you create has a numeric Priority associated with it, the purpose of which is to control what
happens when a paging conflict occurs. For example, suppose we have Scenario A that contains Zones 1 and
2, and Scenario B that contains Zones 2 and 3. The two Scenarios have one zone in common—Zone 2. Let's
also assume we have two paging stations—Paging Station X and Paging Station Y. While Paging Station X
CHAPTER 3: Key Audio Design Features
100