
Installation Guide
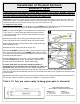

STEP 3: ATTACH FIRST ARM CONTINUED
Now remove the barrel bolt (28A) from one of the corners, keeping barrel nut (28B) in position. Place a curve arm (22) (2-hole
end) on the OUTSIDE of the body. Align the three pieces: (side bar 3A) on inside, bookshelf end piece (9) in middle, arm (22)
on outside), and reinsert the barrel bolt (28A) through the upper hole from the OUTSIDE.
Repeat for lower hole. Do not tighten barrel bolts firmly until all bolts are in place.
STEP 4: ATTACH OTHER ARM
Repeat STEP THREE for remaining arm.
STEP 5: LEVEL POT RACK ON TABLE
Place assembled rack squarely on table and adjust all parts to be certain they are level and straight. Then tighten all bolts firm-
ly. Remember ~ the back bar (3D) is not attached until the rack is installed on the wall.
STEP 6: MEASURE FOR WALL
After the bookshelf rack is squared and tightened, the distance from the center of holes at top of arms to center of upper hole in
back bar is 9 3/4”. The width between upper holes is 20-3/4”. (see diagram A at bottom of Toggler Instructions on page 4).
Use these measurements when determining location of rack on the wall in the installation section below.
NOTE: Grid and brackets will be added AFTER the rack is attached to the wall.
You’re now finished and ready to attach to the wall!
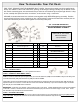
How to Attach Your Pot Rack to the Wall
TOOLS NEEDED FOR INSTALLATION:
Provided: Installation hardware (anchors, bolts, wall screws and red sleeves)
You will need: level, tape measure, pencil, electric drill and ½” and 1/8” drill bits, hammer and nail.
STEP 1: LOCATION
Decide where you want to place your pot rack. Consider the height of the wall where the pot rack will hang, keeping in mind
how far below the rack your pots and utensils will hang, plus how high above your head you can still easily reach cookbooks,
etc. stored on the grid.
On the wall, mark the four points 20-3/4” long by 9-3/4” high where the top of rack arms and back bar will attach. Then tap a
small nail through each mark to be certain a joist is not in the way. NOTE: because your pot rack includes toggle anchors, you
DO NOT need to locate and bolt to studs. See more information under STEP 2 below.
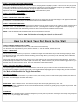
STEP 2: INSTALL DRYWALL ANCHORS
The drywall togglers included with your rack eliminate the need to bolt your pot rack to a stud. The steel anchors are very
strong and when installed in drywall each drywall. See Toggler® brand snaptoggle specs for weight rating on back of booklet.
See Back of this Booklet for Toggle Instructions.
INSTALL IN WOOD
If you need to install one or both sides of your rack in wood, use as many of the four wall screws (30A) included, but without a
red sleeve. See back page of booklet under Step 1.
CLEANING
Your pot rack has a durable powder coat finish designed to provide years of protection. Cleaning is done easily using soap and
a damp cloth. Dry thoroughly after cleaning.
PAINTABLE Want a different color? The finish on this pot rack can be spray painted any color. We
recommend Rustoleum “Hammered” colors for their metal-like finishes, however any quality spray-can paint may be used. See
a paint retailer for guidance.