
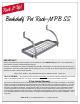
Installation Guide
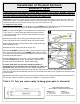

STEP 1: LAYOUT PARTS
On a table lay out all parts as shown in the exploded view above.
STEP 2: CONNECT MAIN BODY PARTS
TIP!
It is easiest to attach the pot rack parts when you insert the barrel nut (28B) from the INSIDE of the pot rack body, then
screw the barrel bolt (28A) into the barrel nut (28B) from the OUTSIDE.
Temporarily connect two Bookshelf ends (9) and the side bar(3A) by inserting a barrel nut and bolt (28A, 28B) through the
top hole at each of four corners. This is the front of the rack. This will cause body of pot rack to stand on edge. Be certain
side bar (3A) is on the INSIDE when connected.
IMPORTANT: At this time you will NOT connect back bar (3D) to the body. It will be attached when the pot rack is installed
on the wall. However, at this time screw two button head bolts (18A) into lower screw holes simply to cover them. These
are decorative only and will not be used as anchors.
STEP 3: ATTACH FIRST ARM
TIP! It is easiest to attach arms when the corner of the pot rack to which you are connecting the arm hangs slightly past the
edge of the table. That provides clearance for the flared end that extends below the body of the rack.
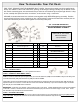
How To Assemble Your Pot Rack
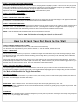
Item No.
Assembly Hardware
Qty. Item No Qty.
3A Side bar 4 though holes 1 28A Barrel Bolt 5
3D Back bar 2 through 2 tap holes 1 28B Barrel Nut 5
7B Grid bracket for bookshelf 3
Installation Hardware
8B Grid Shelf 1 19C Button head bolt 1/4 x 20 x 2” 2
9 Bookshelf end piece 2 26A Hex wrench 2
18A 1/4” Button head screws 1/4 x 20 x 1/4” 2 27A Toggle Anchor 2
22 Bookshelf curved arm (long) 2 30A Wall Screw 4
25A Pot hook Straight 4
30B Red Wall Sleeves 2
25B Pot Hook angled 4
MISSING A PART?
Please call our TOLL FREE
SERVICE CENTER
1 (877) 362-5863
TIP! SAVE TIME AND HASSLE.
PLEASE READ ENTIRE INSTRUCTIONS
BEFORE BEGINNING ASSEMBLY.
TIP!
FIRST, REMOVE PAINT FROM BARREL BOLT HOLES. Because the powder coat finish applied at the
factory also adheres to the inside of bolt holes, pushing a bolt through it during assembly may be difficult. There-
fore, before connecting parts, we recommend that you check to see that bolts slip easily through all holes. If they
do not, carefully clear paint from holes in side bars, ends and arms using a small knife.
SECOND, be certain that barrel nuts and bolts screw together easily BEFORE beginning assembly. Residue
from the black finish may cause some bolts to stick a bit, therefore use the two hex wrenches enclosed (one for
each end of the barrel) and screw them together to clear away extra paint.